Sony FW-75BZ40L Wall-Mount Bracket: 3rd Party
Sony FW-75BZ40L Manual
 |
View all Sony FW-75BZ40L manuals
Add to My Manuals
Save this manual to your list of manuals |
Sony FW-75BZ40L manual content summary:
- Sony FW-75BZ40L | Wall-Mount Bracket: 3rd Party - Page 1
H-275-100-11(1) To Customers and Sony Dealers How to prepare the LCD Display before Wall-Mount Installation Installation Manual EN Manuel d'installation FR Manual de instalación ES CS © 2023 Sony Corporation - Sony FW-75BZ40L | Wall-Mount Bracket: 3rd Party - Page 2
If the safety precautions are not observed or the product is used incorrectly, it may result in serious injury or fire. This instruction manual shows the correct handling of the product and important precautions necessary to prevent accidents. It is your responsibility to read, thoroughly understand - Sony FW-75BZ40L | Wall-Mount Bracket: 3rd Party - Page 3
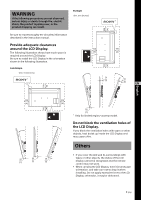
product dropping can result. Portrait Unit: mm (inches) (4) 100 Be sure to read thoroughly the all safety information described in the instruction manual. Provide adequate clearances around the LCD Display. The following illustration shows how much space is required around the LCD Display. Be - Sony FW-75BZ40L | Wall-Mount Bracket: 3rd Party - Page 4
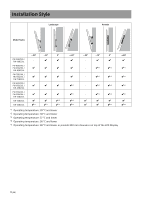
Installation Style Landscape Portrait Model Name ~-20° ~-15° 0° FW-98BZ50L / FW-98BZ30L - FW-85BZ40L / FW-85BZ35L / FW-85BZ30L FW-75BZ40L / FW-75BZ35L / FW-75BZ30L FW-65BZ40L / FW-65BZ35L / FW-65BZ30L FW-55BZ40L / FW-55BZ35L / FW-55BZ30L - Sony FW-75BZ40L | Wall-Mount Bracket: 3rd Party - Page 5
Landscape Style The length of the screw for Wall-Mount Bracket differs depending on the Wall-Mount Bracket thickness. Please refer to below illustration. FW-98BZ50L / FW-98BZ30L 11 - 20 (mm) Screw (M8) Wall-Mount Bracket LCD Display's rear cover FW-85BZ40L / FW-85BZ35L / FW-85BZ30L / FW-75BZ40L / - Sony FW-75BZ40L | Wall-Mount Bracket: 3rd Party - Page 6
Installing the LCD Display to the Wall from Table-Top Stand* * Only for limited region/country/model. 1 Remove the stand covers. 2 Remove the screws from the rear of the LCD Display. 3 Attach the Wall-Mount Bracket (not supplied) using the screws (not supplied). Wall-Mount Bracket (not supplied) 4 - Sony FW-75BZ40L | Wall-Mount Bracket: 3rd Party - Page 7
2 Attach the Wall-Mount Attachment (supplied with the LCD Display) to the rear of the LCD Display (to make it parallel with the wall). Supplied with the LCD Display VS Wall-Mount Attachment (4) When using an electric screwdriver, set the torque setting to approximately 1.5 N·m {15 kgf·cm}. Do not - Sony FW-75BZ40L | Wall-Mount Bracket: 3rd Party - Page 8
Note • Be sure to fasten the Wall-Mount Attachment when attaching them to the LCD Display. Use only a flat head screwdriver to install the Wall-Mount Attachment. Use of another tool might result in over torqueing the Wall-Mount Attachment and damaging the LCD Display. 3 Attach the Wall-Mount Bracket - Sony FW-75BZ40L | Wall-Mount Bracket: 3rd Party - Page 9
Portrait Style The length of the screw for Wall-Mount Bracket differs depending on the Wall-Mount Bracket thickness. Please refer to below illustration. FW-98BZ50L / FW-98BZ30L 11 - 20 (mm) Screw (M8) Wall-Mount Bracket LCD Display's rear cover FW-85BZ40L / FW-85BZ35L / FW-85BZ30L / FW-75BZ40L / - Sony FW-75BZ40L | Wall-Mount Bracket: 3rd Party - Page 10
Installing the LCD Display to the Wall from Table-Top Stand* * Only for limited region/country/model. 1 Remove the stand covers. 2 Remove the screws from the rear of the LCD Display. 3 Attach the Wall-Mount Bracket (not supplied) using the screws (not supplied). Wall-Mount Bracket (not supplied) 4 - Sony FW-75BZ40L | Wall-Mount Bracket: 3rd Party - Page 11
2 Attach the Wall-Mount Attachment (supplied with the LCD Display) to the rear of the LCD Display (to make it parallel with the wall). Supplied with the LCD Display VS Wall-Mount Attachment (4) When using an electric screwdriver, set the torque setting to approximately 1.5 N·m {15 kgf·cm}. Do not - Sony FW-75BZ40L | Wall-Mount Bracket: 3rd Party - Page 12
Note • Be sure to fasten the Wall-Mount Attachment when attaching them to the LCD Display. Use only a flat head screwdriver to install the Wall-Mount Attachment. Use of another tool might result in over torqueing the Wall-Mount Attachment and damaging the LCD Display. 3 Attach the Wall-Mount Bracket - Sony FW-75BZ40L | Wall-Mount Bracket: 3rd Party - Page 13
façon incorrecte, ils peuvent entraîner des blessures graves en provoquant un incendie ou l'électrocution, ou encore la chute de l'appareil hors de son support. Veillez à observer les consignes de sécurité préconisées pour éviter de tels accidents. 2 (FR) - Sony FW-75BZ40L | Wall-Mount Bracket: 3rd Party - Page 14
100 (4) AVERTISSEMENT Le non-respect des consignes suivantes peut être fatal ou entraîner des blessures graves en provoquant un incendie ou une électrocution, ou encore le basculement ou la chute de l'appareil. Portrait Unité : mm (pouces) 100 Veillez à lire toutes les consignes de sécurité - Sony FW-75BZ40L | Wall-Mount Bracket: 3rd Party - Page 15
Style d'installation Paysage Portrait N° de modèle ~-20° ~-15° 0° FW-98BZ50L / FW-98BZ30L - FW-85BZ40L / FW-85BZ35L / FW-85BZ30L FW-75BZ40L / FW-75BZ35L / FW-75BZ30L FW-65BZ40L / FW-65BZ35L / FW-65BZ30L FW-55BZ40L / FW-55BZ35L / FW- - Sony FW-75BZ40L | Wall-Mount Bracket: 3rd Party - Page 16
Retirez les vis situées à l'arrière de l'écran LCD. Vis (M6) Support de fixation murale VS Reportez-vous au tableau suivant pour le schéma des trous couple à 1,5 N·m {15 kgf·cm} environ. Ne soulevez pas le support de fixation murale (non fourni) avant d'avoir convenablement serré les vis (deux - Sony FW-75BZ40L | Wall-Mount Bracket: 3rd Party - Page 17
l'écran LCD. Vis (non fournie) Si vous utilisez un tournevis électrique, réglez son couple à 1,5 N·m {15 kgf·cm} environ. Ne soulevez pas le support de fixation murale (non fourni) avant d'avoir convenablement serré les vis (deux vis de chacun des côtés gauche/droit). Vous risqueriez de déformer le - Sony FW-75BZ40L | Wall-Mount Bracket: 3rd Party - Page 18
Accessoire de fixation murale (4) Si vous utilisez un tournevis électrique, réglez son couple à 1,5 N·m {15 kgf·cm} environ. Ne soulevez pas le support de fixation murale (non fourni) avant d'avoir convenablement serré les vis (deux vis de chacun des côtés gauche/droit). Vous risqueriez de déformer - Sony FW-75BZ40L | Wall-Mount Bracket: 3rd Party - Page 19
fournie) VS 1,5 N·m {15 kgf·cm} Si vous utilisez un tournevis électrique, réglez son couple à 1,5 N·m {15 kgf·cm} environ. Ne soulevez pas le support de fixation murale (non fourni) avant d'avoir convenablement serré les vis (deux vis de chacun des côtés gauche/droit). Vous risqueriez de déformer - Sony FW-75BZ40L | Wall-Mount Bracket: 3rd Party - Page 20
de table, prenez soin d'éviter d'endommager l'écran LCD. • Soulevez l'écran LCD avec prudence, car le support de table qui se démonte pourrait basculer et provoquer des blessures. • Lors du retrait du support de table de l'écran LCD, prenez soin d'éviter de le faire tomber et d'endommager la surface - Sony FW-75BZ40L | Wall-Mount Bracket: 3rd Party - Page 21
/ FW-75BZ35L / FW-75BZ30L / FW-65BZ40L / FW-65BZ35L / FW-65BZ30L / FW-55BZ40L / FW-55BZ35L / FW-55BZ30L / FW-50BZ30L / FW-43BZ30L 10 - 12 (mm) Vis (M6) Support de fixation murale VS Reportez-vous au tableau suivant pour le schéma des trous pour la fixation murale. Nom du modèle FW-98BZ50L - Sony FW-75BZ40L | Wall-Mount Bracket: 3rd Party - Page 22
ou le boîtier de l'écran LCD. Si vous utilisez un tournevis électrique, réglez son couple à 1,5 N·m {15 kgf·cm} environ. Ne soulevez pas le support de fixation murale (non fourni) avant d'avoir convenablement serré les vis (deux vis de chacun des côtés gauche/droit). Vous risqueriez de déformer le - Sony FW-75BZ40L | Wall-Mount Bracket: 3rd Party - Page 23
murale et endommager l'écran LCD. Si vous utilisez un tournevis électrique, réglez son couple à 1,5 N·m {15 kgf·cm} environ. Ne soulevez pas le support de fixation murale (non fourni) avant d'avoir convenablement serré les vis (deux vis de chacun des côtés gauche/droit). Vous risqueriez de déformer - Sony FW-75BZ40L | Wall-Mount Bracket: 3rd Party - Page 24
fournie) VS 1,5 N·m {15 kgf·cm} Si vous utilisez un tournevis électrique, réglez son couple à 1,5 N·m {15 kgf·cm} environ. Ne soulevez pas le support de fixation murale (non fourni) avant d'avoir convenablement serré les vis (deux vis de chacun des côtés gauche/droit). Vous risqueriez de déformer - Sony FW-75BZ40L | Wall-Mount Bracket: 3rd Party - Page 25
de table, prenez soin d'éviter d'endommager l'écran LCD. • Soulevez l'écran LCD avec prudence, car le support de table qui se démonte pourrait basculer et provoquer des blessures. • Lors du retrait du support de table de l'écran LCD, prenez soin d'éviter de le faire tomber et d'endommager la surface - Sony FW-75BZ40L | Wall-Mount Bracket: 3rd Party - Page 26
el futuro. Para distribuidores de Sony Para la instalación de este producto, se requieren conocimientos y experiencia suficientes. Lea detenidamente este manual para realizar la instalación de manera segura. Sony no será responsable de daños o lesiones ocacionadas por el manejo indebido o instalaci - Sony FW-75BZ40L | Wall-Mount Bracket: 3rd Party - Page 27
caerse el producto. Vertical Unidad: mm (pulgadas) 100 Asegúrese de leer detenidamente toda la información de seguridad descrita en el manual de instrucciones. Deje espacio suficiente alrededor de la pantalla LCD. La siguiente ilustración muestra el espacio requerido alrededor de la pantalla LCD - Sony FW-75BZ40L | Wall-Mount Bracket: 3rd Party - Page 28
Estilo de instalación Horizontal Vertical Nombre de modelo ~-20° ~-15° 0° FW-98BZ50L / FW-98BZ30L - FW-85BZ40L / FW-85BZ35L / FW-85BZ30L FW-75BZ40L / FW-75BZ35L / FW-75BZ30L FW-65BZ40L / FW-65BZ35L / FW-65BZ30L FW-55BZ40L / FW-55BZ35L / FW - Sony FW-75BZ40L | Wall-Mount Bracket: 3rd Party - Page 29
Estilo horizontal La longitud del tornillo para el soporte de montaje mural varía dependiendo del espesor del soporte de montaje mural. Consulte la siguiente ilustración. FW-98BZ50L / FW-98BZ30L 11 - 20 (mm) Tornillo (M8) Soporte de Montaje Mural Parte posterior de la pantalla LCD FW-85BZ40L / FW- - Sony FW-75BZ40L | Wall-Mount Bracket: 3rd Party - Page 30
Instalación de la pantalla LCD en la pared con un soporte de sobremesa* * Solo para regiones/países/modelos limitados. 4 Desinstalación del soporte de sobremesa de la pantalla LCD. Para desinstalar el soporte de sobremesa de la pantalla LCD, quite los tornillos . 1 Retire las cubiertas del soporte - Sony FW-75BZ40L | Wall-Mount Bracket: 3rd Party - Page 31
2 Coloque la sujeción del soporte de montaje mural (provisto con la pantalla LCD) a la parte posterior de la pantalla LCD (para que esté paralelo a la pared). Suministrado con la pantalla LCD VS Sujeción del soporte de montaje mural (4) 3 Fije el soporte de montaje mural (no suministrado) - Sony FW-75BZ40L | Wall-Mount Bracket: 3rd Party - Page 32
2 Coloque la sujeción del soporte de montaje mural (provisto con la pantalla LCD) a la parte posterior de la pantalla LCD (para que esté paralelo a la pared). Suministrado con la pantalla LCD VS Sujeción del soporte de montaje mural (4) 3 Fije el soporte de montaje mural (no suministrado) - Sony FW-75BZ40L | Wall-Mount Bracket: 3rd Party - Page 33
4 Desinstalación del soporte de sobremesa de la pantalla LCD. Retire un lado del soporte de sobremesa a la vez. Sostenga firmemente el soporte de sobremesa con ambas manos y de forma segura mientras otras personas levantan la pantalla LCD. Repita el paso anterior y retire el otro lado del - Sony FW-75BZ40L | Wall-Mount Bracket: 3rd Party - Page 34
Estilo inclinado La longitud del tornillo para el soporte de montaje mural varía dependiendo del espesor del soporte de montaje mural. Consulte la siguiente ilustración. FW-98BZ50L / FW-98BZ30L 11 - 20 (mm) Tornillo (M8) Soporte de Montaje Mural Parte posterior de la pantalla LCD FW-85BZ40L / FW- - Sony FW-75BZ40L | Wall-Mount Bracket: 3rd Party - Page 35
Instalación de la pantalla LCD en la pared con un soporte de sobremesa* * Solo para regiones/países/modelos limitados. 4 Desinstalación del soporte de sobremesa de la pantalla LCD. Para desinstalar el soporte de sobremesa de la pantalla LCD, quite los tornillos . 1 Retire las cubiertas del soporte - Sony FW-75BZ40L | Wall-Mount Bracket: 3rd Party - Page 36
2 Coloque la sujeción del soporte de montaje mural (provisto con la pantalla LCD) a la parte posterior de la pantalla LCD (para que esté paralelo a la pared). Suministrado con la pantalla LCD VS Sujeción del soporte de montaje mural (4) 3 Fije el soporte de montaje mural (no suministrado) - Sony FW-75BZ40L | Wall-Mount Bracket: 3rd Party - Page 37
2 Coloque la sujeción del soporte de montaje mural (provisto con la pantalla LCD) a la parte posterior de la pantalla LCD (para que esté paralelo a la pared). Suministrado con la pantalla LCD VS Sujeción del soporte de montaje mural (4) 3 Fije el soporte de montaje mural (no suministrado) - Sony FW-75BZ40L | Wall-Mount Bracket: 3rd Party - Page 38
4 Desinstalación del soporte de sobremesa de la pantalla LCD. Retire un lado del soporte de sobremesa a la vez. Sostenga firmemente el soporte de sobremesa con ambas manos y de forma segura mientras otras personas levantan la pantalla LCD. Repita el paso anterior y retire el otro lado del - Sony FW-75BZ40L | Wall-Mount Bracket: 3rd Party - Page 39
Sony Sony 警告 Sony Sony 注意事项 指定产品 LCD 显示器 FW-98BZ50L FW-98BZ30L FW-85BZ40L FW-85BZ35L FW-85BZ30L FW-75BZ40L FW-75BZ35L FW-75BZ30L FW-65BZ40L FW-65BZ35L FW-65BZ30L FW-55BZ40L FW-55BZ35L FW-55BZ30L FW-50BZ30L FW-43BZ30L 安全须知 Sony 2 (CS) - Sony FW-75BZ40L | Wall-Mount Bracket: 3rd Party - Page 40
警告 竖屏 单位: mm (4) 100 请在 LCD LCD LCD 横屏 单位: mm 100 100 (4) (4) (4) 100 (4) 100 100 (4) 100 20 20 20 (1) (1) (1) (4) 20 (1) 20 (1) 100 (4) 简体中文 CS 20 (1) LCD LCD 其他 LED LCD • 搬运 LCD LCD LCD LCD 3 (CS) - Sony FW-75BZ40L | Wall-Mount Bracket: 3rd Party - Page 41
安装方式 横屏 竖屏 型号名称 ~-20° ~-15° 0° FW-98BZ50L / FW-98BZ30L - FW-85BZ40L / FW-85BZ35L / FW-85BZ30L FW-75BZ40L / FW-75BZ35L / FW-75BZ30L FW-65BZ40L / FW-65BZ35L / FW-65BZ30L FW-55BZ40L / FW-55BZ35L / FW-55BZ30L FW-50BZ30L *5 FW- - Sony FW-75BZ40L | Wall-Mount Bracket: 3rd Party - Page 42
横屏式 FW-98BZ50L / FW-98BZ30L 11 - 20 (mm) 螺丝 (M8 LCD FW-85BZ40L / FW-85BZ35L / FW-85BZ30L / FW-75BZ40L / FW-75BZ35L / FW-75BZ30L / FW-65BZ40L / FW-65BZ35L / FW-65BZ30L / FW-55BZ40L / FW-55BZ35L / FW-55BZ30L / FW-50BZ30L / FW-43BZ30L 10 - 12 (mm) FW-98BZ50L / FW-98BZ30L 将 LCD 1 从 LCD - Sony FW-75BZ40L | Wall-Mount Bracket: 3rd Party - Page 43
将 LCD 4 从 LCD LCD 1 注意 • 抬起 LCD • 从 LCD LCD LCD 2 从 LCD 3 FW-85BZ40L / FW-85BZ35L / FW-85BZ30L / FW-75BZ40L / FW-75BZ35L / FW-75BZ30L / FW-65BZ40L / FW-65BZ35L / FW-65BZ30L / FW-55BZ40L / FW-55BZ35L / FW-55BZ30L / FW-50BZ30L / FW-43BZ30L 将 LCD 1 从 LCD - Sony FW-75BZ40L | Wall-Mount Bracket: 3rd Party - Page 44
2 LCD 固定到 LCD LCD LCD VS 4) 1.5 N·m {15 kgf·cm LCD 将 LCD 1 从 LCD VS 1.5 N·m {15 kgf·cm} LCD LCD 3 7 (CS) - Sony FW-75BZ40L | Wall-Mount Bracket: 3rd Party - Page 45
2 LCD 固定到 LCD LCD LCD VS 4) 4 从 LCD LCD VS 1.5 N·m {15 kgf·cm} LCD LCD 3 LCD LCD LCD LCD LCD LCD LCD LCD 1.5 N·m {15 kgf·cm LCD 8 (CS) - Sony FW-75BZ40L | Wall-Mount Bracket: 3rd Party - Page 46
竖屏式 FW-98BZ50L / FW-98BZ30L 11 - 20 (mm) 螺丝 (M8 LCD FW-85BZ40L / FW-85BZ35L / FW-85BZ30L / FW-75BZ40L / FW-75BZ35L / FW-75BZ30L / FW-65BZ40L / FW-65BZ35L / FW-65BZ30L / FW-55BZ40L / FW-55BZ35L / FW-55BZ30L / FW-50BZ30L / FW-43BZ30L 10 - 12 (mm) 螺丝 (M6) VS 型号名称 FW-98BZ50L / FW-98BZ30L - Sony FW-75BZ40L | Wall-Mount Bracket: 3rd Party - Page 47
将 LCD 4 从 LCD LCD 1 注意 • 抬起 LCD • 从 LCD LCD LCD 2 从 LCD 3 FW-85BZ40L / FW-85BZ35L / FW-85BZ30L / FW-75BZ40L / FW-75BZ35L / FW-75BZ30L / FW-65BZ40L / FW-65BZ35L / FW-65BZ30L / FW-55BZ40L / FW-55BZ35L / FW-55BZ30L / FW-50BZ30L / FW-43BZ30L 将 LCD 1 从 LCD - Sony FW-75BZ40L | Wall-Mount Bracket: 3rd Party - Page 48
2 LCD 固定到 LCD LCD LCD VS 4) 1.5 N·m {15 kgf·cm LCD 将 LCD 1 从 LCD VS 1.5 N·m {15 kgf·cm} LCD LCD 2 LCD 固定到 LCD LCD LCD VS 4) 3 VS 1.5 N·m {15 kgf·cm} 11 (CS) - Sony FW-75BZ40L | Wall-Mount Bracket: 3rd Party - Page 49
注意 LCD LCD 4 从 LCD LCD 3 1.5 N·m {15 kgf·cm LCD 注意 LCD LCD LCD LCD LCD LCD LCD LCD 12 (CS) - Sony FW-75BZ40L | Wall-Mount Bracket: 3rd Party - Page 50
https://www.sony.net/
-
 1
1 -
 2
2 -
 3
3 -
 4
4 -
 5
5 -
 6
6 -
 7
7 -
8
-
9
-
10
-
11
-
12
-
13
-
14
-
15
-
16
-
17
-
18
-
19
-
20
-
21
-
22
-
23
-
24
-
25
-
26
-
27
-
28
-
29
-
30
-
31
-
32
-
33
-
34
-
35
-
36
-
37
-
38
-
39
-
40
-
41
-
42
-
43
-
44
-
45
-
46
-
47
-
48
-
49
-
50
 |
 |
H-275-100-
11
(1)
To Customers and Sony Dealers
How to prepare the LCD
Display before Wall-Mount
Installation
Installation Manual
Manuel d’installation
Manual de instalación
安装说明书
EN
FR
ES
© 2023 Sony Corporation
CS