Sony HDR FX7 Operating Instructions - Page 76
Dubbing/Editing, Dubbing to VCR, DVD/HDD device, etc., Connecting to external devices - hd camcorder
 |
UPC - 027242701946
View all Sony HDR FX7 manuals
Add to My Manuals
Save this manual to your list of manuals |
Page 76 highlights
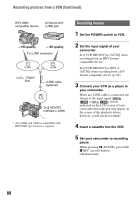
Dubbing/Editing Dubbing to VCR, DVD/HDD device, etc. Connect your camcorder to the wall outlet using the supplied AC Adaptor for this operation (p. 18). Refer also to the instruction manuals supplied with the devices to be connected. Connecting to external devices The connection method and the image quality will differ depending on the VCR, DVD/HDD device and the connectors used. : Signal flow Camcorder Cable External device i.LINK cable (optional) 2 HDV1080i compatible device t HD quality*1 • i.LINK jack which is compatible with HDV1080i specification is required on the external device. 2 i.LINK cable (optional) AV device with i.LINK jack t SD quality*1 A/V connecting cable with S VIDEO (optional) 1 (Red) (White) (Yellow) AV device with S VIDEO jack t SD quality*1 A/V connecting cable 1 (supplied) (Red) (White) (Yellow) AV device with audio/video jacks*2 t SD quality*1 *1 Pictures recorded in the DV format are dubbed in the SD (standard definition) quality, regardless of the connection. *2 When connecting your camcorder to a monaural device, connect the yellow plug of the A/V connecting cable to the video jack on the device, and connect the white (left channel) or red (right channel) plug to the audio jack on the device. b Note • You cannot dub pictures using the HDMI cable. 76
-
 1
1 -
2
-
3
-
4
-
5
-
6
-
7
-
8
-
9
-
10
-
11
-
12
-
13
-
14
-
15
-
16
-
17
-
18
-
19
-
20
-
21
-
22
-
23
-
24
-
25
-
26
-
27
-
28
-
29
-
30
-
31
-
32
-
33
-
34
-
35
-
36
-
37
-
38
-
39
-
40
-
41
-
42
-
43
-
44
-
45
-
46
-
47
-
48
-
49
-
50
-
51
-
52
-
53
-
54
-
55
-
56
-
57
-
58
-
59
-
60
-
61
-
62
-
63
-
64
-
65
-
66
-
67
-
68
-
69
-
70
-
 71
71 -
 72
72 -
 73
73 -
 74
74 -
 75
75 -
 76
76 -
 77
77 -
 78
78 -
 79
79 -
 80
80 -
 81
81 -
82
-
83
-
84
-
85
-
86
-
87
-
88
-
89
-
90
-
91
-
92
-
93
-
94
-
95
-
96
-
97
-
98
-
99
-
100
-
101
-
102
-
103
-
104
-
105
-
106
-
107
-
108
-
109
-
110
-
111
-
112
-
113
-
114
-
115
-
116
-
117
-
118
-
119
-
120
-
121
-
122
-
123
-
124
-
125
-
126
-
127
-
128
-
129
-
130
-
131
 |
 |
