Sony HDRFX1E Operating Instructions
Sony HDRFX1E - Handycam PAL High Definition Camcorder Manual
 |
UPC - 411378010834
View all Sony HDRFX1E manuals
Add to My Manuals
Save this manual to your list of manuals |
Sony HDRFX1E manual content summary:
- Sony HDRFX1E | Operating Instructions - Page 1
Operating Instructions Read this first Digital HD Video Camera Recorder HDR-FX1E 2-178-349-14(1) © 2004 Sony Corporation - Sony HDRFX1E | Operating Instructions - Page 2
in the plug supplied need to be replaced, a fuse of the same rating as the supplied one and approved by ASTA or BSI to BS1362 (i.e., Sony service station. FOR CUSTOMERS IN EUROPE ATTENTION The electromagnetic fields at the specific frequencies may influence the picture and sound of this camcorder - Sony HDRFX1E | Operating Instructions - Page 3
in the wrong direction, the terminal may be damaged, or this may cause a malfunction of your camcorder. Using this manual The images of the LCD screen and the viewfinder used on this manual are captured using a digital still camera, and thus may appear different from what you see. ,continued 3 - Sony HDRFX1E | Operating Instructions - Page 4
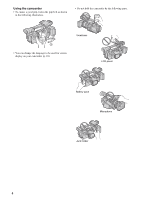
Using the camcorder • To ensure a good grip, fasten the grip belt as shown in the following illustration. • Do not hold the camcorder by the following parts. Viewfinder • You can change the language to be used for screen display on your camcorder (p. 18). LCD panel Battery pack Microphone Jack - Sony HDRFX1E | Operating Instructions - Page 5
Guide Recording movies 8 Getting started Step 1: Checking supplied items 10 Step 2: Charging the battery pack Recording movies 20 Recording for a longer time 22 Using zoom ...22 Recording in Adjusting the white balance 26 Recording using manual adjustments 27 Adjusting the iris ...28 Adjusting - Sony HDRFX1E | Operating Instructions - Page 6
manually 32 Enhancing the outline to focus - PEAKING 33 Customizing the picture quality or sound 34 Customizing the picture quality - PICTURE PROFILE 34 Adjusting the audio Reviewing the most recently recorded scenes - Rec Review time and camera settings data - Data code 44 Displaying the video - Sony HDRFX1E | Operating Instructions - Page 7
VCR to the computer via your camcorder - Signal conversion function ........81 Troubleshooting Troubleshooting 83 Warning indicators and messages .....88 Additional Information Using your camcorder abroad 90 HDV format and recording/playback ..91 About the "InfoLITHIUM" battery pack 92 About - Sony HDRFX1E | Operating Instructions - Page 8
Quick Start Guide Recording movies 1 Attach the charged battery pack to the camcorder. To charge the battery, see page 11. Press the battery pack and slide it down. Battery Pack 2 Insert a cassette into the camcorder. Slide the OPEN/ EJECT lever in the direction of the arrow to open the lid. The - Sony HDRFX1E | Operating Instructions - Page 9
Quick Start Guide 3 Start recording while checking the subject on the LCD screen. The date and time is not set up in the default setting. To set the date and time, see page 16. The pictures are recorded in the HDV format in the default setting. To record in the DV format, see page 60 - Sony HDRFX1E | Operating Instructions - Page 10
(2) To insert the batteries in the Remote Commander, see page 105. Cleaning cassette (1) Shoulder strap (1) To attach it to your camcorder, see page 101. 21-pin adaptor (1) For the models with the their bottom surfaces only. mark printed on Operating Instructions (This manual) (1) 10 Getting - Sony HDRFX1E | Operating Instructions - Page 11
slide it down. 2 With the b mark on the DC plug facing the cassette compartment, connect the AC Adaptor to the DC IN jack on your camcorder. Battery pack DC IN jack DC plug AC Adaptor Mains lead To the wall socket b mark 3 Connect the mains lead to the AC Adaptor. 4 Connect the - Sony HDRFX1E | Operating Instructions - Page 12
AC Adaptor from the DC IN jack. To remove the battery pack You can check the battery's current charge level and its current remaining recording time both during charging or when the power is turned off. The remaining recording time in the selected recording format appears. 1 Set the POWER switch - Sony HDRFX1E | Operating Instructions - Page 13
NP-F330/F530/500/510/710 battery packs cannot be used with your camcorder. Recording time Approximate number of minutes available when you use a fully charged battery pack at 25°C (77°F). Recording in the HDV format Battery pack Continuous Typical recording recording time time NP-F570 115 65 - Sony HDRFX1E | Operating Instructions - Page 14
back pictures. When using this camcorder for the first time, the [CLOCK SET] screen appears (p. 16). While pressing the green button, set the POWER switch. The power turns on. Connect your camcorder as shown in "Step 2: Charging the battery pack" (p. 11). • CAMERA: To record pictures. • VCR: To - Sony HDRFX1E | Operating Instructions - Page 15
by setting [LCD BL LEVEL] on the [LCD/VF SET] menu (p. 58). • When you use your camcorder in bright conditions using the battery pack, set the LCD BACKLIGHT switch to OFF ( appears). This position saves battery power. • Even if you change the brightness of the LCD panel, the brightness of recorded - Sony HDRFX1E | Operating Instructions - Page 16
. If you do not set the date and time, the [CLOCK SET] screen appears every time you turn on your camcorder. b Note • If you do not use your camcorder for about 3 months, the built-in rechargeable button-type battery gets discharged and the date and time settings may be cleared from the memory. In - Sony HDRFX1E | Operating Instructions - Page 17
Getting started 3 Press MENU. CAMERA SET WB PRESET AE RESPONSE GA I N SETUP SHOT TRANS STEADYSHOT STDYSHOT TYP Note • Do not force the cassette into the compartment. This may cause a malfunction of your camcorder. 1 Slide the OPEN/EJECT lever in the direction of the arrow and open the lid. OPEN/ - Sony HDRFX1E | Operating Instructions - Page 18
automatically comes out. 2 Take out the cassette, then press . The cassette compartment automatically slides back in. 3 Close the lid. 1 Turn on your camcorder. 2 Open the LCD panel and adjust the angle. 3 Press MENU. 4 Select the (OTHERS) menu by turning the SEL/PUSH EXEC dial, then - Sony HDRFX1E | Operating Instructions - Page 19
] : END 6 Select the desired language by turning the SEL/PUSH EXEC dial, then press the dial. 7 Press MENU to hide the menu screen. z Tip • Your camcorder offers [ENG [SIMP]] (simplified English) for when you cannot find your native tongue among the options. Getting started 19 - Sony HDRFX1E | Operating Instructions - Page 20
adjust the angle. 3 While pressing the green button, set the POWER switch to CAMERA. The HDV format lamp lights up and your camcorder is set to recording standby (the default setting). It takes some time for your camcorder to be set to recording standby. 4 Select the recording format. To record in - Sony HDRFX1E | Operating Instructions - Page 21
battery time. C Recording status ([STBY] (standby) or [REC] (recording)) D Time code or tape counter (hour: minute: second) The time code of this camcorder utilizes the drop-frame not record pictures in the HDV format and the DV format on The recording time, date, and the camera settings data - Sony HDRFX1E | Operating Instructions - Page 22
external microphone is monaural, sound is recorded only in L (left) channel, and the audio level meter indicates only L (left) channel (p. 56). Recording for a longer time Using zoom Zoom levers are mounted on the camera itself and on the handle. Occasional use of the zoom is effective, but use it - Sony HDRFX1E | Operating Instructions - Page 23
set the zoom speed of H or L of the handle zoom lever in [HANDLE ZOOM] on the (CAMERA SET) menu. In the default setting, [H] is set to 6, and [L] is set to 3 (p. or to keep the attention of small children attracted to the camcorder while you record them. Up to about 100 degrees Open the LCD - Sony HDRFX1E | Operating Instructions - Page 24
profile setup (p. 34) 1 Press STATUS CHECK. 2 Turn the SEL/PUSH EXEC dial to display the desired item. Each time you turn the dial, the items appear in the following order: AUDIO t OUTPUT t ASSIGN t PICT. PROFILE To turn off the display of the recording setup information Press STATUS CHECK. 24 - Sony HDRFX1E | Operating Instructions - Page 25
darker pictures than those of the auto exposure adjustment, use the manual adjustment function (p. 27), or customize the picture quality by if 2 or more items out of iris, gain, and shutter speed are adjusted manually. Recording the subject lit by strong light - SPOT LIGHT When the subject is lit - Sony HDRFX1E | Operating Instructions - Page 26
preset or automatic white balance. To use the preset white balance Your camcorder has 2 sets of preset white balance values to be selected according to position to release the auto lock mode. 2 Press MENU. 3 Select the (CAMERA SET) menu by turning the SEL/PUSH EXEC dial, then press the dial. - Sony HDRFX1E | Operating Instructions - Page 27
• at party or in studios where lighting conditions change quickly • under video lamps such as those in a studio, under sodium lamps, mercury lamps, Center (to To adjust manually. release the auto lock mode) HOLD Select this position after adjusting the settings manually to retain them. See - Sony HDRFX1E | Operating Instructions - Page 28
adjustment Press IRIS, or set the AUTO LOCK switch to AUTO LOCK. b Note • If you set the AUTO LOCK switch to AUTO LOCK, other manually adjusted items (gain, shutter speed, white balance) also become temporarily automatic. • As you shift the zoom from W (wide) to T (telephoto), the aperture value - Sony HDRFX1E | Operating Instructions - Page 29
can set the value for the respective positions with [GAIN SETUP] on the (CAMERA SET) menu (p. 52). The default settings for each position are 18 dB the number, the greater the gain. Adjusting the shutter speed You can manually adjust and fix the shutter speed for your convenience. Depending on the - Sony HDRFX1E | Operating Instructions - Page 30
difficult to focus automatically at a lower shutter speed. Manual focusing with your camcorder attached to a tripod is recommended. • The picture resulting in a fuzzy focus. (This is a common phenomenon with video cameras.) The ND filter suppresses this phenomenon and gives better recording results. - Sony HDRFX1E | Operating Instructions - Page 31
cannot use the zebra pattern when the peaking function is activated (p. 33). Recording 1 During recording or in the standby mode, press MENU. 2 Select the (CAMERA SET) menu by turning the SEL/PUSH EXEC dial, then press the dial. 3 Select [ZEBRA LEVEL] by turning the SEL/PUSH EXEC dial, then - Sony HDRFX1E | Operating Instructions - Page 32
use the expanded focus Press EXPANDED FOCUS. [EXPANDED FOCUS] appears and the center of the screen is magnified by about 2 times. It will be easier to confirm the focus setting during manual focusing. The screen returns to the original size after about 5 seconds. As long as the focus ring is rotated - Sony HDRFX1E | Operating Instructions - Page 33
cases. (It will not be displayed correctly if you are using a conversion lens (optional).) - When the focus mode is switched from automatic to manual. - When you rotate the focus ring. Enhancing the outline to focus - PEAKING z Tip • For easier focusing, use peaking together with the expanded focus - Sony HDRFX1E | Operating Instructions - Page 34
picture quality settings depending on the recording time of day, the weather, or the camera person, and store them in the memory. Connect your camcorder to a TV or monitor, and condition number PP1 Appropriate setting to record in the HDV format PP2 Appropriate setting to record in the DV - Sony HDRFX1E | Operating Instructions - Page 35
[CINEMATONE γ] [ON]: Pictures are recorded with the gamma curve that reproduces the natural gradation sequence, similar to that of film cameras. [CINEFRAME] [CINEFRAME 25]: Pictures are recorded with a cinema-like atmosphere. [OFF]: normal recording [COPY] To copy a picture profile setting to - Sony HDRFX1E | Operating Instructions - Page 36
, the shutter speed may reach 1/1750 automatically. • If you adjust the gain manually, you cannot obtain the effect of [AGC LIMIT]. • If you select [CINEFRAME adjust the volume of audio input from the AUDIO/VIDEO jack or the HDV/DV jack. z Tip • To check the audio setting information in greater - Sony HDRFX1E | Operating Instructions - Page 37
to turn on the STORE lamp. 2 Adjust the desired items manually. To adjust the camera setup items such as iris manually, set the AUTO LOCK switch to the center position to release cannot check the transition time and curve set using [SHOT TRANS] on the (CAMERA SET) menu. ,continued Recording 37 - Sony HDRFX1E | Operating Instructions - Page 38
• You cannot zoom, focus, or adjust manually while checking or activating the Shot transition. • When you change [SHOT TRANS] on the (CAMERA SET) menu, turn off the STORE/ CHECK during recording (to fade out). Each time you press the button, the indicator changes as follows: [BLACK FADER] t [WHITE FADER - Sony HDRFX1E | Operating Instructions - Page 39
ASSIGN button assigned to the FADER function repeatedly until the FADER indicators disappear. b Note • You cannot use the FADER function together with [FRAME REC] (Frame recording). Recording an index signal at the beginning of recording If you make an index for a scene, you can easily search for - Sony HDRFX1E | Operating Instructions - Page 40
screen by setting [DV WIDE REC] on the (CAMERA SET) menu at the time of recording. Refer to the operating instructions supplied with your TV as well. [ON] On a 4:3 TV screen 1 In the standby mode, press MENU. 2 Select the (CAMERA SET) menu by turning the SEL/PUSH EXEC dial, then press the dial. 3 - Sony HDRFX1E | Operating Instructions - Page 41
most recently recorded scenes - Rec Review You can view a few seconds of the scene recorded just before you stopped the tape. In the standby mode, press REC REVIEW. The last few seconds of the most recently recorded scene are played back. Then, your camcorder is set to the standby mode. Recording - Sony HDRFX1E | Operating Instructions - Page 42
Press M (fast forward) or m (rewind) in stop mode. To review movies on the viewfinder Close the LCD panel. Then, adjust the viewfinder B Remaining battery C Tape transport indicator D Time code (hour: minute: second: frame) or tape counter (hour: minute: second) The time code of this camcorder is of - Sony HDRFX1E | Operating Instructions - Page 43
play back the tape recorded in the HDV format on video cameras of the DV format or miniDV players. . 2 y (slow). To Press play back 2 times faster (double speed) ×2 (double speed) on the frame by frame C (frame) on the Remote Commander during playback pause. To reverse direction, press c (frame - Sony HDRFX1E | Operating Instructions - Page 44
to [1080i/576i]. Displaying the date/time and camera settings data - Data code During playback, you can view the date/time data and the camera settings data that are automatically recorded while recording pictures on a tape. 1 Set the POWER switch to VCR. 2 Press DATA CODE on the camcorder or Remote - Sony HDRFX1E | Operating Instructions - Page 45
the video information - Status check You can check the setup value of the following items. • Audio setup such as audio mix (p. 56) • Output signal setup ([VCR HDV/DV], camera settings data Select the (OTHERS) menu, [DATA CODE] then [DATE] (p. 63). Each time you press DATA CODE, the date/ time - Sony HDRFX1E | Operating Instructions - Page 46
the power supply (p. 14). Refer also to the instruction manuals supplied with the devices to be connected. To copy camcorder is connected. Refer to the operating manual supplied with the TV for the details. To connect the TV using the component video cable • To view the picture recorded in the HDV - Sony HDRFX1E | Operating Instructions - Page 47
analog signal, the output signals have priority in the following order: COMPONENT OUTPUT jack t S video jack t AUDIO/VIDEO jack • See page 94 for details on i.LINK. When your TV is connected to a VCR Connect your camcorder to the LINE IN input on the VCR using the A/V connecting cable. Set the input - Sony HDRFX1E | Operating Instructions - Page 48
HDV format, set [COMPONENT] on the (IN/ OUT REC) menu according to your TV (p. 60). When a picture recorded in the DV format is played back, an equivalent signal with [576i] is output, even if [1080i/576i] is selected. • Only video signals are output from the COMPONENT OUTPUT jack. To output audio - Sony HDRFX1E | Operating Instructions - Page 49
camcorder to the LINE IN input on the VCR using the A/V connecting cable. Set the input selector on the VCR to LINE. When your TV is monaural (When your TV has only one audio input jack) Connect the yellow plug of the A/V connecting cable to the video time code display, and the zero set memory display - Sony HDRFX1E | Operating Instructions - Page 50
again. b Note • There may be a discrepancy of several seconds between the time code and the tape counter. • Zero set memory will not function correctly if b Note • If 1 day's recording is less than 2 minutes, your camcorder may not accurately find the point where the recording date changes. • The - Sony HDRFX1E | Operating Instructions - Page 51
dial. The available menu items vary depending on the power mode of your camcorder. Unavailable items will be grayed out. 1 2 0min STBY 0:00:00 the desired menu by turning the SEL/PUSH EXEC dial, then press the dial. CAMERA SET (p. 52) AUDIO SET (p. 56) LCD/VF SET (p. 58) REMOTE CTRL ON OFF [ MENU - Sony HDRFX1E | Operating Instructions - Page 52
SET) menu - STDYSHOT TYP/FRAME REC, etc. You can select the items listed below on the CAMERA SET menu. For details on how to the power mode of your camcorder. The screen shows the items you can operate at the moment. Unavailable items will be grayed out. CAMERA SET STBY RETURN WB PRESET - Sony HDRFX1E | Operating Instructions - Page 53
setting. TRANS CURVE Select the transition curve. The figures below show the transition curve of each mode. *1: parameter level *2: transition of time LINEAR Select to make the transition linearly. *1 *2 GSOFT STOP Select to make the transition slowly at the end. *1 *2 SOFT TRANS Select - Sony HDRFX1E | Operating Instructions - Page 54
other than VCL- HG0872 (optional) is attached to your camcorder. • When using VCL-HG0872, select [WIDE CONV.] in not recommended for recording with camera panning technique. Select to is attached. This mode is the most effective with Sony VCL-HG0872 wide conversion lens. HANDLE ZOOM Select this item - Sony HDRFX1E | Operating Instructions - Page 55
few frames and then moving the subject a little. Operate your camcorder using the Remote Commander to prevent camera frames) is recorded, and your camcorder enters the standby mode. 4 Move the subject and repeat step 3. b Note • When you use frame recording continuously, the remaining tape time - Sony HDRFX1E | Operating Instructions - Page 56
SOUND AUD I O MIX AUD I O MODE WIND M I C / L I NE I N STEREO [ MENU ] : END MULTI-SOUND You can select how to play back audio on a tape that was recorded in stereo mode using another camcorder. GSTEREO 1 2 Select to play back a stereo tape or dual sound track tape with both main and sub sound - Sony HDRFX1E | Operating Instructions - Page 57
• When recording in the HDV format, sound is automatically recorded in [16BIT] mode. GON OFF MIC/LINE IN Standard setting. Select when you want to record the sound as it is without reducing the noise caused by wind. GEXT MIC LINE Select to input an audio signal when a microphone is connected - Sony HDRFX1E | Operating Instructions - Page 58
items, see "Selecting menu items" (p. 51). The default settings are marked with G. The settings you can adjust vary depending on the power mode of your camcorder. The screen shows the items you can operate at the moment. Unavailable items will be grayed out. LCD / VF SET RETURN LCD COLOR LCD BL - Sony HDRFX1E | Operating Instructions - Page 59
DV format only. Select this when connecting the camcorder to a computer, etc. (p. 77). b Note • Disconnect the i.LINK cable before setting [VCR HDV/DV]. Otherwise, the connected TV may not be able to recognize the video signal from this camcorder. • When [AUTO] is selected and the signal switches - Sony HDRFX1E | Operating Instructions - Page 60
to a TV with the component input jack. Select when connecting your camcorder to a TV that has the component input jack and is capable of displaying the 1080i signal. i.LINK CONV When the POWER switch is set to CAMERA, this setting is effective only when [HDV1080i] is selected in [REC FORMAT - Sony HDRFX1E | Operating Instructions - Page 61
pictures will appear as follows: When HDV pictures are played back When DV pictures are with [DV WIDE REC] on the (CAMERA SET) menu set to [ON] on camcorder. The analog signal input to the AUDIO/VIDEO jack of your camcorder will be converted and output from the i.LINK Interface of your camcorder - Sony HDRFX1E | Operating Instructions - Page 62
BTN You can assign functions to the ASSIGN buttons (p. 68). CLOCK SET You can set the date and time (p. 16). WORLD TIME You can adjust the time difference when using your camcorder abroad. Set the time difference by turning the SEL/PUSH EXEC dial, the clock will be adjusted in accordance with the - Sony HDRFX1E | Operating Instructions - Page 63
camera recording lamps on the front and rear of your camcorder during recording. Select this setting in the following recording situations. The camera signal from another device when [VCR HDV/DV] on the (IN/OUT REC time, or the camera settings data during playback. Select to display the date and time - Sony HDRFX1E | Operating Instructions - Page 64
seconds: • After you set the POWER switch to CAMERA or VCR with a cassette inserted, and your camcorder calculates the remaining amount of tape. • After you such as the time code on the TV screen, LCD screen, and in the viewfinder. b Note • You cannot input a signal to your camcorder if you press - Sony HDRFX1E | Operating Instructions - Page 65
(customizing). You can customize the Personal Menu for each power mode of your camcorder. 1 Press P-MENU. 2 Select the desired item by turning the SEL/PUSH access. b Note • You can add up to 28 menu items each for the CAMERA and VCR modes. If you want to add more, you must delete a less important - Sony HDRFX1E | Operating Instructions - Page 66
dial, then press the dial. The available items vary depending on the power mode of the camcorder. Only the available items are displayed. 1 2 0min STBY 0:00:00 ADD STDYSHOT TYP A d d t o CAMERA m o d e ' s P-MENU? YES NO [ P-MENU ] : END 6 Select [YES] by turning the SEL/ PUSH EXEC dial, then - Sony HDRFX1E | Operating Instructions - Page 67
Arranging the order of menus displayed on Personal Menu - Sort You can sort the menus added to Personal Menu in the desired order. 1 Press P-MENU. 1 2 0min STBY P-MENU END SHOT TRANS ASS I GN BTN REC FORMAT AE RESPONSE WB PRESET GA I N SETUP [ P-MENU ] : END 0:00:00 2 Select [P-MENU SETUP] by - Sony HDRFX1E | Operating Instructions - Page 68
PUSH EXEC dial, then press the dial. 1 2 0min STBY 0:00:00 RESET I n i t i a l i ze CAMERA m o d e ' s P-MENU s e t t i n g ? YES NO [ P-MENU ] : END 4 ASSIGN buttons • [FADER] (p. 38) • [STEADYSHOT] • [INDEX SAVE] (p. 39) • [AUDIO DUB] (p. 79) • [DISPLAY] (p. 44) • [BARS] (p. 21) 68 Using the - Sony HDRFX1E | Operating Instructions - Page 69
. To activate the SteadyShot fucntion, press the same button again. You can select the effect level of the SteadyShot function at [STDYSHOT TYP] on the (CAMERA SET) menu (p. 54). • There are independent buttons of DISPLAY and BARS, however you can assign them also to the ASSIGN buttons at your - Sony HDRFX1E | Operating Instructions - Page 70
may not be able to recognize the video signal from the camcorder at the time of dubbing. • When [VCR HDV/DV] is set to [AUTO] and the signal switches between HDV and DV, the picture and sound disappear temporarily. • When the recorder is an HDR-FX1E, set [VCR HDV/DV] on the (IN/OUT REC) menu - Sony HDRFX1E | Operating Instructions - Page 71
so neither picture nor sound will be dubbed. b Note • If you change the settings of [VCR HDV/DV] and [i.LINK CONV] with the i.LINK cable connected, the video device may not be able to recognize the video signal from the camcorder at the time of dubbing. • If [i.LINK CONV] is set to [OFF] while [VCR - Sony HDRFX1E | Operating Instructions - Page 72
setting) (p. 64). • When you connect your camcorder to a monaural device, connect the yellow plug of the A/V connecting cable to the video jack, and the red or the white plug to the audio jack on the VCR or the TV. z Tip • To record the date/time and camera settings data, first have them displayed - Sony HDRFX1E | Operating Instructions - Page 73
camcorder, and record it on the VCR. Refer to the operating instructions supplied with your VCR for details. 5 When the dubbing is finished, stop your camcorder camcorder while recording it to a VCR. • Pictures recorded in the HDV format are not output from the HDV lamp, HDV or DV, on the HDV/DV jack - Sony HDRFX1E | Operating Instructions - Page 74
tape inserted in your camcorder. Connecting a VCR or TV b Note • Your camcorder can only record from a PAL source. For example, French video or TV programs ( camcorder (recorder), select the (IN/OUT REC) menu, [VCR HDV/DV], then [AUTO] (p. 59) before connecting. Player (HDV compatible unit) HDV/ - Sony HDRFX1E | Operating Instructions - Page 75
you have an S video jack on your TV or VCR * VCRs or TVs S video cable (optional) Dubbing/Editing AUDIO/VIDEO jack HDV/DV jack Yellow your camcorder to a monaural device, connect the yellow plug of the A/V connecting cable to the video jack, and the red or the white plug to the audio jack on - Sony HDRFX1E | Operating Instructions - Page 76
, insert a cassette. 3 Set the POWER switch to VCR. 4 Set your camcorder to recording pause. While pressing X (pause), press both z REC (record) buttons HDV/DV jack holder will light up and indicate the format of the input signal when you use an i.LINK cable. • When you use an i.LINK cable, the video - Sony HDRFX1E | Operating Instructions - Page 77
application software to read video signals must be installed on the computer. Refer to the manual supplied with the application software for the system requirements of the computer. HDV/DV jack i.LINK cable (optional) Connecting the computer • Before connecting your camcorder to the computer with - Sony HDRFX1E | Operating Instructions - Page 78
/VIDEO jack. Check the picture on the LCD screen or the viewfinder, and the sound on the headphones. • You cannot record additional audio: - When the tape is recorded in the HDV format. - When the tape is recorded in the 16-bit mode. - When the tape is recorded in the LP mode. - When your camcorder - Sony HDRFX1E | Operating Instructions - Page 79
on other camcorders (including other HDR-FX1E camcorders). z Tip • You can manually adjust the microphone volume when you are: - Recording sound from an external microphone or audio device connected to the MIC/LINE jack. - Recording sound from a device connected to the AUDIO/VIDEO jack. - Recording - Sony HDRFX1E | Operating Instructions - Page 80
afterwards (ST2), then press the dial. The original sound (ST1) is output in the default setting. The adjusted audio balance returns to the default setting about 5 minutes after the battery pack or other power sources have been disconnected. 6 Press MENU to hide the menu screen. 80 Dubbing/Editing - Sony HDRFX1E | Operating Instructions - Page 81
. Dubbing/Editing Refer to the manual supplied with the application software for the system requirements of the computer. When you have an S video jack on your VCR S video cable (optional) AUDIO/VIDEO jack Yellow A/V connecting cable (supplied) White Red HDV/DV jack i.LINK cable (optional - Sony HDRFX1E | Operating Instructions - Page 82
the manual supplied with the program software or its on-line help for details. After importing the picture and sound Stop importing on the computer, and stop playback on the analog device. b Note • Your camcorder may not be able to output the signal to the computer correctly depending on the video - Sony HDRFX1E | Operating Instructions - Page 83
problem using your camcorder, use the following table to troubleshoot the problem. If the problem Overall operations persists, remove the power source and contact your Sony camcorder gets warm. • This is because the power has been turned on for a long time. This is not a malfunction. Batteries/ - Sony HDRFX1E | Operating Instructions - Page 84
) lamp flashes while cAttach the battery pack to the camcorder correctly. If the problem the battery pack is being charged. persists, disconnect the AC Adaptor from the wall socket and contact your Sony dealer. The battery pack may be damaged (p. 11, 93). The battery pack is not charged. cSet - Sony HDRFX1E | Operating Instructions - Page 85
(p. 15). Recording Troubleshooting Symptom Cause and/or . Remove the cassette and leave your camcorder for at least 1 hour, then power abruptly turns off. cCharge the battery pack (p. 11). The zoom does to [ON] in the (CAMERA SET) menu (p. 54). cPress . Adjust the focus manually (p. 32). A - Sony HDRFX1E | Operating Instructions - Page 86
AUDIO SET) menu, adjust [AUDIO MIX] from the [ST2] (additional sound) side until the sound is heard appropriately (p. 56). cWhen you are using an S VIDEO cable or a component video time. CAMERA. Review. • The tape was recorded in both HDV and DV formats. This is not a malfunction. 86 Troubleshooting - Sony HDRFX1E | Operating Instructions - Page 87
are using the component video cable, make sure CAMERA SET) menu to [OFF] (p. 40). • The tape was recorded in a TV color system other than that of your camcorder during dubbing. cSet [VCR HDV/DV] on the (IN/ tape cIn the (AUDIO SET) menu, adjust [AUDIO MIX] from Troubleshooting Troubleshooting 87 - Sony HDRFX1E | Operating Instructions - Page 88
problem persists even after you tried a couple of times, contact your Sony dealer or local authorized Sony service facility. C:04:ss cA battery pack that is not an "InfoLITHIUM" battery pack is being used. Use an "InfoLITHIUM" battery , then operate your camcorder again. Do not Troubleshooting - Sony HDRFX1E | Operating Instructions - Page 89
correct tape format. No output image in "VCR HDV/DV". Change format. Already added to CAMERA mode's P-MENU. Already added to VCR mode's P-MENU. x Dirty video head. Use a cleaning cassette. Corrective Actions/ References cSee page 92. cCharge the battery (p. 11). cSee page 92. - cSee page 95. cSee - Sony HDRFX1E | Operating Instructions - Page 90
On TV color systems Your camcorder is a PAL system-based camcorder. If you want to view the playback picture recorded in the DV format on a TV, it must be a PAL system-based TV (see following list) with the AUDIO/VIDEO input jack. System Used in PAL PAL - M PAL - N SECAM NTSC Australia, Austria - Sony HDRFX1E | Operating Instructions - Page 91
scan lines of screen ruling (1080i, number of pixels 1440 × 1080 dots). The video bit rate for recording is about 25 Mbps. i.LINK is adopted for the digital interface, enabling a digital connection with an HDV compatible TV or computer. Playback Your camcorder can play back pictures in both - Sony HDRFX1E | Operating Instructions - Page 92
are not mentioned in each case in this manual. About the "InfoLITHIUM" battery pack This unit is compatible with the "InfoLITHIUM" battery pack (L series). Your camcorder operates only with the "InfoLITHIUM" battery pack. "InfoLITHIUM" L series battery packs have the mark. What is the "InfoLITHIUM - Sony HDRFX1E | Operating Instructions - Page 93
OFF (CHG) when not recording or playing back on your camcorder. The battery pack is also consumed when your camcorder is in recording standby or playback pause. • Have spare battery packs ready for 2 or 3 times the expected recording time, and make trial recordings before making the actual recording - Sony HDRFX1E | Operating Instructions - Page 94
Sony (e.g. a VAIO series personal computer) as well as to video device. Some i.LINK compatible video device HDV/DV or not. For details on precautions and compatible application software, refer also to the operating instructions for the device to be connected. b Note • When connecting your camcorder - Sony HDRFX1E | Operating Instructions - Page 95
If the battery electrolytic liquid has leaked, - consult your local authorized Sony service facility. - wash off any liquid that may have contacted your skin. - if any liquid gets in your eyes, wash with plenty of water and consult a doctor. When not using your camcorder for a long time Occasionally - Sony HDRFX1E | Operating Instructions - Page 96
following problem occurs, clean the video heads Sony dealer or local authorized Sony service facility to have the video head replaced. LCD screen • Do not add excessive pressure on the LCD screen, as it may cause damage. • If your camcorder objects for a long period of time. About care and storage of - Sony HDRFX1E | Operating Instructions - Page 97
for a long time. To charge the pre-installed button-type battery Your camcorder has a pre-installed button-type battery to retain the date, time, and other settings MANNER THAT COMPLIES WITH THE MPEG-2 STANDARD FOR ENCODING VIDEO INFORMATION FOR PACKAGED MEDIA IS EXPRESSLY PROHIBITED WITHOUT A - Sony HDRFX1E | Operating Instructions - Page 98
bits (Fs 48 kHz, stereo) Transfer rate: 384 kbps Audio recording system (DV) Rotary heads, PCM system Quantization: 12 bits (Fs 32 kHz, stereo 1, stereo 2), 16 bits (Fs 48 kHz, stereo) Video signal PAL color, CCIR standards, 1080/50i specification Usable cassette Mini DV cassette with the - Sony HDRFX1E | Operating Instructions - Page 99
battery pack) During camera recording using the viewfinder with normal brightness: HDV recording 7.3 W DV recording 6.9 W During camera recording using the LCD with normal brightness: HDV battery pack, DVM60 cassette and lens hood. Supplied accessories other specifications. Rechargeable battery pack - Sony HDRFX1E | Operating Instructions - Page 100
parts and controls Camcorder A SHOT TRANSITION operation buttons (p. 37) B Eyecup (p. 16) C Viewfinder release lever (p. 97) D Rear remote sensor E Rear camera recording lamp (p. 20) F BATT RELEASE (battery release) button (p. 12) G REC START/STOP button (p. 20) H i.LINK lamps (HDV/DV) (p. 73 - Sony HDRFX1E | Operating Instructions - Page 101
) C Focus ring (p. 32) D FOCUS switch (AUTO/MAN (manual)/ INFINITY) (p. 32) E ZOOM switch (p. 22) F ND 26) K Handle zoom switch (H/L/OFF) (p. 23) L REC REVIEW button (p. 41) M Format lamps (p. 20) N Viewfinder (p. camcorder to the hooks for the shoulder strap. ,continued Quick Reference 101 - Sony HDRFX1E | Operating Instructions - Page 102
G END SEARCH (VCR) button (p. 44) H Handle zoom lever (p. 23) I Video control buttons (Rewind, Playback*, Fast-forward, Pause, Stop, Slow, Record) (p. 42 HOLD lever (p. 21) O AUTO/MAN (manual) audio switch (p. 36) P CHG (charge) lamp (p. 11) Q DC IN jack (p. 11) R AUDIO LEVEL dial (p. 36) * Each of - Sony HDRFX1E | Operating Instructions - Page 103
, the speaker on your camcorder is silent. C Hook for the shoulder strap (p. 101) D HDV/DV jack (p. 46, 70, 71, 74, 75, 77) E S VIDEO jack (p. 46, 48, your camcorder. H AUDIO/VIDEO jack (p. 46, 48, 72, 75, 78) I MIC (PLUG IN POWER)/LINE jack (red) (p. 78) J Microphone (p. 78) K Front camera recording - Sony HDRFX1E | Operating Instructions - Page 104
end, and then tighten the screw. To remove an accessory, loosen the screw, and then press down and pull out the accessory. When you attach the shoe adaptor, be careful not hood Align the marks on the lens hood to those on the camcorder, and turn the lens hood in the opposite direction of the arrow - Sony HDRFX1E | Operating Instructions - Page 105
- in the battery compartment. 3 Replace the cover back until it clicks. A DISPLAY button (p. 44) B SEARCH MODE button (p. 50) C ./> buttons (p. 50) D Video control buttons (Rewind, Playback, Fast-forward, Pause, Stop, Frame, Slow, ×2) (p. 42) E Transmitter After turning on your camcorder, point - Sony HDRFX1E | Operating Instructions - Page 106
the state of your camcorder. Example: Indicators in the CAMERA mode Time code (p. 44)/Tape counter Audio mode (p. 56)* Remaining tape (p. 21) Frame recording (p. 55)* Output analog images and sound in digital format (p. 61)* HDV input/DV input (p. 76) Zero set memory (p. 49) Warning (p. 88) Manual - Sony HDRFX1E | Operating Instructions - Page 107
AE SHIFT 35 AGC LIMIT 35 Aperture 28 ASSIGN BTN 68 AT IRIS LMT 35 Audio dubbing (AUDIO MIX 56, 79 AUDIO MODE 56 AWB SENS 35 B BACK LIGHT (camera) ....25 Battery Battery Info 12 Battery pack 11 Remaining battery time 21, 93 Remote Commander ........105 BEEP 62 BLACK FADER 38 Button-type - Sony HDRFX1E | Operating Instructions - Page 108
NTSC 90 O Operation confirmation beep See BEEP P PAL 90 PEAKING 33 Personal Menu (P-MENU 65 PICTURE PROFILE ......... 34 Picture search 43 Playback Double speed 43 Frame 43 Reverse 43 Slow 43 Playing time 13 R Rec review 41 Recording capacity Display 21 REMAINING 64 Recording format ( - Sony HDRFX1E | Operating Instructions - Page 109
- Sony HDRFX1E | Operating Instructions - Page 110
- Sony HDRFX1E | Operating Instructions - Page 111
- Sony HDRFX1E | Operating Instructions - Page 112
Printed on 70% or more recycled paper using VOC (Volatile Organic Compound)free vegetable oil based ink. Printed in Japan
-
 1
1 -
 2
2 -
 3
3 -
 4
4 -
 5
5 -
 6
6 -
 7
7 -
8
-
9
-
10
-
11
-
12
-
13
-
14
-
15
-
16
-
17
-
18
-
19
-
20
-
21
-
22
-
23
-
24
-
25
-
26
-
27
-
28
-
29
-
30
-
31
-
32
-
33
-
34
-
35
-
36
-
37
-
38
-
39
-
40
-
41
-
42
-
43
-
44
-
45
-
46
-
47
-
48
-
49
-
50
-
51
-
52
-
53
-
54
-
55
-
56
-
57
-
58
-
59
-
60
-
61
-
62
-
63
-
64
-
65
-
66
-
67
-
68
-
69
-
70
-
71
-
72
-
73
-
74
-
75
-
76
-
77
-
78
-
79
-
80
-
81
-
82
-
83
-
84
-
85
-
86
-
87
-
88
-
89
-
90
-
91
-
92
-
93
-
94
-
95
-
96
-
97
-
98
-
99
-
100
-
101
-
102
-
103
-
104
-
105
-
106
-
107
-
108
-
109
-
110
-
111
-
112
 |
 |

2-178-349-
14
(1)
© 2004 Sony Corporation
Operating
Instructions
Read this first
Digital HD Video Camera Recorder
HDR-FX1E