Sony HMZ-T3 Startup Guide - Page 1
Sony HMZ-T3 Manual
 |
View all Sony HMZ-T3 manuals
Add to My Manuals
Save this manual to your list of manuals |
Page 1 highlights
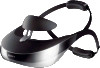
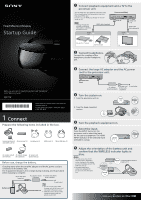
Head Mounted Display Startup Guide 1 Connect playback equipment and a TV to the processor unit. You can watch video from playback equipment on the TV by connecting the TV to the processor unit with a High-Speed HDMI cable. In such a case, set "HDMI pass-through" in "General Setup" to "On." Note HDMI pass-through does not enable simultaneous video playback on the head mounted unit and TV. HDMI cable (supplied) Processor unit (Rear) HDMI IN HDMI OUT (TV) HDMI cable (sold separately) Blu-ray Disc™ player Game console TV 2 Connect headphones. Connect the miniplug of the headphones to the headphone jack. 3 Connect the large AC adaptor and the AC power cord to the processor unit. Before use, also refer to "Health Precautions" and "Precautions" in the "Reference Guide." HMZ-T3W Printed using VOC (Volatile Organic Compound)-free vegetable based ink. © 2013 Sony Corporation Printed in Japan 4-471-975-11(1) 1 Connect Prepare the following items included in the box. Head mounted unit Processor unit (1) and battery unit (1) Headphones (1) HDMI cable (1) Micro USB cable (1) AC adaptor (small) AC adaptor (large) AC power cord (AC-UD10) (1) (AC-L200D) (1) (mains lead) (2) Before use, charge the battery. Charging starts when the small AC adaptor and the AC power cord are connected to the battery unit. The (power) indicator is lit in orange during charging, and it goes dark when charging is complete. Micro USB cable (supplied) AC adaptor (small) AC power cord (mains (supplied) lead) (supplied) Battery unit Head mounted unit To wall outlet Tips You can use the system while charging, with the AC power cord connected to the power source. It will take about 5 hours to fully charge the battery, when the system is turned off. Processor unit (Rear) 4 Turn the system on. 1. Turn the processor unit on. AC power cord To wall outlet AC adaptor (mains lead) (large) (supplied) (supplied) 2. Turn the head mounted unit on. 5 Turn the playback equipment on. 6 Select the input. Press the INPUT button on the processor unit to select the input for the source equipment. The HDMI INPUT indicator of the selected input will light in orange. 7 Adjust the orientation of the battery unit and confirm that the WIRELESS indicator lights in blue. Notes The radio waves may not be received properly, depending on the orientation of the battery unit. Use the battery unit with the SONY logo side up. Use where there are no obstructions between the processor unit and the battery unit. Communication distance: Approx. 5 m 2 Continued in Adjust and Wear
-
 1
1 -
 2
2
 |
 |