Sony HMZ-T3 Startup Guide - Page 2
Adjust and Wear, Set Up and View - head mounted 3d
 |
View all Sony HMZ-T3 manuals
Add to My Manuals
Save this manual to your list of manuals |
Page 2 highlights
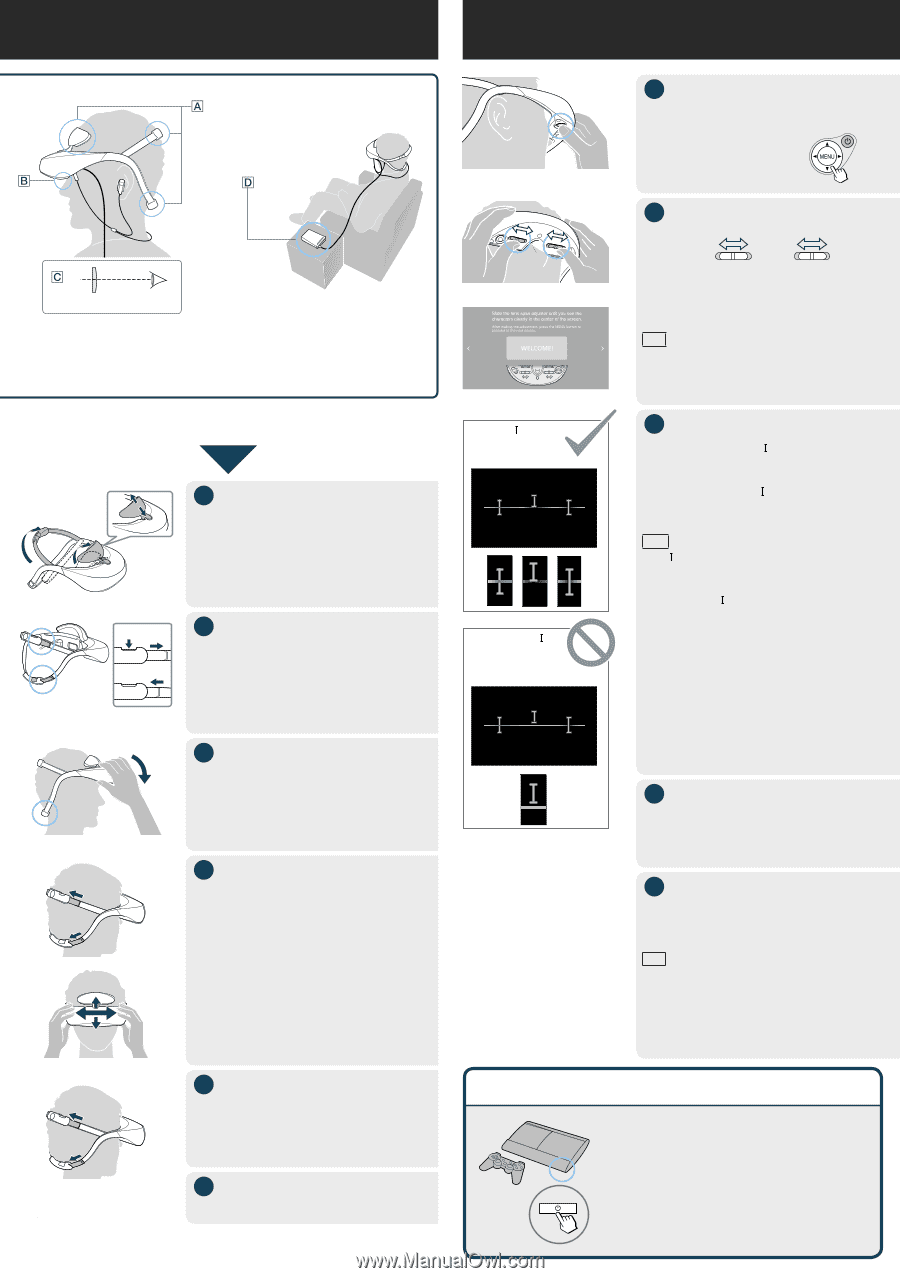
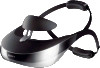
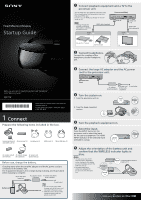
2 Adjust and Wear For a Comfortable Fit Battery unit Follow the instructions 3 Set Up and View displayed on the screen for operations. 1 Select a display language (first time only). Press the / button to select a language, and then press the MENU or button. 2 Adjust the lens span. Screen Eye Support the unit with your forehead and at two positions on the back of your head. Do not rest it on your nose. Adjust the unit so that the screens are in front of your eyes. Place the battery unit in a stable position. If you normally wear glasses or contact lenses, wear them as usual during use (with the exception of reading glasses). Note that watching with bifocals may be less than optimal. Screen All three " " marks and the horizontal line intersect. 1 Raise the top headband and the forehead supporter. The position of the forehead supporter is adjustable. The lowest position is standard. To loosen To tighten 2 Pull out the straps of the top and bottom headbands. Hold down the button on the upper side of each adjuster and pull out the strap on the right. 3 Put the head mounted unit on your head. Lower the bottom headband to the base of your head. One or more " " marks and the horizontal line do not intersect. 4 Tighten the headbands loosely and adjust the position of the head mounted unit. Push the strap into the adjuster on the top and bottom headbands to fix the head mounted unit. Carefully adjust the unit left, right, up, and down to find the best position for viewing the centers of the screens. Slide each lens span adjuster until you can see both screens clearly. After adjustment, press the MENU button or button. Tips If you cannot see the screen clearly after lens span adjustment, start over from "2 Adjust and Wear." If adjustment is difficult, try sliding both adjusters to the center position before adjustment. 3 Check display alignment. Confirm that all three " " marks and the horizontal line intersect then press the MENU or button. It is acceptable if the " " marks and the horizontal line intersect in a position other than the center of the screen. Note The " " marks and the horizontal line do not intersect if the position of the head mounted unit is shifted. Readjust the length of the headbands and confirm the position, referring to "2 Adjust and Wear" and " Adjust the lens span." If even one of the " " marks and the horizontal line do not intersect, refer to "Confirming Screen Alignment" of the "Reference Guide." 4 Follow the instructions displayed on the screen. Refer to the information on the screen for operation. 5 Operate the playback equipment. The picture appears on the screen of the head mounted unit. Tips Adjust the volume using the VOL +/- button on the head mounted unit. It is useful to keep the remote control unit for the playback equipment at hand. Some functions of the playback equipment can be controlled from this system. For details refer to "Control for HDMI" in "General Setup" of the "Reference Guide." 5 Tighten the headbands securely. 6 Put on the headphones. Resolving lack of audio, video, or 3D playback 1. Turn on the processor unit and the head mounted unit. 2. Turn the playback equipment off then back on. If the playback equipment is a PlayStation®3, turn it off then hold down the power button on the PlayStation®3 for at least 5 seconds (until you hear another beep) to restart it. When you wear glasses or need further adjustment Refer to "Fitting the Head Mounted Unit" of the "Reference Guide." "PlayStation" is a registered trademark of Sony Computer Entertainment Inc.
-
 1
1 -
 2
2
 |
 |