Sony ICD-BM1DR9 Quick Reference Card - Page 1
Sony ICD-BM1DR9 - Memory Stick Media Digital Voice Recorder Manual
 |
View all Sony ICD-BM1DR9 manuals
Add to My Manuals
Save this manual to your list of manuals |
Page 1 highlights
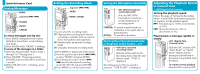
3-261-558-11(1) IC Recorder ICD-BM1/BM1PRO Quick Reference Card For details, see the operating instructions. Recording Tips You can use the following three types of recording (1/ 2/3) depending on where or how you start recording: Example) Message 1 Message 2 Blank space Start recording at a point in the middle of Message 1 b1 Start recording at the end Start recording at any point of Message 1 by pressing NEW FILE b2 b3 1 Overwrite Message 1 Message 2 Blank space recording Recording is added as part of Message 1. It overwrites part of the original Message 1. 2 Add recording Message 1 Message 2 Blank space Recording is added as part of Message 1. It is added after the end of the original Message 1 without deleting part of the original message. 3 New Message 1 Message 2 Message 3 Blank space recording Recording is added as a new message after the last message (Message 3). C 2003 Sony Corporation Printed in Japan Recording 1 Slide POWER to ON. OPR indicator Lights in red during recording. 4 Speak into the built-in microphone. 2 To record as a new message, press NEW FILE. 3Slide the control key to REC. Remaining Microphone memory sensitivity Message Recording number mode Counter display To stop recording Slide the control key to STOP. To select a folder for recording Follow steps 1 through 3 of "Playing back." Playing Back 1 Press FOLDER. OPR indicator Lights in green during playback. 2Press the jog lever up or down (>/ .) to display the desired folder. 3 Press ENTER to select the folder. 4Press the jog lever up or down (>/ .) to display the desired message. 5 Slide the control key to PLAY. 6 Adjust the volume with VOL +/- . Counter display To stop playback Slide the control key to STOP.
-
 1
1 -
 2
2
 |
 |