Sony ICFS79W Operating Instructions - Page 1
Sony ICFS79W - AM/FM/Weather Band Digital Tuner Shower Radio Manual
 |
UPC - 027242733602
View all Sony ICFS79W manuals
Add to My Manuals
Save this manual to your list of manuals |
Page 1 highlights
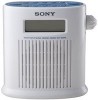
3-860-702-13 (1) FM/AM Synthesized Radio ICF-S79 FM/MW/LW Synthesized Radio ICF-S79L TV/WEATHER/FM/AM Synthesized Radio ICF-S79V Operating Instructions Mode d'emploi Bedienungsanleitung (Rückseite) Istruzioni per l'uso (facciata opposta) Sony Corporation © 1997 A R 14 (C) x 3 B ICF-S79/ICF-S79L TUNE/TIMER ADJUST CLOCK BAND OFF TIMER SET/ON/OFF TIME ADJUST PRESET TUNING/PRESET TIMER RADIO ON 1 2 3 4 5 AUTO OFF 60 45 30 20 10 SELECT/ PRESET ICF-S79V TUNE/TIMER ADJUST CLOCK BAND OFF TIMER SET/ON/OFF TIME ADJUST WEATHER RADIO ON 1 2 3 4 5 AUTO OFF 60 45 30 20 10 PRESET TUNING/PRESET TIMER SELECT/ PRESET VOL FM wire antenna Antenne fil FM C Suction cup (supplied) Ventouse (fournie) FM wire antenna Antenne fil FM D Strap Courroie Shower holder Sjpport de douche English For Customers in the U.S. WARNING You are cautioned that any changes or modifications not expressly approved in this manual could void your authority to operate this equipment. INFORMATION This equipment has been tested and found to comply with the limits for a Class B digital device, pursuant to Part 15 of the FCC Rules. These limits are designed to provide reasonable protection against harmful interference in a residential installation. This equipment generates, uses, and can radiate radio frequency energy and, if not installed and used in accordance with the instructions, may cause harmful interference to radio communications. However, there is no guarantee that interference will not occur in a particular installation. If this equipment does cause harmful interference to radio or television reception, which can be determined by turning the equipment off and on, the user is encouraged to try to correct the interference by one or more of the following measures: -Reorient or relocate the receiving antenna. -Increase the separation between the equipment and receiver. -Connect the equipment into an outlet on a circuit different from that to which the receiver is connected. -Consult the dealer or an experienced radio/TV technician for help. Before You Begin Thank you for choosing a Sony radio! It will give you many hours of reliable service and listening pleasure. Before operating the radio, please read these instructions thoroughly and retain them for future reference. These instructions cover these models: ICF-S79, ICF-S79L and ICF-S79V. Their differences are shown below. Model Number ICF-S79 ICF-S79L ICF-S79V Band FM/AM FM/MW/LW TV/WEATHER/FM/AM Features • Splash resistant; you can listen to the radio while taking a shower. • 90 minute Countdown Timer with 5 timer presets. • AUTO OFF function automatically turns off the radio after a preset duration. • PLL (Phase Locked Loop) Synthesized Tuner. 5 memory presets buttons to preset your favorite stations for easy tuning. Installing the Batteries (See Fig. A) Wipe all water droplets from the radio. Then, open the lid at the rear of the radio. Install three R14 (size C) batteries (not supplied) with correct polarity and close the lid until it clicks. Battery Life Using Sony R14 (size C) batteries (Approx. hours) AM(MW)/LW FM TV/WEATHER ICF-S79 110 ICF-S79L 110 ICF-S79V 110 80 - 80 - 80 65 Replacing the Batteries • When the batteries become weak, the sound becomes weak and distorted and "i" flashes. Replace the batteries with new ones. When the batteries are completely exhausted, the radio and the timer will turn off and "i" is displayed. • Before replacing the batteries, make sure that the radio is turned off. • After replacing the batteries, press RADIO ON and "i" will disappear. • Replace the batteries within a minute. Otherwise, the memories for the clock and the preset stations will be erased and "AM 12:00" or "0:00" will flash in the display the next time the batteries are installed. • To preserve clock and memory settings, keep unexhausted batteries in the radio even when you are not going to use the unit for a long time. Replace the batteries with new ones in about a year, since battery power is consumed even in this condition. Notes on the batteries • Do not charge the dry batteries. • Do not carry the batteries with coins or other metallic objects. It can generate heat if the positive and negative terminals of the batteries are accidentally contacted by a metallic object. • Do not leave exhausted batteries in the radio when you are not going to use the unit for a long time. Remove the batteries to avoid damage from battery leakage and corrosion. Setting the Clock "AM 12:00" or "0:00" will flash in the display when the batteries are installed for the first time. The clock can be adjusted whether or not the radio is on. 1 To stop flashing of the display,press CLOCK. 2 While holding down CLOCK, press TIME ADJUST + or - until the correct time appears in the display. When you release CLOCK, ":" starts to flash and the clock begins to operate. • The clock system varies depending on the model you own. 12-hour system: "AM 12:00" = midnight, "PM 12:00" = noon. 24-hour system: "0:00" = midnight, "12:00" = noon. • To set the current time rapidly, keep pressing the + or - button while holding down CLOCK. • To set the current time from zero seconds, at step 2, release CLOCK with the time signal. Operating the Radio Manual Tuning 1 Press RADIO ON to turn on the radio. The band and frequency will appear in the display for a few seconds. Then the current time indication will return to the display. 2 Press BAND repeatedly to select the desired band. There are two bands for FM (FM1 and FM2); you may listen to either band. 3 Tune in to a station by pressing TUNE/ TIMER ADJUST + or - . 4 Adjust the volume using VOL. • To turn off the radio, press OFF. • To improve radio reception TV/WEATHER/FM (See Fig C): Tie the FM wire antenna to the suction cup. Extend and adjust the antenna. Secure the suction cup on the wall where you get optimum reception. AM(MW)/LW: Rotate the unit horizontally for optimum reception. A ferrite bar antenna is built in to the unit. To listen to the WEATHER band (North and South American model only) 1 Press RADIO ON to turn on the radio. 2 Press WEATHER to switch to the WEATHER band. "WEATHER" will appear in the display. Weather band channels 1 to 5 are preset under PRESET TUNING buttons 1 to 5. Choose the broadcast with the best reception. To switch back to the previous band, press BAND. Preset Tuning You can preset up to 5 stations for each band; 10 stations for FM (5 stations in FM1, 5 stations in FM2) and 5 stations for MW and/or LW. Presetting a Station Example: To set AM 1260 kHz to memory preset button 2. 1 Press RADIO ON to turn on the radio. 2 Tune in to AM 1260 kHz (See "Manual Tuning"). 3 Hold down the desired PRESET TUNING/PRESET TIMER button (in this case, 2) until you hear two short beeps. The frequency will appear for a few seconds and then the display will return to the current time. • To change the preset station, preset a new station to the button of your choice. The previous station will be overwritten by the new one. Tuning in to a Preset Station 1 Press RADIO ON. 2 Press BAND repeatedly to select the desired band. 3 Press a PRESET TUNING/PRESET TIMER button of your choice. 4 Adjust the volume using VOL. After a few seconds, the display will return to the current time but the preset tuning number indication will remain. Using the Countdown Timer The buzzer alarm will go off when the countdown time has elapsed. Use the timer as a reminder. The buzzer alarm is operable whether or not the radio is on. The countdown time can be set at 1 minute intervals between 1 to 90 minutes. 1 Press TIMER•SET/ON/OFF. "0" and " " will appear in the display. 2 While " " is in the display, press TUNE/TIMER ADJUST + or - until the desired countdown time appears in the display. 3 Press TIMER•SET/ON/OFF. You will hear two short beeps and " " starts to flash; the timer is set. When the countdown time has elapsed, the buzzer will go off and the display will flash. • To stop the buzzer, press TIMER•SET/ON/ OFF. The buzzer will beep for 60 minutes if it is not turned off. • While the timer is counting down, the display shows the remaining time. To display the current time, press CLOCK. To check the station you are listening to, press TUNE/ TIMER ADJUST + or - lightly. The band and frequency will appear for a few seconds. • To cancel the timer during the countdown, press TIMER•SET/ON/OFF. The countdown timer will be canceled and the current time will appear in the display. Using the PRESET TIMER buttons You can use the countdown timer with the PRESET TIMER buttons. 1 Press TIMER•SET/ON/OFF. 2 Press the desired PRESET TUNING/ PRESET TIMER button. " ", the countdown time and the preset button number will appear in the display. The default countdown time for the PRESET TIMER buttons 1 to 5 are 3 minutes, 10 minutes, 20 minutes, 40 minutes and 60 minutes respectively. 3 Press TIMER•SET/ON/OFF again. You will hear two short beeps and " " starts to flash. When the countdown time has elapsed, the buzzer will go off and the display will flash. Presetting a countdown time You can also assign a countdown time of your choice to each of the five preset buttons. 1 Set the timer (See steps 1 and 2 of "Using the Countdown Timer"). 2 Hold down the desired PRESET TUNING/PRESET TIMER button until you hear two short beeps. The countdown time has been stored as displayed. • When you assign a countdown time to a preset button, the default countdown time assigned to the button will be overwritten by the new one. However, the preset countdown time will return to the default setting when the batteries are reset. • To check the station you are listening to, press TUNE/TIMER ADJUST + or - lightly. The band and frequency will appear for a few seconds. Other Features AUTO OFF function The AUTO OFF function will turn off the radio after a preset duration of time. 1 Press RADIO ON/AUTO OFF. The radio turns on with the first push. With every push, the AUTO OFF time changes as follows. OFF frequency display 60 (min) 10 20 30 45 The radio will play for the AUTO OFF time you have set, then shut off. • To turn off the radio before the AUTO OFF time has elapsed, press OFF. Using the Strap (See Fig. D) (North and South American model only) Use the strap as shown in the illustration. • The strap is only for hanging the radio; do not use the strap to carry it. Precautions • Operate the unit only on 4.5 V DC with three R14 (size C) batteries (not supplied). • The nameplate indicating voltage, etc., is located at the bottom of the unit. • Do not leave the unit in a location near a heat source such as a radiator or airduct, or in a place subject to direct sunlight, excessive dust, mechanical vibration, or shock. • Should any liquid or solid object fall into the unit, remove batteries from the unit and have it checked by qualified personnel before operating it further. • When the casing becomes soiled, clean it with a soft cloth dampened with a mild detergent solution. Never use abrasive cleansers or chemical solvents, as they may mar the casing. DO NOT IMMERSE IN WATER This product is not designed to be immersed in water or to come in continuous contact with water. • Open the battery compartment lid with dry hands where water cannot fall into the unit. • Do not use the unit in water. • The batteries themselves may be negatively affected by prolonged exposure to moisture. Therefore, it is recommended that the batteries periodically be removed, dried and inspected for corrosion. • Do not expose the unit to water that is warmer than 70˚C (158˚F) for a long time. • When the unit gets wet or if you accidentally drop the unit into the water, wipe it with a soft cloth. • Do not touch the unit with hands wet with soapsuds. If you have any questions, please consult your nearest Sony dealer. Specifications Frequency range: Model for North and South America Band ICF-S79V Channel step FM 87.5 - 108 MHz 0.1 MHz AM 530 - 1,710 kHz 10 kHz TV 2 - 13 ch - WEATHER 1 - 5 ch - Model for other countries Band ICF-S79 ICF-S79L Channel Step FM 87.5 - 108 MHz 87.5 - 108 MHz 0.05 MHz* AM(MW) 531 - 1,602 kHz 531 - 1,602 kHz 9 kHz LW - 153 - 279 kHz 9 kHz * The frequency display is raised or lowered by steps of 0.1 MHz. For example, both 88.00 MHz and 88.05 MHz will be displayed as "88.0 MHz." Time display: Model for North and South America: 12-hour system Model for other countries: 24-hour system Speaker: 7.7 cm (3 1/8 inches), 8 ohms Power output: 220 mW (at 10% harmonic distortion) Power requirements: 4.5 V DC, three size C (R14) batteries Dimensions: Approx. 143.5 x 139 x 67 mm (w/h/d) (Approx. 5 3/4 x 5 1/2 x 2 3/4 inches) incl. projecting parts and controls Mass: Approx. 523 g (1lb 2oz) incl. batteries Supplied accessories: Suction cup (1), Strap (1)* *North and South American model only Design and specifications are subject to change without notice. Français Avant de commencer Nous vous remercions d'avoir choisi cette radio Sony! Elle vous apportera dans la fiabilité de nombreuses heures de plaisir. Avant la mise en service de cette radio, veuillez lire attentivement ce mode d'emploi et le conserver pour toute référence ultérieure. Les instructions de ce mode d'emploi sont destinées aux modèles suivants: ICF-S79, ICF-S79L et ICF-S79V. Leurs différences sont indiquées ci-dessous. Numéro de modèle Gamme ICF-S79 FM/AM ICF-S79L FM/PO/GO ICF-S79V TV/WEATHER/FM/AM Caractéristiques • Résistante aux éclaboussures; vous pouvez écouter la radio en prenant une douche. • Minuterie de 90 minutes avec 5 temps préréglés. • Fonction de mise hors tension automatique AUTO OFF pour éteindre la radio au bout d'un certain temps que vous pouvez prérégler. • Tuner à synthétiseur PLL (circuit à verrouillage de phase). 5 touches de préréglage de mémoire pour accorder facilement vos stations préférées. Mise en place des piles (voir Fig. A) Essuyez toutes les gouttes d'eau à la surface de la radio, puis ouvrez le couvercle à l'arrière de la radio. Insérez trois piles R14 (format C) (non fournies) en respectant la polarité et refermez le couvercle jusqu'à ce qu'il s'encliquette. Autonomie des piles Avec des piles Sony R14 (format C) (Env. en heures) AM(PO)/GO FM TV/WEATHER ICF-S79 110 ICF-S79L 110 ICF-S79V 110 80 - 80 - 80 65 Remplacement des piles • Lorsque les piles faiblissent, le son devient faible, présente de la distorsion et "i" clignote. Remplacez les piles par des neuves. Quand les piles sont épuisées, la radio s'éteint, la minuterie s'arrête et le voyant "i" est affiché. • Avant de remplacer les piles, assurez-vous que la radio est hors tension. • Après avoir remplacé les piles, appuyez sur RADIO ON et "i" disparaîtra. • Remplacez les piles en moins d'une minute; faute de quoi le contenu de la mémoire de l'horloge et des stations préréglées sera effacé et l'indication "AM 12:00" ou "0:00" clignotera sur l'afficheur quand les piles neuves seront en place. • Pour conserver les réglages de l'horloge et de la mémoire, laissez des piles qui ne sont pas épuisées en place dans la radio, même si vous n'avez pas l'intention d'utiliser la radio pendant un certain temps. Remplacez les piles par des neuves dans l'année suivant leur mise en place car de l'énergie est consommée même dans ces conditions. Remarques à propos des piles • Ne pas recharger une pile sèche. • Ne pas porter de pile sèche avec des pièces de monnaie ou d'autres objets métalliques. Le contact des bornes positive et négative avec un objet métallique peut générer de la chaleur. • Ne pas laisser de piles épuisées en place dans la radio si vous n'avez pas l'intention d'utiliser la radio pendant longtemps. Retirez les piles pour éviter tout dommage dû à une fuite de l'électrolyte des piles et à la corrosion. Réglage de l'horloge "AM12:00" ou "0:00" apparaîtront en clignotant sur l'afficheur quand les piles seront installées la première fois. Vous pouvez régler l'horloge, que la radio soit allumée ou non. 1 Pour interrompre le clignotement de l'affichage, appuyez sur CLOCK. 2 Tout en maintenant la pression sur CLOCK, appuyez sur TIME ADJUST + ou - jusqu'à ce que l'heure juste apparaisse sur l'afficheur. Quand vous relâchez la touche CLOCK, ":" se met à clignoter et l'horloge se met en marche. • Le système de l'horloge varie en fonction du modèle que vous avez acheté. Système de 12 heures: "AM 12:00" = minuit, "PM 12:00" = midi. Système de 24 heures: "0:00" = minuit, "12:00" = midi. • Pour régler l'heure plus rapidement, tenez la touche + ou - enfoncée tout en appuyant sur CLOCK. • Pour régler l'heure en partant de zéro pour les secondes, relâchez CLOCK au top horaire, à l'étape 2. Fonctionnement de la radio Accord manuel 1 Appuyez sur RADIO ON pour mettre la radio sous tension. La gamme et la fréquence seront affichées pendant quelques secondes, puis l'heure actuelle sera de nouveau affichée. 2 Appuyez de façon répétée sur BAND pour sélectionner la gamme. Deux gammes FM (FM1 et FM2) sont disponibles; vous pouvez écouter l'une ou l'autre au choix. 3 Accordez une station en appuyant sur TUNE/TIMER ADJUST + ou -. 4 Ajustez le volume avec VOL. • Pour éteindre la radio, appuyez sur OFF. • Pour améliorer la réception radio TV/WEATHER/FM (voir Fig. C): Fixez l'antenne fil FM à la ventouse. Déployez l'antenne et ajustez sa position. Collez la ventouse sur un mur à l'endroit où la réception est la meilleure. AM(PO)/GO: Faites pivoter le radioréveil à l'horizontale pour une réception optimale. Une barre de ferrite est intégrée à la radio. Pour écouter la gamme WEATHER (bulletins météorologiques) (Amérique du Nord et du Sud seulement) 1 Appuyez sur RADIO ON pour mettre la radio sous tension. 2 Appuyez sur WEATHER pour passer sur la gamme WEATHER. "WEATHER" apparaîtra sur l'afficheur. Les stations de diffusion de bulletins météorologiques 1 à 5 de la gamme WEATHER sont préréglées sur les touches PRESET TUNING 1 à 5. Choisissez l'émission la mieux reçue. Pour revenir à la gamme précédente, appuyez sur BAND. Accord de stations préréglées Vous pouvez prérégler jusqu'à 5 stations pour chaque gamme; 10 stations en FM (5 stations en FM1, 5 stations en FM2), et 5 stations en PO et/ ou GO. Préréglage d'une station Exemple: Pour régler AM 1260 kHz sur la touche de préréglage 2. 1 Appuyez sur RADIO ON pour mettre la radio sous tension. 2 Accordez AM 1260 kHz (voir "Accord manuel"). 3 Appuyez en continu sur la touche de préréglage PRESET TUNING/PRESET TIMER souhaitée (dans ce cas, la touche de préréglage 2) jusqu'à ce que vous entendiez deux bips sonores courts. La fréquence sera affichée pendant quelques secondes, puis l'heure actuelle sera de nouveau affichée. • Pour changer la station préréglée, préréglez une nouvelle station sur la touche de votre choix. La station précédente sera remplacée par la nouvelle. Accord d'une station préréglée 1 Appuyez sur RADIO ON. 2 Appuyez de façon répétée sur BAND pour sélectionner la gamme. 3 Appuyez sur la touche PRESET TUNING/PRESET TIMER de votre choix. 4 Réglez le volume avec VOL. Après quelques secondes, l'heure actuelle sera de nouveau affichée mais le numéro de préréglage ne disparaîtra pas. Utilisation de la minuterie La sonnerie retentit quand le temps préréglé s'est écoulé. Utilisez la minuterie comme aidemémoire. La sonnerie retentit, que la radio soit allumée ou non. La minuterie peut être réglée à des intervalles d'une minute entre 1 et 90 minutes. 1 Appuyez sur TIMER•SET/ON/OFF. "0" et " " apparaîtra sur l'afficheur. 2 Pendant que " " est affiché, appuyez sur TUNE/TIMER ADJUST + ou - jusqu'à ce que le temps souhaité apparaisse sur l'afficheur. 3 Appuyez sur TIMER•SET/ON/OFF. Vous entendrez deux bips courts et " " commencera à clignoter; la minuterie sera réglée. Quand le temps préréglé se sera écoulé, la sonnerie retentira et l'affichage clignotera. • Pour arrêter la sonnerie, appuyez sur TIMER•SET/ON/OFF. La sonnerie retentira pendant 60 minutes si elle n'est pas arrêtée. • Pendant le décompte, l'afficheur montre le temps restant. Pour afficher l'heure actuelle, appuyez sur CLOCK. Pour vérifier quelle station vous êtes en train d'écouter, appuyez légèrement sur TUNE/TIMER ADJUST + ou -. La gamme et la fréquence seront affichées pendant quelques secondes. • Pour effacer le temps préréglé de la minuterie avant la fin du décompte, appuyez sur TIMER•SET/ON/OFF. Le temps préréglé de la minuterie sera effacé et l'heure actuelle apparaîtra sur l'afficheur. Utilisation des touches PRESET TIMER Vous pouvez utiliser la minuterie avec les touches PRESET TIMER. 1 Appuyez sur TIMER•SET/ON/OFF. 2 Appuyez sur la touche PRESET TUNING/PRESET TIMER souhaitée. " ", le temps de la minuterie et le numéro de la touche de préréglage apparaîtront sur l'afficheur. Les temps préréglés en usine pour les touches PRESET TIMER 1 à 5 sont de 3 minutes, 10 minutes, 20 minutes, 40 minutes et 60 minutes respectivement. 3 Appuyez de nouveau sur TIMER•SET/ ON/OFF. Vous entendrez deux bips courts et " " commencera à clignoter. Quand le temps se sera écoulé, la sonnerie retentira et l'affichage clignotera. Préréglage d'un temps de la minuterie Vous pouvez aussi prérégler un temps différent sur chacune des cinq touches de préréglage. 1 Réglez la minuterie (voir étapes 1 et 2 de "Utilisation de la minuterie"). 2 Appuyez en continu sur la touche de préréglage PRESET TUNING/PRESET TIMER souhaitée jusqu'à ce que deux bips courts retentissent. Le temps affiché est mémorisé. • Quand vous préréglez un temps sur une touche de préréglage, le temps de la minuterie préréglé en usine sera remplacé par le nouveau. Néanmoins, le temps préréglé reviendra à la valeur préréglée en usine quand les piles seront changées. • Pour vérifier quelle station vous êtes en train d'écouter, appuyez légèrement sur TUNE/ TIMER ADJUST + ou -. La gamme et la fréquence seront affichées pendant quelques secondes. Autres caractéristiques Fonction AUTO OFF La fonction AUTO OFF met la radio hors tension automatiquement quand un temps préréglé s'est écoulé. 1 Appuyez sur RADIO ON/AUTO OFF. La radio s'allume à la première pression. A chaque pression consécutive, le temps de mise hors tension automatique AUTO OFF changera comme suit. OFF 10 affichage de la fréquence 20 30 60 (min) 45 La radio fonctionnera pendant le temps AUTO OFF sélectionné, puis s'éteindra. • Pour éteindre la radio avant que le temps AUTO OFF se soit écoulé, appuyez sur OFF. Utilisation de la courroie (voir Fig. D) (Amérique du Nord et du Sud seulement) Utilisez la courroie comme indiqué dans l'illustration. • La courroie est conçue uniquement pour suspendre la radio; n'utilisez pas la courroie pour la transporter. Précautions • Faites fonctionner la radio seulement sur courant continu 4,5 V avec trois piles R14 (format C) (non fournies) • La plaque signalétique indiquant la tension de fonctionnement, etc., se trouve sous la radio. • Ne pas laisser la radio près d'une source de chaleur, comme un radiateur ou une sortie d'air chaud, et ne pas l'exposer au soleil, à une poussière excessive, des vibrations mécaniques ou des chocs. • Si un solide ou un liquide pénétrait dans la radio, retirez les piles et faites vérifier la radio par un technicien qualifié avant de la remettre en service. • Quand le coffret est sale, nettoyez-le avec un chiffon doux imprégné d'une solution détergente neutre. Ne jamais utiliser de tampons abrasifs, ni de solvants chimiques, car ils pourraient abîmer le coffret. NE PAS IMMERGER Ce produit n'a pas été conçu pour être immergé ou rester au contact continuel de l'eau. • Ouvrez le couvercle du logement des piles avec les mains sèches à un endroit où l'eau ne risque pas de tomber dans l'appareil. • Ne pas utiliser l'appareil dans l'eau. • Les piles elles-mêmes peuvent être endommagées par une exposition prolongée à l'humidité. Nous vous conseillons par conséquent d'enlever les piles régulièrement, de les sécher et vérifier si elles ne sont pas corrodées. • Ne pas laisser l'appareil longtemps en contact avec de l'eau à plus de 70°C (158°F). • Quand l'appareil est mouillé ou si vous laissez tomber accidentellement l'appareil dans l'eau, essuyez-le avec un chiffon doux. • Ne pas toucher l'appareil avec des mains recouvertes d'eau savonneuse. Pour toute question veuillez consulter votre revendeur Sony. Spécifications Plage de fréquences: Modèle pour l'Amérique du Nord et du Sud Gamme ICF-S79V Intervalle d'accord FM 87,5 - 108 MHz 0,1 MHz AM 530 - 1.710 kHz 10 kHz TV Canal 2 - 13 - WEATHER Canal 1 - 5 - Modèle pour les autres pays Gamme ICF-S79 ICF-S79L Intervalle d'accord FM 87,5 - 108 MHz 87,5 - 108 MHz 0,05 MHz* AM(PO) 531 - 1.602 kHz 531 - 1.602 kHz 9 kHz GO - 153 - 279 kHz 9 kHz * L'affichage de la fréquence augmente ou diminue par intervalles de 0,1 MHz. Par exemple, 88,00 MHz et 88,05 MHz seront affichés sous la forme "88.0 MHz". Affichage de l'heure: Modèle pour l'Amérique du Nord et du Sud: Système de 12 heures Modèle pour les autres pays: Système de 24 heures Haut-parleur: 7,7 cm (3 1/8 pouces), 8 ohms Puissance de sortie: 220 mW (à 10% de distorsion harmonique) Alimentation: CC 4,5 V, trois piles de format C (R14) Dimensions: Env. 143,5 x 139 x 67 mm (l/h/p) (Env. 5 3/4 x 5 1/2 x 2 3/4 pouces) saillies et commandes comprises Poids: Env. 523 g (1 li. 2 on.) piles comprises Accessoires fournis: Ventouse (1), Courroie (1)* * Modèle pour l'Amérique du Nord et du Sud seulement La conception et les spécifications sont modifiables sans préavis.
-
 1
1 -
 2
2
 |
 |