Sony KDE-55XBR950 Operating Instructions
Sony KDE-55XBR950 - 55" Xbr Plasma Wega™ Integrated Television Manual
 |
View all Sony KDE-55XBR950 manuals
Add to My Manuals
Save this manual to your list of manuals |
Sony KDE-55XBR950 manual content summary:
- Sony KDE-55XBR950 | Operating Instructions - Page 1
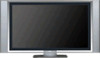
4-098-430-15 (3) Flat Panel Color TV KDE42XBR950/KDE50XBR950/KDE55XBR950/KDE61XBR950 Printed on 100% recycled paper. Printed in Japan Flat Panel Color TV Operating Instructions KDE42XBR950 KDE50XBR950 KDE55XBR950 KDE61XBR950 2003 Sony Corporation - Sony KDE-55XBR950 | Operating Instructions - Page 2
Serial No. Display Unit Media Receiver Unit Contacting Sony If, after reading these operating instructions, you have additional questions related to the use of your Sony television, please call our Customer Information Services Center at 1-800-222-SONY (7669) (US residents only) or 1-877-899 - Sony KDE-55XBR950 | Operating Instructions - Page 3
(servicing) instructions in cable ground shall be connected to the grounding system of the building, as close to the point of cable entry as practical. Use of this television manual could void your authority to operate this equipment. Safety s Operate the TV KDE55XBR950, this Plasma Display - Sony KDE-55XBR950 | Operating Instructions - Page 4
see page 100 for instructions on adjusting picture settings. TV STAND or WALL-HANGING RACK UNIT is capable of resulting in instability causing possible injury. SONY APPLIANCE MODEL NO. KDE42XBR950 (consists of PDM-4210 and MBD-XBR950) KDE50XBR950 (consists of PDM-5010 and MBD-XBR950) KDE55XBR950 - Sony KDE-55XBR950 | Operating Instructions - Page 5
plug when disconnecting the AC power cord. s Refer to the operating instructions when disconnecting the display interface cable. If the AC power cord or display interface cable is damaged, stop using it and ask your dealer or Sony service center to exchange it. Cleaning Unplug the AC power cord when - Sony KDE-55XBR950 | Operating Instructions - Page 6
not use power-line operated sets stand recommended by Sony for the specific model of TV. No part of the TV set should overhang any edge of the TV cart or stand instructions supplied with your stand or wall mount unit when installing the unit. s Be sure to attach the brackets supplied with your stand - Sony KDE-55XBR950 | Operating Instructions - Page 7
a stand 30 cm (11 7/8 inches) 10 cm (4 inches) Never install the unit as follows: Air circulation is blocked. 10 cm (4 inches) Allow this much space. Air circulation is blocked. Media receiver unit: Front view 5 cm (2 inches) POWER POWER/STANDBY TIMER i.LINK/STANDBY 7 cm (2 7/8 inches) TV - Sony KDE-55XBR950 | Operating Instructions - Page 8
fall from the stand or wall mount supporting structure, grounding of the lead-in wire to an antenna discharge unit, size of grounding conductors, location of antenna discharge unit, connection service grounding electrode system (NEC Art 250 Part H) Lightning For added protection for this television - Sony KDE-55XBR950 | Operating Instructions - Page 9
a need for service. Servicing Do not attempt to service the set yourself since instructions given below. s Carry the TV with the specified number of persons. s Carry the TV holding the upper and bottom frames of the TV serious injury. Cable wiring Take care not to catch your feet on the cables. It - Sony KDE-55XBR950 | Operating Instructions - Page 10
Install in accordance with the manufacturer's instructions. 8) Do not install near any the manufacturer. 12) Use only with the cart, stand, tripod, bracket, or table specified by the of time. 14) Refer all servicing to qualified service personnel. Servicing is required when the apparatus has - Sony KDE-55XBR950 | Operating Instructions - Page 11
20 Media Receiver Unit Rear Panel 22 Installing the TV 23 Detaching the speakers (KDE55XBR950 and KDE61XBR950 only 26 Basic Connections: Connecting a Cable or Antenna 28 Cable or Antenna 28 Cable Box and Cable 29 Cable Box 30 Connecting Optional Equipment 32 About Using S VIDEO 32 VCR and - Sony KDE-55XBR950 | Operating Instructions - Page 12
61 Operating a Cable Box 62 Operating a DVD Player 62 Operating an MDP (Laserdisc Player 62 Using the Features Overview 63 Watching TV 64 Using the Using the Digital Program Guide Displaying the Digital Program Guide 73 Navigating the Digital Program Menus 74 Using the Guide Menu 74 Using the - Sony KDE-55XBR950 | Operating Instructions - Page 13
Using the Memory Stick Viewer About Memory Stick 77 Features 77 Memory Stick Compatibility 78 File Compatibility 78 Trademark Information 78 Inserting and Removing a Memory Stick 79 Inserting a Memory Stick 79 Inserting the Memory Stick Duo 80 Removing a Memory Stick 81 Using the Memory - Sony KDE-55XBR950 | Operating Instructions - Page 14
Custom Rating Options 111 Viewing Blocked Programs 111 Using the Setup Menu 112 Selecting Setup Options 112 Overview 117 Glossary 118 Contacting Sony 119 Troubleshooting 119 Twin View 119 Remote Control 120 Memory Stick 120 Video 122 Audio 123 Channels 123 General 124 Specifications - Sony KDE-55XBR950 | Operating Instructions - Page 15
KDE61XBR950 only) s Four Screws (KDE55XBR950 and KDE61XBR950 only) s Operating Instructions s Warranty Card These items are all you need to set up and operate the TV in its basic configuration. Most components (VCRs, DVD players, etc.) come with the necessary cables to connect them. If you want to - Sony KDE-55XBR950 | Operating Instructions - Page 16
Features 14 Some of the features that you will enjoy with your new TV include: s Integrated HDTV: You can watch digital television programs and enjoy the improved audio/video quality offered by these programs. s WEGA Engine™: Delivers superb picture quality from any video source by minimizing the - Sony KDE-55XBR950 | Operating Instructions - Page 17
from younger viewers. s Digital Visual Interface (DVI-HDTV): Can accommodate a copyprotected digital connection (HDCP*) to other devices (such as digital set between these devices and your digital TV. The i.LINK terminals on the TV are not intended for connection with personal computers. *High- - Sony KDE-55XBR950 | Operating Instructions - Page 18
- Sony KDE-55XBR950 | Operating Instructions - Page 19
Overview This chapter includes illustrated instructions for setting up your TV. Topic TV Controls and Connectors Installing the TV Basic Connections: Connecting a Cable or Antenna Connecting Optional Equipment About Using S VIDEO VCR and Cable VCR and Cable Box Two VCRs for Tape Editing Satellite - Sony KDE-55XBR950 | Operating Instructions - Page 20
ON/ STAND BY1 LED Lights up in green when the TV set is turned on. When in standby mode, the LED lights up in red. The LED does not light up when the main power is turned off. If the LED blinks continuously, this may indicate the display unit needs servicing (see "Contacting Sony" on - Sony KDE-55XBR950 | Operating Instructions - Page 21
KDE50XBR950 KDE61XBR950 KDE55XBR950 Setup SONY EXCLUSIVE CABLE ONLY BLACK WHITE DISPLAY SIGNAL IN AC IN AC IN SONY EXCLUSIVE CABLE ONLY BLACK and not used for terminals this model. (KDE55XBR950 and KDE61XBR950 only) 8 DISPLAY SIGNAL IN Connect to the DISPLAY SIGNAL OUT jacks of the - Sony KDE-55XBR950 | Operating Instructions - Page 22
red continuously, this may indicate the media receiver unit needs servicing (see "Contacting Sony" on page 119). 3 TIMER LED When lit, indicates one of the timers is set. When the timer is set, this LED will remain lit even if the TV through the video equipment connected to the TV's video inputs. - Sony KDE-55XBR950 | Operating Instructions - Page 23
to the i.LINK jack on your i.LINK-compatible portable device. Provides a secure digital connection between your TV and your i.LINK-compatible portable device. qh VIDEO/ Connects to the composite A/V output jacks on your L (MONO)- camcorder or other video equipment. AUDIO-R VIDEO 2 IN qj - Sony KDE-55XBR950 | Operating Instructions - Page 24
digital set-top boxes. This DVI-HDTV input terminal is NOT INTENDED FOR USE WITH PERSONAL COMPUTERS and is compliant with the EIA-861 standard. See the instruction manual that came with your equipment for details about connecting and using it with the TV. Use a DVI cable. qa AUDIO OUT (VAR/FIX - Sony KDE-55XBR950 | Operating Instructions - Page 25
the TV Disconnect all power sources before making any connections. 1 Connect the display interface cable (supplied) to the DISPLAY SIGNAL IN jack, and the AC power cord (supplied) to the AC IN jack of the unit. KDE42XBR950 KDE50XBR950 KDE61XBR950 KDE55XBR950 Setup SONY EXCLUSIVE CABLE ONLY - Sony KDE-55XBR950 | Operating Instructions - Page 26
stand or rack unit. For details, refer to the operating instructions supplied with your stand or rack unit. 4 Connect the other end of the display interface cable S400 (TS/DV/MICROMV) i.LINK VHF/UHF CABLE WHITE BLACK ~ AC IN DVI-HDTV DVI-HDTV IN 6 DISPLAY SIGNAL OUT Tighten the screw slowly - Sony KDE-55XBR950 | Operating Instructions - Page 27
the AC power cords to wall outlets until you have completed making all connections. Do not tighten the screws too much. It may damage the screws. Do not use damaged cables, such as cables whose connectors are deformed. This unit may fall and cause injury if accidently knocked or pulled by the - Sony KDE-55XBR950 | Operating Instructions - Page 28
remove the speakers before installing the TV on a wall, etc. Detaching the speakers from the TV should be performed by qualified Sony personnel. When detaching the speakers, ) M4x14 screws (supplied) (For KDE55XBR950 only) Keep the screws for future use. Use them to reattach the speakers. 26 - Sony KDE-55XBR950 | Operating Instructions - Page 29
supplied two screws. Rear of the display unit Frame bar (supplied) Screws (supplied) 4 Repeat steps 2 and 3 with the speaker on the other side. Do not connect the detached speakers to other audio equipment. The EXT SP ON/OFF switch is provided for future use and not used for this model. Make - Sony KDE-55XBR950 | Operating Instructions - Page 30
in which you will connect your TV varies, depending on how your home receives a signal (cable, cable box, antenna) and whether or not you plan to connect a VCR. If You Are Connecting See Page Cable or Antenna 28 s No cable box or VCR Cable Box and Cable 29 s Cable box unscrambles only some - Sony KDE-55XBR950 | Operating Instructions - Page 31
have a VCR, see pages 33 and 35.) With this connection you can: s Use the remote control to change channels coming through the cable box to the TV's VHF/UHF input jack. (You must first program the remote control for your specific cable box; see "Programming the Remote Control" on page 58.) s Use - Sony KDE-55XBR950 | Operating Instructions - Page 32
program the remote control for your specific cable box, see page 58.) About Using This Connection with Dual Picture (Twin View, etc.) Features With this connection, all channels come into the TV through your cable box and only one unscrambled signal is sent to the TV, so you cannot use the dual - Sony KDE-55XBR950 | Operating Instructions - Page 33
page 58. Press FUNCTION repeatedly until the SAT/CABLE indicator lights up. When using the cable box, you need the TV to stay on the channel the cable box is set to (usually channel 3 or 4). You can use the TV's Channel Fix feature to lock in a specific channel. For details, see "Using the Channel - Sony KDE-55XBR950 | Operating Instructions - Page 34
: If You Are Connecting VCR and Cable VCR and Cable Box Two VCRs for Tape Editing Satellite Receiver Satellite Receiver and VCR DVD Player with Component Video Connectors DVD Player with S VIDEO and Audio Connectors Digital Satellite Receiver with DVI-HDTV connector Camcorder Audio Receiver - Sony KDE-55XBR950 | Operating Instructions - Page 35
, you can use all the dual picture features. To connect the VCR and cable 1 Connect the CATV cable to the VCR's VHF/UHF input jack. 2 Use the supplied antenna cable to connect the VCR's VHF/UHF output jack to the TV's CABLE input jack. 3 Use an A/V cable to connect the VCR's A/V output jacks to the - Sony KDE-55XBR950 | Operating Instructions - Page 36
Label video inputs to easily identify equipment connected to the TV Do This ... Press TV/VIDEO repeatedly to select the VCR input (VIDEO 1 in the illustration). Press TV/VIDEO repeatedly to select the cable input (CABLE in the illustration). If you have a non-Sony VCR, you must program the remote - Sony KDE-55XBR950 | Operating Instructions - Page 37
, you can use all the dual picture features. With this connection you can: s Use the remote control to change channels coming through the cable box. You must first program the remote control for your specific cable box; see "Programming the Remote Control" on page 58. s Use the remote control - Sony KDE-55XBR950 | Operating Instructions - Page 38
the remote control to operate the cable box or VCR Control specific cable box and VCR functions with the remote control Label video inputs to easily identify equipment connected to the TV Do This ... Press TV/VIDEO repeatedly to select the cable input (CABLE in the illustration). Turn on the - Sony KDE-55XBR950 | Operating Instructions - Page 39
/480p/480i) Y Y AUDIO PB L PB SUB WOO OUT(VAR AUDIO L L PR 3 R PR 4 R R 5 AUDIO (VAR/F A/V cable When connecting two VCRs for tape editing; - you cannot edit a tape with copy protection. - do not connect the TV's A/V input jack and output jack to your VCRs at the same time to avoid - Sony KDE-55XBR950 | Operating Instructions - Page 40
control to operate the VCR(s) Control VCR functions with the remote control Label video inputs to easily identify equipment connected to the TV Do This ... If you have a non-Sony VCR, you must program the remote control. See "Programming the Remote Control" on page 58. Press FUNCTION repeatedly - Sony KDE-55XBR950 | Operating Instructions - Page 41
to the satellite receiver's satellite input jack. 2 Use an A/V cable to connect the satellite receiver's A/V output jacks to the TV's A/V input jacks (VIDEO 1 or 3). 3 Connect the supplied antenna cable from your cable or antenna to the TV's CABLE or VHF/UHF input jack. 4 Run the Auto Setup program - Sony KDE-55XBR950 | Operating Instructions - Page 42
functions with the remote control See "Operating a Satellite Receiver" on page 61. Label video inputs to easily identify equipment See the instructions for setting up Video Labels on page 113. connected to the TV Do not leave the Electric Program Guide and display indication turned on. Setup 40 - Sony KDE-55XBR950 | Operating Instructions - Page 43
the VCR's VHF/UHF input jack. 3 Use the supplied antenna cable to connect the VCR's VHF/UHF output jack to the TV's CABLE input jack. 4 Use an A/V cable to connect the satellite receiver's A/V output jacks to the VCR's A/V input jacks. 5 Use an A/V cable to connect the VCR's A/V output jacks to the - Sony KDE-55XBR950 | Operating Instructions - Page 44
VCR may need to be turned on and set to the satellite receiver input. Press TV/VIDEO repeatedly to select the input to which the VCR is connected (VIDEO 1 in the illustration). If you have a non-Sony VCR or satellite receiver, you must program the remote control. See "Programming the Remote Control - Sony KDE-55XBR950 | Operating Instructions - Page 45
sometimes labeled Y, CB and CR, or Y, B-Y and R-Y. If so, connect the cables to their matching color jacks. 2 Use an audio cable to connect the DVD player's audio output jacks to the TV's VIDEO 4 or 5 audio input jacks. Component video cable Rear of Media Receiver Unit S VIDEO VIDEO L (MONO) AUDIO - Sony KDE-55XBR950 | Operating Instructions - Page 46
connected to the TV Do This ... Press TV/VIDEO repeatedly to select the DVD input (VIDEO 4 in the illustration). If you have a non-Sony " on page 62. See the instructions for setting up Video Labels on page 113. You cannot record the signal from any equipment connected into the Y, PB, PR jacks - Sony KDE-55XBR950 | Operating Instructions - Page 47
if your DVD player does not have component video (Y, PB, PR) jacks. To connect a DVD player with A/V connectors 1 Use an S VIDEO cable to connect the DVD player's S VIDEO jack to the TV's S VIDEO input jack (VIDEO 1 or 3). 2 Use an audio cable to connect the DVD player's audio output jacks to the - Sony KDE-55XBR950 | Operating Instructions - Page 48
(VIDEO 6 in the illustration). Label video inputs to easily See the instructions for setting up Video Labels on page 113. identify equipment connected to the TV Do not leave the Electric Program Guide and display indication turned on. Do not connect the PC to the TV with the DVI cable. 46 - Sony KDE-55XBR950 | Operating Instructions - Page 49
Camcorder A/V cable To A/V output Notes on Using This Connection To Do This ... Watch the camcorder Label video inputs to easily identify equipment connected to the TV Do This ... Press TV/VIDEO repeatedly to select the camcorder input (VIDEO 2 in the illustration). See the instructions for - Sony KDE-55XBR950 | Operating Instructions - Page 50
Setup Audio Receiver For improved sound quality, you may want to play the TV's audio through your stereo system. To connect an audio system 1 Use an audio cable to connect the TV's AUDIO OUT jacks to the audio receiver's line input jacks. Rear of Media Receiver Unit SUB WOOFER 480i) OUT(VAR) - Sony KDE-55XBR950 | Operating Instructions - Page 51
audio cable to connect the TV's SUB WOOFER OUT jack to the sub woofer's input jack. Monaural audio cable (not supplied) D IN 20p/480p/480i) Y SUB WOOFER OUT(VAR) AUDIO L PB AUDIO L CONTROL S L IN R PR 4 R OUT R 5 AUDIO OUT (VAR/FIX) OPTICAL OUT DVI-HDTV R - AUDIO - L DVI-HDTV IN - Sony KDE-55XBR950 | Operating Instructions - Page 52
, read the instruction manual of the i.LINK device to be connected. To connect a digital i.LINK device (using only a digital signal) 1 Using an i.LINK cable (see page 50), connect the device's i.LINK jack to either of the TV's i.LINK jacks. To connect an i.LINK device that supports an EIA-775A - Sony KDE-55XBR950 | Operating Instructions - Page 53
devices (devices that require only the i.LINK connection), no setup is necessary. The TV automatically recognizes the device as soon as the connection is made. Set up an i.LINK ❑ device that supports an EIA-775A analog ❑ connection Connect analog A/V cables to the VIDEO 3 input (see page 50 - Sony KDE-55XBR950 | Operating Instructions - Page 54
two or more i.LINK devices, use i.LINK cables to connect them as shown below. A B i.LINK C i.LINK D i.LINK E i.LINK You can connect up to 63 i.LINK devices. However, the maximum number of cables in any serial route is 16. A B i.LINK C i.LINK D i.LINK E i.LINK F i.LINK G i.LINK Do - Sony KDE-55XBR950 | Operating Instructions - Page 55
Sony equipment with a single remote control. In addition, the CONTROL S feature allows you to always point your remote control at your TV be hidden or out of direct line of sight. Use CONTROL S IN to send signals to the TV. Use CONTROL S OUT to send signals to connected equipment. CONTROL S IN OUT - Sony KDE-55XBR950 | Operating Instructions - Page 56
Setup Setting Up the Channel List After you finish connecting your TV, you need to run Auto Setup, which automatically set up available analog and digital channels. The Auto Program screen appears when you turn on your TV for the first time after hooking it up. If you do not want to set up - Sony KDE-55XBR950 | Operating Instructions - Page 57
use the remote control. Topic Inserting Batteries Button Descriptions Programming the Remote Control Using Other Equipment with Your Remote Control Page 55 56 58 61 Inserting Batteries 1 2 3 Use a coin to open the battery compartment, as illustrated below. Insert two size AA batteries (supplied - Sony KDE-55XBR950 | Operating Instructions - Page 58
to turn on and off Twin View. For details, see page 66. qa ANT Press to switch between the sources connected to the TV's VHF/UHF and CABLE inputs. When FUNCTION is switched on SAT/CABLE INDEX* Press to display the index of your satellite program provider. qs VOL +/- Press to adjust the volume - Sony KDE-55XBR950 | Operating Instructions - Page 59
cable box, and other audio/video equipment you have programmed into the remote control. For instructions, see "Programming the Remote Control" on page 58. POWER: Press to turn on and off the TV TV/VIDEO Press repeatedly to cycle through the video equipment connected to the TV Sony brand that you want - Sony KDE-55XBR950 | Operating Instructions - Page 60
Sony brand that you want to control with the TV's remote control, use the following procedure to program the remote control. The equipment must have infrared (IR FUNCTION repeatedly until the DVD/VCR, SAT/CABLE or i.LINK indicator lights up. 3 Press SAT/CABLE for five seconds until the indicator of - Sony KDE-55XBR950 | Operating Instructions - Page 61
901 755 758 756 757 761 759 753 757 752 755 758 754 760 AV Receiver*1 Manufacturer Code Sony 651 5.1 DVD AV System (DAV)*2 Manufacturer Code Sony 601 Cable Boxes Manufacturer Code Sony 230 Hamlin/Regal 222, 223, 224, 225, 226 Jerrold/G. I. 201, 202, 203, 204, 205, 206, 207, 208, 218 - Sony KDE-55XBR950 | Operating Instructions - Page 62
Remote Control Satellite Receivers Manufacturer Code Sony 801 Dish Network 810 Echostar 810 General Electric 802 Hitachi 805 Hughes 804 Mitsubishi 809 Panasonic 803 RCA/ 802, 808 PROSCAN Toshiba 806, 807 *1 This - Sony KDE-55XBR950 | Operating Instructions - Page 63
connected the video equipment connected to the TV's equipment video inputs. Set up the remote control to operate You must program the remote control the first non-Sony Back to previous channel Display channel number Display SAT Guide Display SAT Index Display SAT Menu Move highlight (cursor) Select - Sony KDE-55XBR950 | Operating Instructions - Page 64
Do This ... Activate the remote control to operate the DVD Turn on/off Press FUNCTION repeatedly until the DVD/VCR indicator lights up. SAT/CABLE Play Stop x Pause X Step through different tracks of the disc M to step forward or m to step backward Step through different chapters CH+ to step - Sony KDE-55XBR950 | Operating Instructions - Page 65
Using the Features Overview This chapter describes how to use the features of your TV. Topic Watching TV Using the Wide Screen Mode Using Twin View Using Favorite Channels Using the Freeze Function Using Picture Off Page 64 65 66 69 70 71 63 - Sony KDE-55XBR950 | Operating Instructions - Page 66
also select digital channels using the digital program guide. See page 73 for details. Adjust the TV's input between sources connected to the TV's VHF/UHF and CABLE inputs Press ANT to alternate between sources connected to the TV's VHF/UHF and CABLE inputs. Switch the TV's input to a connected - Sony KDE-55XBR950 | Operating Instructions - Page 67
Using the Wide Screen Mode Wide Screen mode lets you watch 4:3 normal broadcasts or other picture sizes such as Letterbox movies in several Wide Screen modes (16:9 aspect ratio). z Wide Zoom is recommended for 4:3 picture to prevent image retention. z You can also access the Wide Screen mode - Sony KDE-55XBR950 | Operating Instructions - Page 68
Affecting Twin View s If you use a cable box, you can view the cable box output in one window and view a different source (such as a VCR or DVD player) in the second window by using TV/VIDEO. For details, see "Connecting Optional Equipment" on page 32. s Digital TV channels, as well as any sources - Sony KDE-55XBR950 | Operating Instructions - Page 69
To Do This ... Tune to a channel Adjust the volume Mute the volume Switch the TV's input between sources connected to the TV's VHF/UHF and CABLE inputs Switch the TV's input between sources connected to the TV's A/V inputs Change the picture size Do This ... Press 0-9 and then ENTER (or wait - Sony KDE-55XBR950 | Operating Instructions - Page 70
picture that you want to resize. 2 Press V to enlarge the picture. 3 Press v to make the picture smaller. Features When you adjust the picture sizes, the TV memorizes the change. The next time you use the Twin View function, the memorized sizes appear. 68 - Sony KDE-55XBR950 | Operating Instructions - Page 71
Channel appears. 3 Press to select the channel you want to watch. The Favorite Channels list disappears after 90 seconds if you do not operate the TV. 69 - Sony KDE-55XBR950 | Operating Instructions - Page 72
feature to write down information such as phone numbers, recipes, etc. The TV switches to Freeze mode, and displays the "frozen" picture on the right the program information you want to capture is displayed, press FREEZE. 2 The TV switches to Twin View mode and displays the "frozen" picture on the - Sony KDE-55XBR950 | Operating Instructions - Page 73
Using Picture Off The Picture Off feature lets you enjoy music from radio programs of digital broadcasts or DVDs with the TV screen turned off. This feature turns off the display unit only. 1 Press PIC OFF. The PICTURE OFF LED lights up in blue and the screen - Sony KDE-55XBR950 | Operating Instructions - Page 74
- Sony KDE-55XBR950 | Operating Instructions - Page 75
digital program guide and menus let you review program information, select digital channels and subchannels, set up your TV's digital programming, and enable digital closed captioning. Analog channels are not available in this guide. To display the digital program guide: 1 Tune your TV to a digital - Sony KDE-55XBR950 | Operating Instructions - Page 76
to these menus and through the available options: 1 Press V v B b to navigate through the options. 2 Press to select the desired option. The Guide menu allows you to select digital channels and subchannels from a dropdown list. This list also provides information about the current program being - Sony KDE-55XBR950 | Operating Instructions - Page 77
and to modify how digital closed captioning is shown on your TV. Depending on the program, digital closed captioning will be available in . 1 Press V or v to select from the following six services. The service description, if available, applies to the currently tuned channel. Option Off Guide 75 - Sony KDE-55XBR950 | Operating Instructions - Page 78
the currently active antenna mode (Cable or VHF/UHF). This option is useful if the number of digital channels that your TV is able to receive has your TV to perform a full Auto Setup. Channel Show/Hide This option allows you to remove (hide) digital channels from the Digital Program Guide's list - Sony KDE-55XBR950 | Operating Instructions - Page 79
cameras and digital video cameras. Because it is removable, Memory Stick can also be used for external data storage. The Memory Stick Viewer on your TV allows you to view files that are stored on Memory Stick media. You can view: s Digital photos (JPEG files) s Movies (MPEG1 files) You can also - Sony KDE-55XBR950 | Operating Instructions - Page 80
Trademark Information This television is compatible with the Pro in this TV has been tested to support up to 1 GB media capacity and does not support high-speed transfer Supported File Name Extensions .jpg .jpeg .mpg .mpeg Memory Stick, Memory Stick PRO, and MagicGate are trademarks of Sony - Sony KDE-55XBR950 | Operating Instructions - Page 81
only Memory Stick media into the Memory Stick slot. Attempting to insert other objects into the slot may damage the media receiver unit of your TV. To remove the Memory Stick, see "Removing a Memory Stick" on page 81. 79 Memory Stick - Sony KDE-55XBR950 | Operating Instructions - Page 82
Inserting the Memory Stick Duo into the Memory Stick slot without the adapter may result in permanent damage to the Memory Stick Duo and the TV. 2 Insert the Memory Stick Duo and adapter as shown below. Memory Stick CAUTION: Inserting the Memory Stick adapter backwards or upside down may result in - Sony KDE-55XBR950 | Operating Instructions - Page 83
reading data from the Memory Stick.) Removing the Memory Stick while a file is being accessed (when the Memory Stick indicator on the TV's front panel is lit) may damage the Memory Stick or its contents. 2 Push the Memory Stick gently into the slot, and then release it. The - Sony KDE-55XBR950 | Operating Instructions - Page 84
Using the Memory Stick Index Turn on the TV and insert a Memory Stick that contains the photo or movie files you want to view. For how to insert a Memory Stick, see page 79. If - Sony KDE-55XBR950 | Operating Instructions - Page 85
Using the Memory Stick Index The following describes how to use the Memory Stick Index. To Do This ... Move the highlight to a photo or movie ( ) thumbnail Display the highlighted photo or movie file full screen Display the next page of thumbnails Display the previous or next page of thumbnails - Sony KDE-55XBR950 | Operating Instructions - Page 86
display motion in full screen. This is a result of the way digital video cameras record still images, and is not a result of a malfunction with the TV. Photo Controls z When the menu is hidden, press B or b to go to the previous or next photo. To Do This ... Display the next or previous - Sony KDE-55XBR950 | Operating Instructions - Page 87
Photo Menu Bar Options z JPEG files that are protected are indicated by the Lock icon. The Photo menu bar lets you access additional photo viewing options. To access the Photo menu bar 1 Press B or b to select Slide Show, View, or File. 2 Use V v B b to select the desired option. Option Index - Sony KDE-55XBR950 | Operating Instructions - Page 88
Using Zoom and Pan To Zoom and Pan a photo 1 In the Photo menu bar, press B or b to highlight View. 2 Press V or v to highlight Zoom/Pan and press . 3 Specify the zoom center point by using V v B b; then press the center. The Zoom and Pan controls are displayed. to set Indicates Zoom increment - Sony KDE-55XBR950 | Operating Instructions - Page 89
menu EXIT to exit Movie Controls z The quality of the movie when enlarged depends on the resolution of the MPEG1 file. See your camera's instruction manuals for details. To Do This ... Do This ... Enlarge the movie window Press V or v to highlight Enlarge, and then press . To display the movie - Sony KDE-55XBR950 | Operating Instructions - Page 90
Movie Menu Bar Options To access the Movie menu bar 1 Use V or v to highlight Index in the Movie menu bar. 2 Press B or b to select Index, Slide Show, or File. 3 Press V or v to select the desired option. z MPEG1 files that are protected are indicated by the Lock icon. Option Index Slide Show - Sony KDE-55XBR950 | Operating Instructions - Page 91
. Play All Plays all MP3 files on the Memory Stick. The Piano MP3 file is not played. Piano Plays the MP3 file stored in the TV's internal memory. This file is indicated by a different color than the MP3 files on the Memory Stick. (List of MP3 Files) Displays a list of all - Sony KDE-55XBR950 | Operating Instructions - Page 92
Selects all folders within the directories defined by the DCF rules used by Sony digital cameras (see page 91). JPEG and MPEG1 files in those directories are in alphabetical order by filename. Allows you to selectively display specific file types within the selected folder. Show All Displays - Sony KDE-55XBR950 | Operating Instructions - Page 93
might want to have your digital camera's instruction manual handy in order to check how files and directories are organized for your specific model of digital camera. DCF stands for "Design Rules for Camera File Systems," which are specifications established by the Japan Electronics and Information - Sony KDE-55XBR950 | Operating Instructions - Page 94
Memory Stick Precautions When using Memory Stick media, follow these precautions: s To avoid permanent damage to still image data, do not turn off the TV or remove Memory Stick media from the insertion slot while data is being read (as indicated by the Memory Stick indicator light being on). s - Sony KDE-55XBR950 | Operating Instructions - Page 95
Using i.LINK About i.LINK This TV is equipped with i.LINK, which provides a secure digital transfer of copyright-protected digital content between these devices and your digital television. i.LINK is a trademark of Sony Corporation and used only to designate that a product contains an IEEE - Sony KDE-55XBR950 | Operating Instructions - Page 96
via the i.LINK Device List. 1 Connect the i.LINK device that you wish to operate. For instructions on connecting i.LINK devices, see page 50. 2 quit The TV shown as DTV, along with all devices connected by i.LINK to the TV, appear on the Device List. Devices that are not supported by the TV appear - Sony KDE-55XBR950 | Operating Instructions - Page 97
the selected i.LINK device. 1 If the i.LINK Control Panel is not already displayed, press i.LINK on the remote control. If i.LINK is pressed while the TV is displaying an analog or digital channel (not the i.LINK device), then the Device List will appear. Select the desired device from the list and - Sony KDE-55XBR950 | Operating Instructions - Page 98
functions of the selected i.LINK device by using the equivalent buttons on the TV's remote control. To program the remote control to operate i.LINK devices, see directly through the i.LINK Control Panel. s Not all functions are supported for all i.LINK devices. s When operating the i.LINK device by - Sony KDE-55XBR950 | Operating Instructions - Page 99
setup options, some of which are also available through the Digital Program Guide (described on page 73). to move to select EXIT to quit To box must be EIA-775A compliant and must be connected to the TV's VIDEO 3 input. To associate the device with the TV's analog VIDEO 3 input, press V or v - Sony KDE-55XBR950 | Operating Instructions - Page 100
- Sony KDE-55XBR950 | Operating Instructions - Page 101
of the sound, or listening to second audio programming (SAP) on your TV. Allows you to make Wide Screen mode adjustments and 105 make changes to the more. Lets you control the viewing of programs based on their 109 ratings. Provides options for setting up your system, including 112 setting the - Sony KDE-55XBR950 | Operating Instructions - Page 102
remote control. z You can alter the Mode options (Vivid, Standard, Pro) for each video input (including the TV antenna input). z You can alter the Video menu settings (Picture, Brightness, Color, etc.) for each Mode. z the white colors a neutral tint. Select to give the white colors a red tint. 100 - Sony KDE-55XBR950 | Operating Instructions - Page 103
available when watching 480p, 720p, and 1080i sources. Option NR Noise Reduction Mild Mode Advanced Video Description Select to reduce the noise level of connected equipment. It is also effective on the signal from the VHF/UHF jack. Select from High, Medium, Low, Off. On Select for a natural - Sony KDE-55XBR950 | Operating Instructions - Page 104
you can create one Custom setting to optimize your cable input's picture, and create another to optimize your DVD especially effective for watching a DVD or digital TV picture. Select from High, Medium, Low and Off. Color Corrector Select to emphasize the red and blue colors. Select On or Off. - Sony KDE-55XBR950 | Operating Instructions - Page 105
for stereo reception when viewing a program broadcast in stereo. Auto SAP Select to automatically switch the TV to second audio programs when a signal is received. If no SAP signal is present, the TV remains in Stereo mode. Mono Select for mono reception. Use to reduce noise during weak stereo - Sony KDE-55XBR950 | Operating Instructions - Page 106
speakers are turned off, but the audio output from your audio system can still be controlled by the TV's remote control. Fixed The TV's speakers are turned off and the audio output of the TV is fixed. Use your audio receiver's remote control to adjust the volume (and other audio settings) through - Sony KDE-55XBR950 | Operating Instructions - Page 107
Menus Using the Screen Menu To select the Screen menu 1 Press MENU. 2 Press B or b to move to the Screen icon and press . 3 Press V or v to move to an option. Press to select an option. 4 Press B b V v to change settings. Press to select the changed setting. 5 Press MENU to exit the menu. - Sony KDE-55XBR950 | Operating Instructions - Page 108
Menus z If 4:3 Default is set to anything but Off, the Wide Mode setting changes only for the current channel. When you change channels (or inputs), Wide Mode is automatically replaced with the 4:3 Default setting. To retain the current Wide Mode setting as channels and inputs are changed, set 4:3 - Sony KDE-55XBR950 | Operating Instructions - Page 109
see "Using Favorite Channels" on page 69. Channel Fix Off Useful when you 2-6 have a cable box or a satellite receiver connected Turns off Channel Fix. "Fix" your TV's channel setting to 2-6 and use the cable box or the satellite receiver to change channels. Select one of these settings if you - Sony KDE-55XBR950 | Operating Instructions - Page 110
Option Channel Label Description Allows you to assign labels (such as station call letters) to channel numbers. You can label up to 40 channels. 1 Press V v B b to highlight Channel and press . 2 Press V v to scroll through the channel numbers (1-125). Then press to select the channel number that - Sony KDE-55XBR950 | Operating Instructions - Page 111
permitted are: s US: TV-Y, TV-G, G s Canada: C, G, TV-Y Youth Maximum ratings permitted are: s US: TV-PG, PG s Canada: C8+, PG, 8 ans+, TV-PG Y. Adult Maximum ratings permitted are: s US: TV-14, PG-13 s Canada: 14+, 13 ans+, TV-14 Custom Select to set ratings manually. s US: See page 110 - Sony KDE-55XBR950 | Operating Instructions - Page 112
capability, set the Age-Based Ratings. z If you block unrated TV programs, be aware that the following types of programs may be blocked: programs broadcast from another country, emergency broadcasts, political programs, sports, news, public service announcements, religious programs and weather - Sony KDE-55XBR950 | Operating Instructions - Page 113
the following options. For US models, see page 110. Option English Rating French Rating U.S.A. Rating Description C All children. C8+ Children 8 years and older. G the Parental Lock settings, turn off the TV. When the TV is turned on again, your Parental Lock settings are reactivated. 111 - Sony KDE-55XBR950 | Operating Instructions - Page 114
(if available). For closed captioning, set to CC1. Info Displays the program name and the time remaining in the program (if the broadcaster offers this service). Displays when the channel is changed or DISPLAY is pressed. 112 - Sony KDE-55XBR950 | Operating Instructions - Page 115
z The Skip label is useful for the inputs to which any equipment is connected. z The Game Picture is useful if the TV is connected to game equipment. Option Video Label Description Allows you to identify A/V equipment you connected to the TV, such as a VCR, DVD, etc. For example, if you have a DVD - Sony KDE-55XBR950 | Operating Instructions - Page 116
remain on before shutting off automatically. Timer 1 Timer 2 You can use the Timers to program the TV to turn on and off and tune to a specific channel at two scheduled viewing times. Timer 1 and Timer 2 are not available to be set until you set the Current Time. 1 Press V or v to highlight - Sony KDE-55XBR950 | Operating Instructions - Page 117
Sony logo and input indicator when you switch the power to on or off. On Allows the i.LINK signal to pass through to connected i.LINK devices even when the TV is turned off. The front panel i.LINK STANDBY LED lights in red. The TV requires more - Sony KDE-55XBR950 | Operating Instructions - Page 118
- Sony KDE-55XBR950 | Operating Instructions - Page 119
Other Information Overview This chapter includes the following topics: Topic Glossary Contacting Sony Troubleshooting Specifications Optional Accessories Index Page 118 119 119 125 127 129 117 - Sony KDE-55XBR950 | Operating Instructions - Page 120
, Washington, DC, that establishes television standards in the United States, such as NTSC Color, the standard used in this TV. Radio Frequency. That part of the frequency spectrum that is used to transmit TV and radio signals. S VIDEO requires a single cable, which carries the brightness (luminance - Sony KDE-55XBR950 | Operating Instructions - Page 121
these operating instructions, you have additional questions related to the use of your Sony television, please call our Customer Information Services Center at 1-800-222-SONY (7669) (US residents only) or 1-877-899-SONY (7669) (Canadian residents only). Troubleshooting Twin View Problem Possible - Sony KDE-55XBR950 | Operating Instructions - Page 122
SAT or CABLE mode. s Make sure the TV's AC power cord is connected securely to the wall outlet. s Locate the TV at least Sony equipment cannot be operated by your Sony operate Sony video equipment TV remote control. You may need to use the equipment's original remote control. Memory Stick Problem - Sony KDE-55XBR950 | Operating Instructions - Page 123
Problem the menu again. Cannot hear audio while using Memory Stick s Check the TV's volume or Speaker (page 104) settings. s To hear JPEG voice memo resolution of the MPEG1 enlarged (page 87) file. See your camera's instruction manual for details. MP3 files on the Memory Stick s are not listed - Sony KDE-55XBR950 | Operating Instructions - Page 124
Only snow and noise appear on s Check the antenna/cable connections. the screen s Try another channel; it could be station trouble. s Press ANT to change the input mode (see page 56). Dotted lines or stripes s Adjust the antenna. s Move the TV away from noise sources such as cars, neon signs - Sony KDE-55XBR950 | Operating Instructions - Page 125
s (For KDE55XBR950 and KDE61XBR950 only) Make sure the EXT SP switch at the rear of the display unit is set to OFF. s Communication problems may occur cable box using the cable box's remote control. Then press FUNCTION repeatedly until the TV indicator lights up and adjust the TV's volume. s The TV's - Sony KDE-55XBR950 | Operating Instructions - Page 126
Problem 18) lights up when the TV is turned on. If the LED blinks continuously, this may indicate the TV needs a service. s The TIMER LED (see Sony personnel. The signal from a selected i.LINK device is not being displayed s If you have several i.LINK devices connected and operating at once, the TV - Sony KDE-55XBR950 | Operating Instructions - Page 127
Specifications Panel System Display resolution Antenna Television System Channel Coverage Power Requirements Inputs/Outputs DVI-HDTV Video (IN ) More than 408 mVrms (Fixed) Impedance (output): 2 kilohms Phono jack 42 inches 50 inches 55 inches 61 inches 1352 × 720 × 102 mm (53 1/4 × 28 3/8 × 4 1/8 in - Sony KDE-55XBR950 | Operating Instructions - Page 128
AC plug holder (1) Display interface cable (1) Antenna cable (1) Cleaning cloth (1) Operating Instructions (1) Warranty Card (1) RM-Y1000 Frame bars (2) (KDE55XBR950 and KDE61XBR950 only) Screws (4) (KDE55XBR950 and KDE61XBR950 only) Design and specifications are subject to change without notice - Sony KDE-55XBR950 | Operating Instructions - Page 129
s DVI cable s Component video cable s S VIDEO cable s A/V cable s Audio cable s Optical cable s Control S cable: RK-G69 s i.LINK cables: VMC-IL4415 (4-pin to 4-pin, 1.5 meters) VMC-IL4435 (4-pin to 4-pin, 3.5 meters) s Display interface cable: VMC-P10 (10 meters) s Table top stand: SU-P42T2 - Sony KDE-55XBR950 | Operating Instructions - Page 130
- Sony KDE-55XBR950 | Operating Instructions - Page 131
55 bilingual audio 103 Black Corrector 102 blocking programs. See ratings. brightness, adjusting 100 C cable with VCR, connecting 33 cable box connecting 15, 22 DISPLAY button 64 DISPLAY SIGNAL OUT, described 22 Display unit connecting 23 controls 18 DRC Function 101 DRC Mode 101 DRC Palette 102 DRC - Sony KDE-55XBR950 | Operating Instructions - Page 132
Picture 113 Gamma Corrector 102 GUIDE button 56, 73 Guide menu 74 H HD/DVD control 62 Media receiver unit connecting 24 front panel 20 rear 86 slideshow options 89 troubleshooting 120 viewing photos 84 STAND BY indicator 18 POWER/STANDBY indicator 20 powering on/off, the TV 20 Pro (Video) mode 100 - Sony KDE-55XBR950 | Operating Instructions - Page 133
problems, troubleshooting 119-124 Program Guide 73 Program Options menu 75 progressive 118 R ratings, setting 109-111 ratings, viewing blocked programs 110, 111 Record buttons 57 remote control inserting batteries 55 programming 58 removing, Favorite Channels 69 RESET button 57 resetting Audio - Sony KDE-55XBR950 | Operating Instructions - Page 134
- Sony KDE-55XBR950 | Operating Instructions - Page 135
-
 1
1 -
 2
2 -
 3
3 -
 4
4 -
 5
5 -
 6
6 -
 7
7 -
8
-
9
-
10
-
11
-
12
-
13
-
14
-
15
-
16
-
17
-
18
-
19
-
20
-
21
-
22
-
23
-
24
-
25
-
26
-
27
-
28
-
29
-
30
-
31
-
32
-
33
-
34
-
35
-
36
-
37
-
38
-
39
-
40
-
41
-
42
-
43
-
44
-
45
-
46
-
47
-
48
-
49
-
50
-
51
-
52
-
53
-
54
-
55
-
56
-
57
-
58
-
59
-
60
-
61
-
62
-
63
-
64
-
65
-
66
-
67
-
68
-
69
-
70
-
71
-
72
-
73
-
74
-
75
-
76
-
77
-
78
-
79
-
80
-
81
-
82
-
83
-
84
-
85
-
86
-
87
-
88
-
89
-
90
-
91
-
92
-
93
-
94
-
95
-
96
-
97
-
98
-
99
-
100
-
101
-
102
-
103
-
104
-
105
-
106
-
107
-
108
-
109
-
110
-
111
-
112
-
113
-
114
-
115
-
116
-
117
-
118
-
119
-
120
-
121
-
122
-
123
-
124
-
125
-
126
-
127
-
128
-
129
-
130
-
131
-
132
-
133
-
134
-
135
 |
 |

2003 Sony Corporation
KDE42XBR950
KDE50XBR950
KDE55XBR950
KDE61XBR950
Flat Panel Color TV
Operating Instructions
4-098-430-
15
(3)
Flat Panel Color TV
KDE42XBR950/KDE50XBR950/KDE55XBR950/KDE61XBR950
Printed in Japan
Printed on 100% recycled paper.