Sony KDF-70XBR950 Operating Instructions - Page 45
Setting Up the LCD Projection TV Automatically, Using Auto Setup
 |
UPC - 027242633179
View all Sony KDF-70XBR950 manuals
Add to My Manuals
Save this manual to your list of manuals |
Page 45 highlights
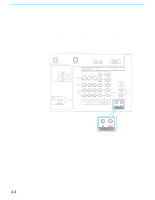
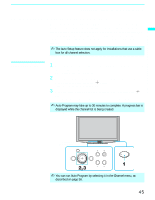
Installing and Connecting the LCD Projection TV Installing and Connecting the LCD Projection TV Setting Up the LCD Projection TV Automatically After you finish connecting your LCD projection TV, you need to run Auto Setup to set up available analog and digital channels. The Auto Program screen appears when you turn your LCD projection TV on for the first time after installing it. If you do not want to set up the channels at this time, you can do it later by using the Auto Program feature in the Channel menu (see page 96). ✍ The Auto Setup feature does not apply for installations that use a cable box for all channel selection. Using Auto Setup 1 Press POWER on the front panel of your LCD projection TV to turn on the LCD projection TV. The Initial Setup screen appears. 2 Move the arrow button up or down to select the desired on-screen display language, and press the button. "Start auto program now?" appears. 3 Move the arrow button up or down to select "Yes," and press the button. Auto Program automatically creates a list of receivable channels. ✍ Auto Program may take up to 30 minutes to complete. A progress bar is displayed while the channel list is being created. LCD projection TV front panel i.LINK i-LINK S VIDEO VIDEO 2 IN VIDEO L-AUDIO-R MENU VOL CH TV/VIDEO MENU VOL CH TV/VIDEO POWER ✍ You can run Auto Program by selecting it in the Channel menu, as described on page 96. 45
-
 1
1 -
2
-
3
-
4
-
5
-
6
-
7
-
8
-
9
-
10
-
11
-
12
-
13
-
14
-
15
-
16
-
17
-
18
-
19
-
20
-
21
-
22
-
23
-
24
-
25
-
26
-
27
-
28
-
29
-
30
-
31
-
32
-
33
-
34
-
35
-
36
-
37
-
38
-
39
-
 40
40 -
 41
41 -
 42
42 -
 43
43 -
 44
44 -
 45
45 -
 46
46 -
 47
47 -
 48
48 -
 49
49 -
 50
50 -
51
-
52
-
53
-
54
-
55
-
56
-
57
-
58
-
59
-
60
-
61
-
62
-
63
-
64
-
65
-
66
-
67
-
68
-
69
-
70
-
71
-
72
-
73
-
74
-
75
-
76
-
77
-
78
-
79
-
80
-
81
-
82
-
83
-
84
-
85
-
86
-
87
-
88
-
89
-
90
-
91
-
92
-
93
-
94
-
95
-
96
-
97
-
98
-
99
-
100
-
101
-
102
-
103
-
104
-
105
-
106
-
107
-
108
-
109
-
110
-
111
-
112
-
113
-
114
-
115
-
116
-
117
-
118
-
119
-
120
 |
 |
