Sony KDL-26ML130 Instructions (SU-WL100 Wall-mount Bracket) - Page 8
Step 5:Preparing for the installation of the TV, Remove the screws from the rear - lcd tv
 |
View all Sony KDL-26ML130 manuals
Add to My Manuals
Save this manual to your list of manuals |
Page 8 highlights
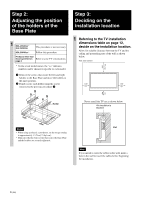
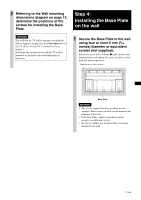
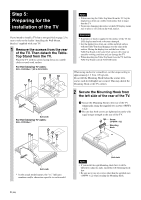
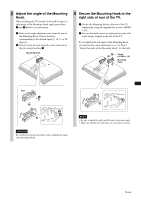
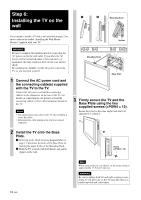
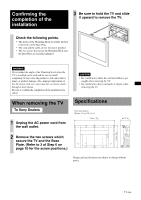
Step 5: Preparing for the installation of the TV Notes • When removing the Table-Top Stand from the TV, lay the display face down on a stable work surface that is larger than the TV. • To prevent damaging the surface of the LCD display, make sure to place a soft cloth on the work surface. If you intend to install a TV that is not specified on page 2, be sure to refer to the leaflet "Installing the Wall-Mount Bracket" supplied with your TV. 1 Remove the screws from the rear of the TV. Then detach the TableTop Stand from the TV. Place the TV with its screen facing down on a stable cloth-covered work surface. For the following TV users: KDL-26S30xx */KLV-26V300A CAUTION • If pressure or shock is applied to the surface of the TV, the LCD display may break or become damaged. • Lay the display face down on a stable and level surface with the Table-Top Stand hanging over the edge of the surface. Having the display face and the base of the Table-Top Stand on the same level surface will create an unstable working condition and can damage the TV. • When detaching the Table-Top Stand from the TV, hold the Table-Top Stand securely with both hands. When using an electric screwdriver, set the torque setting to approximately 1.5 N·m {15 kgf·cm}. Do not lift the Mounting Hook before the screws (two screws each for left/right) are secured. This may distort the Mounting Hook or the TV cabinet. 2 Secure the Mounting Hook from the left side of the rear of the TV. Soft cloth For the following TV users: KDL-20S30xx * 1 Secure the Mounting Hook to the rear of the TV temporarily, using the supplied two screws (+PSW4 × 12). 2 Be sure that both screws are tightened securely with equal torque strength to the rear of the TV. Screw (+PSW4 × 12) Mounting Hook Soft cloth * In the actual model names, the "xx" indicates numbers and/or characters specific to each model. Soft cloth Notes • If you install the right Mounting Hook first, it will be difficult to adjust its angle. Install the left Mounting Hook first. • Be sure not to use any screws other than the supplied ones (+PSW4 × 12) when securing the Mounting Hook. 8 (GB)
-
 1
1 -
2
-
 3
3 -
 4
4 -
 5
5 -
 6
6 -
 7
7 -
 8
8 -
 9
9 -
 10
10 -
 11
11 -
 12
12 -
 13
13 -
14
-
15
-
16
-
17
-
18
-
19
-
20
-
21
-
22
-
23
-
24
-
25
-
26
-
27
-
28
-
29
-
30
-
31
-
32
-
33
-
34
-
35
-
36
-
37
-
38
-
39
-
40
-
41
-
42
-
43
-
44
-
45
-
46
-
47
-
48
-
49
-
50
-
51
-
52
-
53
-
54
-
55
-
56
-
57
-
58
-
59
-
60
-
61
-
62
-
63
-
64
-
65
-
66
-
67
-
68
-
69
-
70
-
71
-
72
-
73
-
74
-
75
-
76
-
77
-
78
-
79
-
80
-
81
-
82
-
83
-
84
-
85
-
86
-
87
-
88
-
89
-
90
-
91
-
92
-
93
-
94
-
95
-
96
-
97
-
98
-
99
-
100
-
101
-
102
-
103
-
104
-
105
-
106
-
107
-
108
-
109
-
110
-
111
-
112
 |
 |
