Sony KDL-52WL130W Operating Instructions - Page 38
Video Options Settings
 |
View all Sony KDL-52WL130W manuals
Add to My Manuals
Save this manual to your list of manuals |
Page 38 highlights
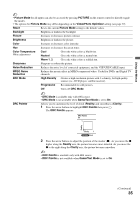
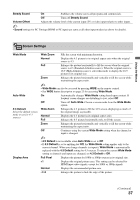
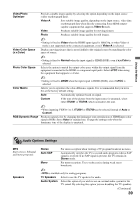
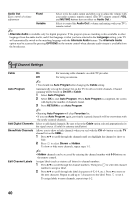
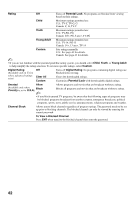
Screen Position Vertical Size Adjust the Vertical positioning by pressing V/v. Press B/b to adjust the Horizontal positioning. ~ • The Screen Position feature is useful if the TV is connected to game equipment. Adjusts the vertical size of the picture. Press B/b and press to adjust. ~ • Vertical Size is available only when Wide Mode is set to Wide Zoom or Zoom. Screen settings for PC Timings (HDMI or PC input) differ from all other input modes and are shown below. Auto Adjust Reset Phase Pitch H Center V Center Wide Mode Select Yes to start the auto adjust to display the PC input. Resets the current screen setting to the default values. Adjust after Pitch to fine tune overall sharpness. Adjust uneven sharpness on screen. ~ • For the PC input Signal Reference Chart, see page 16. Allows you to move the position of the picture horizontally (left and right). To Adjust the H Center Press V/v to highlight H Center and press . Press B/b to correct the centering then press . Allows you to move the position of the picture vertically (up and down). To Adjust the V Center Press V/v to highlight V Center and press . Press B/b to correct the centering then press . Normal Displays the picture in its original resolution and aspect ratio. Full 1 Enlarges the picture to fill the screen, while maintaining its original aspect ratio. Full 2 Enlarges the picture to fill the screen. ~ • Wide Mode can also be accessed by pressing WIDE on the remote control. • See WIDE button description on page 23 for accessing Wide Mode. Video Options Settings CineMotion Game/Text Mode Select Auto to automatically detect film content and apply a reverse 3-2 pulldown process. Moving pictures will appear cleaner and more natural looking. Select Off to disable the detection. Provides the optimum screen for viewing images with fine lines and characters that are input from video game equipment and PCs. Set to On for the sharp display of fine lines or characters. 38
-
 1
1 -
2
-
3
-
4
-
5
-
6
-
7
-
8
-
9
-
10
-
11
-
12
-
13
-
14
-
15
-
16
-
17
-
18
-
19
-
20
-
21
-
22
-
23
-
24
-
25
-
26
-
27
-
28
-
29
-
30
-
31
-
32
-
 33
33 -
 34
34 -
 35
35 -
 36
36 -
 37
37 -
 38
38 -
 39
39 -
 40
40 -
 41
41 -
 42
42 -
 43
43 -
44
-
45
-
46
-
47
-
48
-
49
-
50
-
51
-
52
-
53
-
54
-
55
-
56
 |
 |