Sony KDL-V40XBR1 Operating Instructions - Page 16
Side Panel, Left side, Right side - tv
 |
UPC - 027242677272
View all Sony KDL-V40XBR1 manuals
Add to My Manuals
Save this manual to your list of manuals |
Page 16 highlights
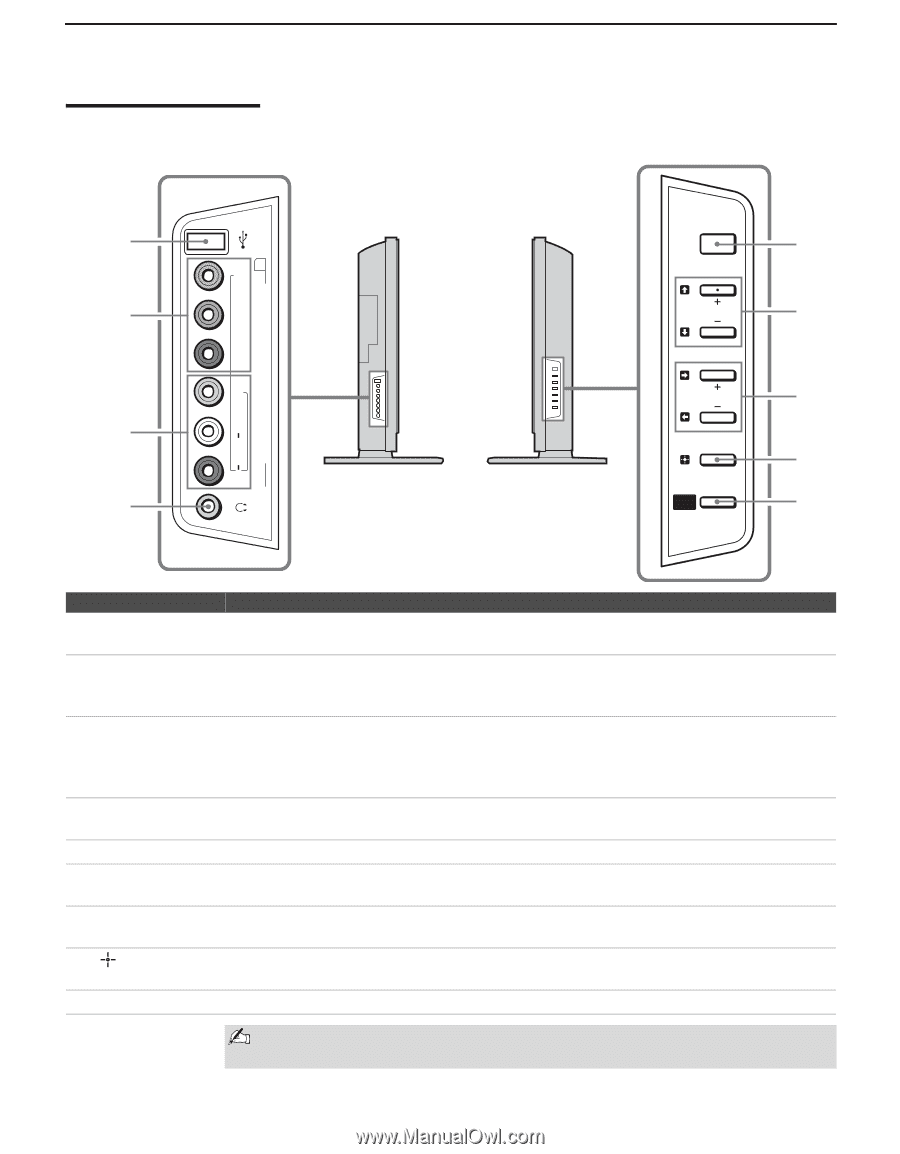
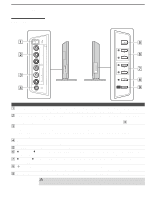
Introducing the TV Side Panel Left side 1 2 3 4 R AUDIO L(MONO)VIDEO PR/CR PB/CB Y (1080i/720p/480p/480i) VIDEO/HD/DVD IN 2 Right side POWER CHANNEL 5 6 VOLUME TV/VIDEO WEGA GATE 7 8 9 Item Description 1 USB jack Connects to the USB port on your USB device. Provides a secure digital connection between your TV and USB device, such as digital video camcorders and digital cameras. 2 VIDEO/HD/DVD Connect to your component video (YPBPR) and audio (L/R) output jacks of your DVD player 2 IN or digital TV receiver. Y PB/CB PR/CR Component video provides better picture quality than the composite video (3) connection. 3 VIDEO/HD/DVD Connect to the composite video and audio output jacks on your camcorder or other video 2 IN equipment. When Auto is selected for the Video 2 (Component) option in the Setup VIDEO/(MONO) settings, the component video function will be preferentially activated (see page 86). L-AUDIO-R 4 Headphones jack Connects to your headphones. If your headphones do not match the jack, use a suitable plug adaptor (not supplied). 5 POWER Press to turn on and off the TV. 6V v Press to scan through channels. To scan quickly through channels, press and hold down either + CHANNEL - + or -. On the WEGA GATE screen, these buttons serve as up/down buttons. 7b B Press to adjust the volume. On the WEGA GATE screen, these buttons serve as right/left + VOLUME - buttons. 8 /TV/VIDEO Press to confirm the selection or setting in WEGA GATE. Press repeatedly to cycle through the video equipment connected to the TV's video inputs. 9 WEGA GATE Press to display WEGA GATE. Press again to exit WEGA GATE. The CHANNEL + button has a tactile dot. Use the tactile dot as a reference when operating the TV. 16
-
 1
1 -
2
-
3
-
4
-
5
-
6
-
7
-
8
-
9
-
10
-
 11
11 -
 12
12 -
 13
13 -
 14
14 -
 15
15 -
 16
16 -
 17
17 -
 18
18 -
 19
19 -
 20
20 -
 21
21 -
22
-
23
-
24
-
25
-
26
-
27
-
28
-
29
-
30
-
31
-
32
-
33
-
34
-
35
-
36
-
37
-
38
-
39
-
40
-
41
-
42
-
43
-
44
-
45
-
46
-
47
-
48
-
49
-
50
-
51
-
52
-
53
-
54
-
55
-
56
-
57
-
58
-
59
-
60
-
61
-
62
-
63
-
64
-
65
-
66
-
67
-
68
-
69
-
70
-
71
-
72
-
73
-
74
-
75
-
76
-
77
-
78
-
79
-
80
-
81
-
82
-
83
-
84
-
85
-
86
-
87
-
88
-
89
-
90
-
91
-
92
-
93
-
94
-
95
-
96
-
97
-
98
-
99
-
100
-
101
-
102
-
103
-
104
 |
 |