Sony KE-37XS910 Instructions - Page 34
Install the Display Unit on the Plate Unit., Installez l, cran sur la plaque.
 |
View all Sony KE-37XS910 manuals
Add to My Manuals
Save this manual to your list of manuals |
Page 34 highlights
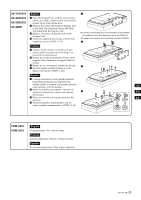
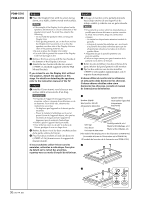
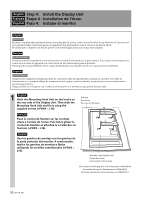
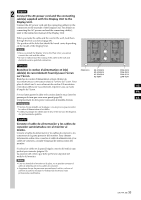
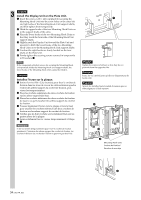
3 English Install the Display Unit on the Plate Unit. 1 Insert the screws (+B6 × L20, supplied) for securing the Mounting Hook Unit into the screw holes on the outer left and right sides of the Mounting Hook Unit support shafts, and then tighten them temporarily. 2 Hitch the upper hooks of the two Mounting Hook Units on to the support shafts of the arms. 3 Place the lower hooks of the two Mounting Hook Units so that they touch the front side of the Mounting Hook Unit support shafts. 4 Slightly push the Display Unit toward the Plate Unit and upward, to hitch the lower hooks of the two Mounting Hook Units on to the Mounting Hook Unit support shafts. 5 Confirm the eight hooks are firmly hooked on the four shafts on the Plate Unit. 6 Firmly tighten the securing screws screwed in temporarily in Procedure 1. Note If the temporarily attached screws for securing the Mounting Hook Unit protrude inside the Mounting Hook Unit support shafts, the lower hooks of the Mounting Hook Units cannot be fitted in. Français Installez l'écran sur la plaque. 1 Insérez les vis (+B6 × L20, fournies) pour fixer le crochet de fixation dans les trous de vis sur les côtés extérieurs gauche et droit des arbres-support du crochet de fixation, puis vissez-les temporairement. 2 Fixez les crochets supérieurs des deux crochets de fixation sur les arbres-support des bras. 3 Placez les crochets inférieurs des deux crochets de fixation de façon à ce qu'ils touchent les arbres-support du crochet de fixation. 4 Poussez légèrement l'écran vers la plaque et vers le haut pour attacher les crochets inférieurs des deux crochets de fixation sur les arbres-support du crochet de fixation. 5 Vérifiez que les huit crochets sont solidement fixés sur les quatre arbres de la plaque. 6 Serrez solidement les vis vissées temporairement à l'étape 1. Remarque Si les vis serrées temporairement pour fixer le crochet de fixation pénètrent à l'intérieur des arbres-support du crochet de fixation, les crochets inférieurs du crochet de fixation ne peuvent pas être fixés. 1 English Tighten the screws to halfway so that they do not protrude from the opposite side. Français Serrez les vis à moitié pour qu'elles ne dépassent pas de l'autre côté. Español Apriete los tornillos hasta la mitad de manera que no sobresalgan por el lado opuesto. 2 4 3 Mounting Hook Unit/ Crochet de fixation/ Ganchos de montaje 6 34 (US, FR, ES)
-
 1
1 -
2
-
3
-
4
-
5
-
6
-
7
-
8
-
9
-
10
-
11
-
12
-
13
-
14
-
15
-
16
-
17
-
18
-
19
-
20
-
21
-
22
-
23
-
24
-
25
-
26
-
27
-
28
-
 29
29 -
 30
30 -
 31
31 -
 32
32 -
 33
33 -
 34
34 -
 35
35 -
 36
36 -
 37
37 -
 38
38 -
 39
39 -
40
-
41
-
42
-
43
-
44
 |
 |
