Sony MHC-RXD5 Operating Instructions - Page 12
Recording a CD
 |
View all Sony MHC-RXD5 manuals
Add to My Manuals
Save this manual to your list of manuals |
Page 12 highlights
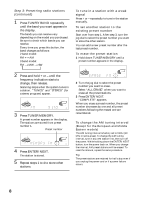
Recording a CD - CD Synchro Recording The CD SYNC button lets you record from a CD to a tape easily. You can use TYPE I (normal) or TYPE II (CrO2) tapes. The recording level is adjusted automatically. (Power) DOLBY NR DISC SKIP/ EX-CHANGE CD (P 2 6 6 2 Press § and place a CD. Then press again to close the disc tray. If the indicator for the tray you want to record is not lit green, press DISC SKIP/ EX-CHANGE repeatedly so that it lights green. With the label side up. When you play a CD single, place it on the inner circle of the tray. 3 Press CD SYNC. Deck B stands by for recording and the CD player stands by for playback. The indicator on TAPE B ( (for front side) lights up. 4 Press DIRECTION repeatedly to select A to record on one side. Select ß (or RELAY) to record on both sides. 5 Press REC PAUSE/START. Recording starts. 4 p 5 31 1 Press 6 and insert a blank tape into deck B. With the side you want to record facing ~6 forward To stop recording Press p. Tips • If you want to record from the reverse side, press TAPE B 9 to light its indicator after pressing CD SYNC. • When you record on both sides, be sure to start from the front side. If you start from the reverse side, recording stops at the end of the reverse side. • When you want to reduce the hiss noise in lowlevel high-frequency signals, press DOLBY NR so that "DOLBY NR" appears after pressing CD SYNC. Note You cannot listen to other sources while recording. 12
-
 1
1 -
2
-
3
-
4
-
5
-
6
-
 7
7 -
 8
8 -
 9
9 -
 10
10 -
 11
11 -
 12
12 -
 13
13 -
 14
14 -
 15
15 -
 16
16 -
 17
17 -
18
-
19
-
20
-
21
-
22
-
23
-
24
-
25
-
26
-
27
-
28
-
29
-
30
-
31
-
32
-
33
-
34
-
35
-
36
-
37
-
38
-
39
-
40
-
41
-
42
-
43
-
44
-
45
-
46
-
47
-
48
 |
 |
