Sony NEX-5RK Instruction Manual - Page 78
Connecting to a network, WPS Push
 |
View all Sony NEX-5RK manuals
Add to My Manuals
Save this manual to your list of manuals |
Page 78 highlights
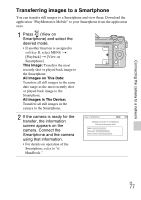
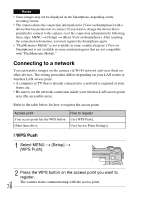
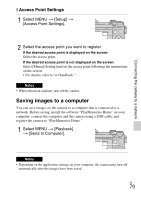
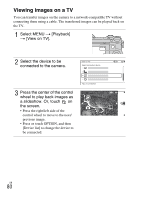
Notes • Some images may not be displayed on the Smartphone, depending on the recording format. • The camera shares the connection information for [View on Smartphone] with a device that has permission to connect. If you want to change the device that is permitted to connect to the camera, reset the connection information by following these steps. MENU t [Setup] t [Reset View on Smartphone]. After resetting the connection information, you must register the Smartphone again. • "PlayMemories Mobile" is not available in some countries/regions. [View on Smartphone] is not available in some countries/regions that are not compatible with "PlayMemories Mobile." Connecting to a network You can transfer images on the camera via Wi-Fi network and view them on other devices. The setting procedure differs depending on your LAN router or wireless LAN access point. • A computer or TV that is already connected to a network is required at your home, etc. • Be sure to set the network connection inside your wireless LAN access point area (the accessible area). Refer to the table below for how to register the access point. Access point How to register Your access point has the WPS button. Use [WPS Push]. Other than above. Use [Access Point Settings]. x WPS Push 1 Select MENU t [Setup] t [WPS Push]. 2 Press the WPS button on the access point you want to register. GB The camera starts communicating with the access point. 78
-
 1
1 -
2
-
3
-
4
-
5
-
6
-
7
-
8
-
9
-
10
-
11
-
12
-
13
-
14
-
15
-
16
-
17
-
18
-
19
-
20
-
21
-
22
-
23
-
24
-
25
-
26
-
27
-
28
-
29
-
30
-
31
-
32
-
33
-
34
-
35
-
36
-
37
-
38
-
39
-
40
-
41
-
42
-
43
-
44
-
45
-
46
-
47
-
48
-
49
-
50
-
51
-
52
-
53
-
54
-
55
-
56
-
57
-
58
-
59
-
60
-
61
-
62
-
63
-
64
-
65
-
66
-
67
-
68
-
69
-
70
-
71
-
72
-
 73
73 -
 74
74 -
 75
75 -
 76
76 -
 77
77 -
 78
78 -
 79
79 -
 80
80 -
 81
81 -
 82
82 -
 83
83 -
84
-
85
-
86
-
87
-
88
-
89
-
90
-
91
-
92
-
93
-
94
-
95
-
96
-
97
-
98
-
99
-
100
-
101
-
102
-
103
-
104
-
105
-
106
-
107
 |
 |
