Sony PCV-R553DS Reference Manual - Page 38
Removing the Front Panel
 |
View all Sony PCV-R553DS manuals
Add to My Manuals
Save this manual to your list of manuals |
Page 38 highlights
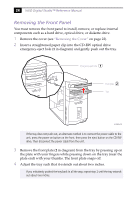
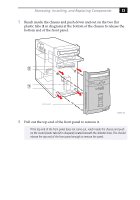
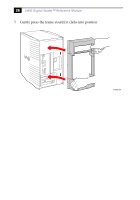
24 VAIO Digital Studio™ Reference Manual Removing the Front Panel You must remove the front panel to install, remove, or replace internal components such as a hard drive, optical drive, or diskette drive. 1 Remove the cover (see "Removing the Cover" on page 22). 2 Insert a straightened paper clip into the CD-RW optical drive emergency-eject hole (1 in diagram) and gently push out the tray. Emergency-eject hole 1 Front plate 2 Tray KY0092.VSD ✍ If the tray does not push out, an alternate method is to connect the power cable to the unit, press the power-on button on the front, then press the eject button on the CD-RW drive. Then disconnect the power cable from the unit. 3 Remove the front plate (2 in diagram) from the tray by pressing up on the plate with your fingers while pressing down on the tray (near the plate end) with your thumbs. The front plate snaps off. 4 Adjust the tray such that it extends out about two inches. ✍ If you mistakenly pushed the tray back in all the way, repeat step 2 until the tray extends out about two inches.
-
 1
1 -
2
-
3
-
4
-
5
-
6
-
7
-
8
-
9
-
10
-
11
-
12
-
13
-
14
-
15
-
16
-
17
-
18
-
19
-
20
-
21
-
22
-
23
-
24
-
25
-
26
-
27
-
28
-
29
-
30
-
31
-
32
-
 33
33 -
 34
34 -
 35
35 -
 36
36 -
 37
37 -
 38
38 -
 39
39 -
 40
40 -
 41
41 -
 42
42 -
 43
43 -
44
-
45
-
46
-
47
-
48
-
49
-
50
-
51
-
52
-
53
-
54
-
55
-
56
-
57
-
58
-
59
-
60
-
61
-
62
-
63
-
64
-
65
-
66
-
67
-
68
-
69
-
70
-
71
-
72
-
73
-
74
-
75
-
76
-
77
-
78
-
79
-
80
-
81
-
82
-
83
-
84
-
85
-
86
-
87
-
88
-
89
-
90
-
91
-
92
-
93
-
94
-
95
-
96
-
97
-
98
-
99
-
100
-
101
-
102
-
103
-
104
-
105
-
106
-
107
-
108
-
109
-
110
-
111
-
112
-
113
-
114
-
115
-
116
-
117
-
118
-
119
-
120
-
121
-
122
 |
 |
