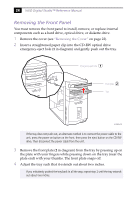
Sony PCV-R553DS Reference Manual - Page 40
Replacing the Front Panel, Replace the front plate on the optical drive tray.
 |
View all Sony PCV-R553DS manuals
Add to My Manuals
Save this manual to your list of manuals |
Page 40 highlights
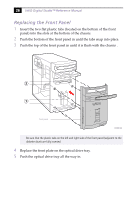
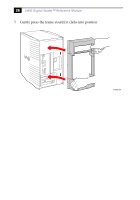
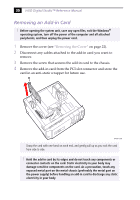
26 VAIO Digital Studio™ Reference Manual Replacing the Front Panel 1 Insert the two flat plastic tabs (located on the bottom of the front panel) into the slots at the bottom of the chassis. 2 Push the bottom of the front panel in until the tabs snap into place. 3 Push the top of the front panel in until it is flush with the chassis . 2 1 Front panel KY0093.VSD ✍ Be sure that the plastic tabs on the left and right side of the front panel (adjacent to the diskette drive) are fully inserted. 4 Replace the front plate on the optical drive tray. 5 Push the optical drive tray all the way in.
-
 1
1 -
2
-
3
-
4
-
5
-
6
-
7
-
8
-
9
-
10
-
11
-
12
-
13
-
14
-
15
-
16
-
17
-
18
-
19
-
20
-
21
-
22
-
23
-
24
-
25
-
26
-
27
-
28
-
29
-
30
-
31
-
32
-
33
-
34
-
 35
35 -
 36
36 -
 37
37 -
 38
38 -
 39
39 -
 40
40 -
 41
41 -
 42
42 -
 43
43 -
 44
44 -
 45
45 -
46
-
47
-
48
-
49
-
50
-
51
-
52
-
53
-
54
-
55
-
56
-
57
-
58
-
59
-
60
-
61
-
62
-
63
-
64
-
65
-
66
-
67
-
68
-
69
-
70
-
71
-
72
-
73
-
74
-
75
-
76
-
77
-
78
-
79
-
80
-
81
-
82
-
83
-
84
-
85
-
86
-
87
-
88
-
89
-
90
-
91
-
92
-
93
-
94
-
95
-
96
-
97
-
98
-
99
-
100
-
101
-
102
-
103
-
104
-
105
-
106
-
107
-
108
-
109
-
110
-
111
-
112
-
113
-
114
-
115
-
116
-
117
-
118
-
119
-
120
-
121
-
122
 |
 |

VAIO Digital Studio
™
Reference Manual
26
Replacing the Front Panel
1
Insert the two flat plastic tabs (located on the bottom of the front
panel) into the slots at the bottom of the chassis.
2
Push the bottom of the front panel in until the tabs snap into place.
3
Push the top of the front panel in until it is flush with the chassis .
4
Replace the front plate on the optical drive tray.
5
Push the optical drive tray all the way in.
Be sure that the plastic tabs on the left and right side of the front panel (adjacent to the
diskette drive) are fully inserted.
KY0093.VSD
Front panel
2
1