Sony PCV-RX270DS User Guide - Page 28
Creating a Photo Album, Using Panorama Maker, Making Still Images and Panoramic from MPEG
 |
View all Sony PCV-RX270DS manuals
Add to My Manuals
Save this manual to your list of manuals |
Page 28 highlights
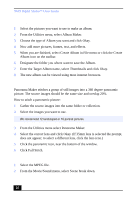
VAIO Digital Studio™ User Guide Creating a Photo Album 1 Select the pictures you want to use to make an album. 2 From the Utilities menu, select Album Maker. 3 Choose the type of Album you want and click Okay. 4 Now add more pictures, frames, text, and effects. 5 When you are finished, select Create Album in File menu or click the Create Album icon on the toolbar. 6 Designate the folder you where want to save the Album. 7 Enter the Target Album name, select Thumbnails and click Okay. 8 The new album can be viewed using most internet browsers. Using Panorama Maker Panorama Maker stitches a group of still images into a 360 degree panoramic picture. The source images should be the same size and overlap 20%. How to stitch a panoramic picture: 1 Gather the source images into the same folder or collection. 2 Select the images you want to use. ✍ We recommend 12 landscaped or 16 portrait pictures. 3 From the Utilities menu select Panorama Maker. 4 Select the correct lens and click Okay. (If 35mm lens is selected the prompt, does not appear; to select a different lens, click the lens icon.) 5 Click the panoramic icon, near the bottom of the window. 6 Click Full Stitch. Making Still Images and Panoramic from MPEG 1 Select the MPEG file. 2 From the Movie/Sound menu, select Scene break down. 28
-
 1
1 -
2
-
3
-
4
-
5
-
6
-
7
-
8
-
9
-
10
-
11
-
12
-
13
-
14
-
15
-
16
-
17
-
18
-
19
-
20
-
21
-
22
-
 23
23 -
 24
24 -
 25
25 -
 26
26 -
 27
27 -
 28
28 -
 29
29 -
 30
30 -
 31
31 -
 32
32 -
 33
33 -
34
-
35
-
36
-
37
-
38
-
39
-
40
-
41
-
42
-
43
-
44
-
45
-
46
-
47
-
48
-
49
-
50
-
51
-
52
-
53
-
54
-
55
-
56
-
57
-
58
-
59
-
60
-
61
-
62
-
63
-
64
-
65
 |
 |
