Sony RDR-GX330 Operating Instructions - Page 70
Select OK, and press ENTER., Select Start, To stop during recording
 |
UPC - 027242692510
View all Sony RDR-GX330 manuals
Add to My Manuals
Save this manual to your list of manuals |
Page 70 highlights
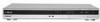
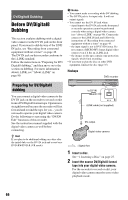
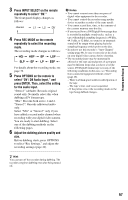
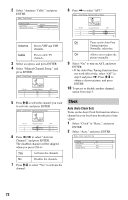
11 Select "OK," and press ENTER. The title name is fixed, and the display asks if you want to start recording. To change the dubbing mode, select "Dub Mode" and press M/m. Data capacity required for the dubbing. This is displayed in red when the size exceeds the available space on the dubbing target media. b Notes • If you set the beginning of the tape as the IN point and the end point as the OUT point, the IN and OUT points may move slightly during dubbing. • You cannot set a scene to be shorter than one second. 12 Select "Start," and press ENTER. The recorder starts recording the tape contents as programmed. To stop during recording Press x REC STOP. Note that it may take a few seconds for the recorder to stop recording. To automatically adjust the dubbing mode If there is not enough available space on the target disc, the recorder automatically selects a dubbing mode with lower picture quality according to the available space. The same dubbing mode is set for all of the titles. If disc space is insufficient for the selected dubbing mode, the following display appears after step 12. Select "OK" and go to step 12. If you do not want to change the dubbing mode, select "Cancel." However, note that dubbing will end before the program is finished. 70
-
 1
1 -
2
-
3
-
4
-
5
-
6
-
7
-
8
-
9
-
10
-
11
-
12
-
13
-
14
-
15
-
16
-
17
-
18
-
19
-
20
-
21
-
22
-
23
-
24
-
25
-
26
-
27
-
28
-
29
-
30
-
31
-
32
-
33
-
34
-
35
-
36
-
37
-
38
-
39
-
40
-
41
-
42
-
43
-
44
-
45
-
46
-
47
-
48
-
49
-
50
-
51
-
52
-
53
-
54
-
55
-
56
-
57
-
58
-
59
-
60
-
61
-
62
-
63
-
64
-
 65
65 -
 66
66 -
 67
67 -
 68
68 -
 69
69 -
 70
70 -
 71
71 -
 72
72 -
 73
73 -
 74
74 -
 75
75 -
76
-
77
-
78
-
79
-
80
-
81
-
82
-
83
-
84
-
85
-
86
-
87
-
88
-
89
-
90
-
91
-
92
-
93
-
94
-
95
-
96
-
97
-
98
-
99
-
100
 |
 |