Sony SLT-A99V α Handbook - Page 58
Setting up the date/time again, Time Setup] or [Area Setting]
 |
View all Sony SLT-A99V manuals
Add to My Manuals
Save this manual to your list of manuals |
Page 58 highlights
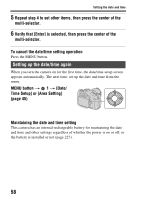
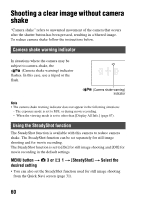
Setting the date and time 5 Repeat step 4 to set other items, then press the center of the multi-selector. 6 Verify that [Enter] is selected, then press the center of the multi-selector. To cancel the date/time setting operation Press the MENU button. Setting up the date/time again When you turn the camera on for the first time, the date/time setup screen appears automatically. The next time, set up the date and time from the menu. MENU button t 1 t [Date/ Time Setup] or [Area Setting] (page 45) Maintaining the date and time setting This camera has an internal rechargeable battery for maintaining the date and time and other settings regardless of whether the power is on or off, or the battery is installed or not (page 227). 58
-
 1
1 -
2
-
3
-
4
-
5
-
6
-
7
-
8
-
9
-
10
-
11
-
12
-
13
-
14
-
15
-
16
-
17
-
18
-
19
-
20
-
21
-
22
-
23
-
24
-
25
-
26
-
27
-
28
-
29
-
30
-
31
-
32
-
33
-
34
-
35
-
36
-
37
-
38
-
39
-
40
-
41
-
42
-
43
-
44
-
45
-
46
-
47
-
48
-
49
-
50
-
51
-
52
-
 53
53 -
 54
54 -
 55
55 -
 56
56 -
 57
57 -
 58
58 -
 59
59 -
 60
60 -
 61
61 -
 62
62 -
 63
63 -
64
-
65
-
66
-
67
-
68
-
69
-
70
-
71
-
72
-
73
-
74
-
75
-
76
-
77
-
78
-
79
-
80
-
81
-
82
-
83
-
84
-
85
-
86
-
87
-
88
-
89
-
90
-
91
-
92
-
93
-
94
-
95
-
96
-
97
-
98
-
99
-
100
-
101
-
102
-
103
-
104
-
105
-
106
-
107
-
108
-
109
-
110
-
111
-
112
-
113
-
114
-
115
-
116
-
117
-
118
-
119
-
120
-
121
-
122
-
123
-
124
-
125
-
126
-
127
-
128
-
129
-
130
-
131
-
132
-
133
-
134
-
135
-
136
-
137
-
138
-
139
-
140
-
141
-
142
-
143
-
144
-
145
-
146
-
147
-
148
-
149
-
150
-
151
-
152
-
153
-
154
-
155
-
156
-
157
-
158
-
159
-
160
-
161
-
162
-
163
-
164
-
165
-
166
-
167
-
168
-
169
-
170
-
171
-
172
-
173
-
174
-
175
-
176
-
177
-
178
-
179
-
180
-
181
-
182
-
183
-
184
-
185
-
186
-
187
-
188
-
189
-
190
-
191
-
192
-
193
-
194
-
195
-
196
-
197
-
198
-
199
-
200
-
201
-
202
-
203
-
204
-
205
-
206
-
207
-
208
-
209
-
210
-
211
-
212
-
213
-
214
-
215
-
216
-
217
-
218
-
219
-
220
-
221
-
222
-
223
-
224
-
225
-
226
-
227
-
228
-
229
-
230
-
231
-
232
-
233
-
234
-
235
-
236
-
237
-
238
-
239
-
240
-
241
-
242
-
243
-
244
-
245
 |
 |

58
Setting the date and time
To cancel the date/time setting operation
Press the MENU button.
When you turn the camera on for the first time, the date/time setup screen
appears automatically. The next time, set up the date and time from the
menu.
Maintaining the date and time setting
This camera has an internal rechargeable battery for maintaining the date
and time and other settings regardless of whether the power is on or off, or
the battery is installed or not (page 227).
5
Repeat step 4 to set other items, then press the center of the
multi-selector.
6
Verify that [Enter] is selected, then press the center of the
multi-selector.
Setting up the date/time again
MENU button
t
1
t
[Date/
Time Setup] or [Area Setting]
(page 45)