Sony SLV-D550P Operating Instructions - Page 69
To set the Progressive setting, DVD Settings and Adjustments
 |
View all Sony SLV-D550P manuals
Add to My Manuals
Save this manual to your list of manuals |
Page 69 highlights
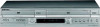
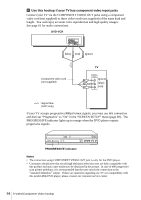
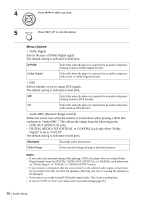
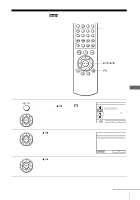
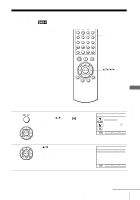
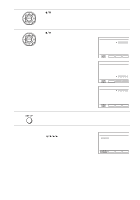
To set the "Progressive" setting If your TV accepts progressive (480p) format signals, you will enjoy accurate color reproduction and high quality image. 1 Follow step 1 and 2 on page 67, then press V/v to select "Progressive." TV Type Black Level Progressive SCREEN SETUP [ 4:3 Letter Box ] [ Off ] [ Off ] 2 Press B/b to select "On," then press ENTER. VvBb TV Type Black Level Progressive RETURN SET UP SCREEN SETUP [ 4:3 Letter Box ] [ Off ] [ On ] 3 Follow the instructions appearing on the screen. 1 Ensure your TV is (480p) Progressive Scan capable. 2 Connect with Component Video Output jacks (red/green/blue connections). See "Use this hookup if your TV has component video input jacks" on page 64. 3 Press B/b to select [OK] to test your video signal. V v B b ENTER RETURN SET UP SCREEN SETUP Progressive Scan Output 1) Ensure your TV is (480P) Progressive Scan capable. 2) Connect with Component Video Output jacks. (red/green/blue connections) 3) Select [OK] to test your video signal. 4) If video signal appears OK, video connection is complete. OK CANCEL B b ENTER RETURN SET UP SCREEN SETUP TEST SCREEN 4 If video signal appears OK, video connection is complete. Press ENTER. The PROGRESSIVE indicator on the unit lights up in orange. If picture is distorted, press O RETURN. Check the connection (page 64). 5 Press SET UP to exit the menu. SCREEN SETUP If picture is OK, press [ENTER] key If picture is distorted, press [RETURN] key. To Deactivate Press [PAUSE] on the unit for 5 seconds. ENTER RETURN TV Type Black Level Progressive SCREEN SETUP [ 4:3 Letter Box ] [ Off ] [ On ] VvBb RETURN SET UP DVD Settings and Adjustments continued Screen Setup 69
-
 1
1 -
2
-
3
-
4
-
5
-
6
-
7
-
8
-
9
-
10
-
11
-
12
-
13
-
14
-
15
-
16
-
17
-
18
-
19
-
20
-
21
-
22
-
23
-
24
-
25
-
26
-
27
-
28
-
29
-
30
-
31
-
32
-
33
-
34
-
35
-
36
-
37
-
38
-
39
-
40
-
41
-
42
-
43
-
44
-
45
-
46
-
47
-
48
-
49
-
50
-
51
-
52
-
53
-
54
-
55
-
56
-
57
-
58
-
59
-
60
-
61
-
62
-
63
-
 64
64 -
 65
65 -
 66
66 -
 67
67 -
 68
68 -
 69
69 -
 70
70 -
 71
71 -
 72
72 -
 73
73 -
 74
74 -
75
-
76
-
77
-
78
-
79
-
80
-
81
-
82
-
83
-
84
-
85
-
86
-
87
-
88
-
89
-
90
-
91
-
92
-
93
-
94
-
95
-
96
-
97
-
98
-
99
-
100
-
101
-
102
-
103
-
104
-
105
-
106
-
107
-
108
-
109
-
110
-
111
-
112
-
113
-
114
-
115
-
116
-
117
-
118
-
119
-
120
-
121
-
122
-
123
-
124
-
125
-
126
-
127
-
128
 |
 |