Sony STR-DA3400ES Quick Setup Guide
Sony STR-DA3400ES - 7.1 Channel Es Receiver Manual
 |
View all Sony STR-DA3400ES manuals
Add to My Manuals
Save this manual to your list of manuals |
Sony STR-DA3400ES manual content summary:
- Sony STR-DA3400ES | Quick Setup Guide - Page 1
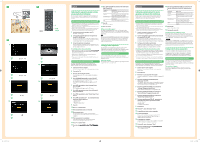
This Quick Setup Guide describes how to connect a Super Audio CD player, DVD player, Blu-ray Disc Player, satellite tuner or set-top box, TV, speakers, and a subwoofer so that you can enjoy multi channel surround sound. Refer to the operating instructions supplied with the receiver for details - Sony STR-DA3400ES | Quick Setup Guide - Page 2
. Refer to the operating instructions supplied with each component. Sony Super Audio CD player Select a suitable playback area (multi channel or 2 channel). Sound may come out from only the front speaker left/right when 2 channel is selected. After the setting The receiver is now ready to use
-
 1
1 -
 2
2
 |
 |
3-289-139-
11
(1)
Sony Corporation © 2008
Printed in Malaysia
1: Installing the speakers/
1: Instalando los altavoces
STR-DA3400ES
Quick Setup Guide
Guía de instalación rápida
2: Connecting the speakers/
2: Conectando los altavoces
3: Connecting other components/
3: Conexión de otros componentes
10 mm (13/32")
Super Audio CD player/ Reproductor Super Audio CD
Video components/ Componentes de vídeo
TV/
Televisor
HDMI cable (not supplied)/
Cable HDMI (no proporcionado)
HDMI cable (not supplied)/Cable HDMI (no proporcionado)
English
This Quick Setup Guide describes how to connect a Super Audio CD player, DVD player, Blu-ray Disc
Player, satellite tuner or set-top box, TV, speakers, and a subwoofer so that you can enjoy multi channel
surround sound. Refer to the operating instructions supplied with the receiver for details.
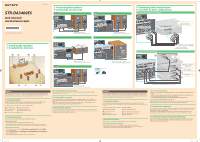
1: Installing the speakers
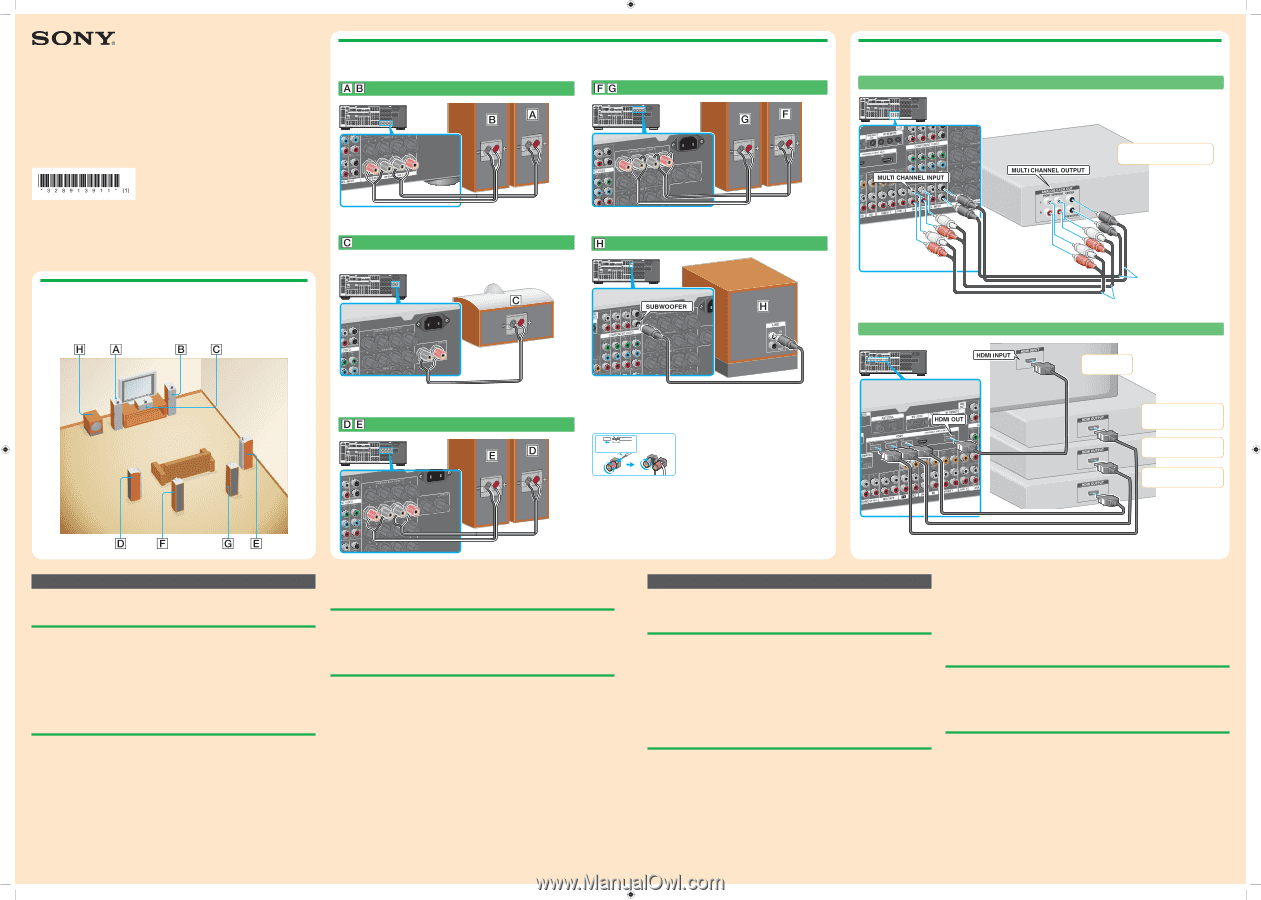
The illustrations above show an example of a 7.1 channel speaker system (seven speakers and one
subwoofer) configuration. Refer to the operating instructions supplied with the receiver.
The illustrations in the guide designate speakers as
through
.
Front speaker (left)
Surround speaker (right)
Front speaker (right)
Surround back speaker
(left)
Center speaker
Surround back speaker (right)
Surround speaker (left)
Subwoofer
2: Connecting the speakers
Connect the speakers according to the number and kind of your speakers.
About speaker cords
Use speaker cords, which are appropriate for the width of the room.
By deciding on the color or mark of the speaker cord to be connected to the plus (+) or minus (–)
terminal, you can always be sure of connecting the cord correctly without mistaking plus or minus.
About speaker terminals
Connect the
terminals to the
terminals of the receiver and connect the
terminals of the receiver and connect the
of the receiver and connect the
terminals to the
terminals to the
to the
terminals of the receiver.
of the receiver.
Refer to the illustration above or the operating instructions supplied with the receiver for details of
to the illustration above or the operating instructions supplied with the receiver for details of
the operating instructions supplied with the receiver for details of
connecting speaker cords.
Turn the locking knob until the speaker cord is connected securely.
About the SPEAKERS (OFF/A/B/A+B) button
You can select the front speaker system. Refer to “8: Setting the speakers” in the operating instructions
supplied with the receiver for details.
3: Connecting other components
This is an example of how to connect this receiver and your components. Refer to step 4 of “Getting
Started” of the operating instructions supplied with this receiver for details on other connections and other
components.
This receiver is equipped with function for converting video signals. Refer to “4b:Connecting the video
components” in the operating instructions supplied with the receiver.
4: Connect all power cords last
Connect the supplied AC power cord (mains lead) to the AC IN terminal on the receiver, then connect the
AC power cord (mains lead) to a wall outlet (mains). Refer to “Connecting the AC power cord (mains lead)”
in the operating instructions supplied with the receiver.
Monaural audio cord (not supplied)/
Cable de audio monofónico (no proporcionado)
Speaker cord (not supplied)/
Cable de los altavoces (no proporcionado)
Speaker cord (not supplied)/
Cable de los altavoces (no proporcionado)
Speaker cord (not supplied)/
Cable de los altavoces (no proporcionado)
Super Audio CD player/
Reproductor Super Audio CD
Speaker cord (not supplied)/
Cable de los altavoces (no proporcionado)
Español
Esta guía de instalación rápida describe como conectar un reproductor Super Audio CD, un reproductor
de DVD, reproductor de disco Blu-ray, un sintonizador de satélite o un decodificador, televisor, altavoces y
un altavoz de subgraves para que pueda disfrutar del sonido envolvente multicanal. Consulte el manual de
instrucciones suministrado con el receptor para obtener más información.
1: Instalando los altavoces
Las ilustraciones anteriores muestran un ejemplo de configuración de un sistema de altavoces de 7.1
canales (siete altavoces y un altavoz de subgraves). Consulte el manual de instrucciones suministrado con el
receptor.
En las ilustraciones de la guía, los altavoces se identifican de
a
.
Altavoz frontal (izquierdo)
Altavoz envolvente (derecho)
Altavoz frontal (derecho)
Altavoz envolvente trasero (izquierdo)
Altavoz de centro
Altavoz envolvente trasero (derecho)
Altavoz envolvente (izquierdo)
Altavoz de subgraves
2: Conectando los altavoces
Conecte los altavoces en función del número y tipo de altavoces de que disponga.
Acerca de los cables de los altavoces
Utilice cables de altavoces que resulten apropiados para la anchura de la habitación.
Al decidir el color o marca del cable del altavoz al terminal más (+) o menos (–), siempre puede
asegurarse de conectar el cable sin equivocarse con el más o menos.
Audio cord (not supplied)/
Cable de audio (no proporcionado)
Sobre los terminals del altavoz
Conecte los
terminales a los
terminales del receptor y conecte el terminales
al terminales
del
receptor.
Remítase a la ilustración que se encuentra arriba o a las manual de instrucciones suministrado con el
receptor para obtener detalles de conexión de los cables del altavoz.
Gire la perilla de bloqueo hasta que el cable del altavoz quede conectado firmemente.
Acerca del botón SPEAKERS (OFF/A/B/A+B)
Es posible seleccionar el sistema de altavoces frontales. Consulte el apartado “8: Configurando los altavoces”
del manual de instrucciones suministrado con el receptor para obtener más información.
3: Conexión de otros componentes
Este es un ejemplo de cómo conectar este receptor a los componentes. Consulte el paso 4 de “Iniciando” del
manual de instrucciones suministrado con el receptor para obtener más información sobre cómo realizar
otras conexiones y sobre otros componentes.
Este receptor se encuentra equipado con una función para convertir señales de video. Refiérase a “4b:
Conectando los componentes de video” en las manual de instrucciones suministrado con el receptor.
4: Conecte todos los cables de alimentación en último lugar
Conecte el cable de poder CA suministrado a la terminal de AC IN en el receptor, luego conecte el cable
de poder CA a un enchufe de pared. Refiérase a “Conectando el cable de poder CA” en las manual de
instrucciones suministrado con el receptor.
Blu-ray disc player/
Reproductor de disco Blu-ray
DVD player/Reproductor de
DVD
Monaural audio cord (not supplied)/Cable
de audio monofónico (no proporcionado)
Satellite tuner or Set-top box/
Sintonizador de satélite o
decodificador
3289139111.indd
1
4/28/2008
2:35:44 PM