Sony STR-DA5200ES Operating Instructions (Large File - 23.24 MB) - Page 44
select Auto Calibration Start, Position, then press
 |
View all Sony STR-DA5200ES manuals
Add to My Manuals
Save this manual to your list of manuals |
Page 44 highlights
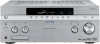
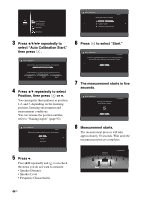
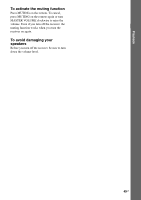
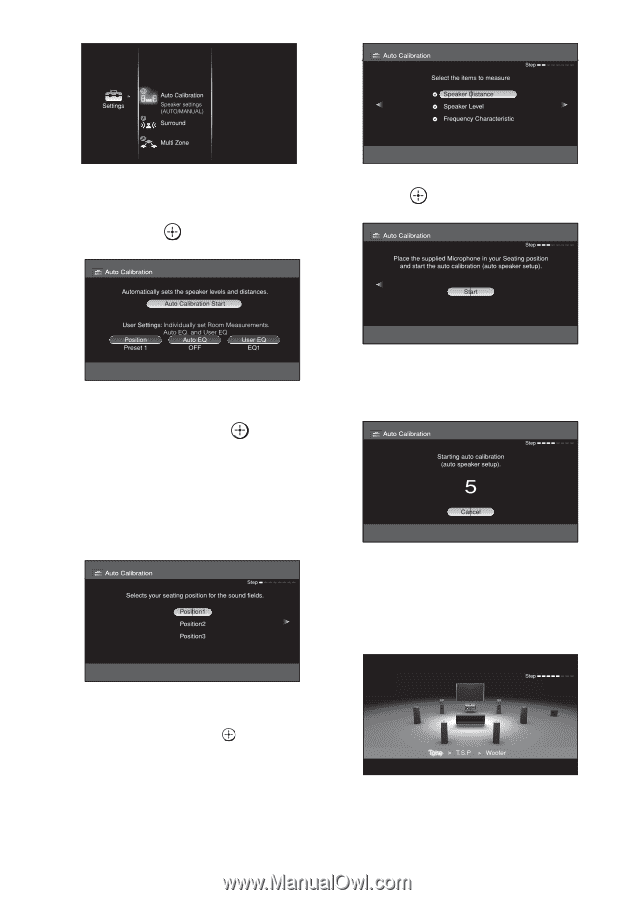
3 Press V/v/B/b repeatedly to select "Auto Calibration Start," then press . 6 Press to select "Start." 4 Press V/v repeatedly to select Position, then press or b. You can register three patterns as position 1,2, and 3, depending on the listening position, listening environment and measurement conditions. You can rename the position number, refer to "Naming inputs" (page 92). 7 The measurement starts in five seconds. 8 Measurement starts. The measurement process will take approximately 30 seconds. Wait until the measurement process completes. 5 Press b. Press V/v repeatedly and to un-check the items you do not want to measure. • Speaker Distance • Speaker Level • Frequency Characteristic 44GB
-
 1
1 -
2
-
3
-
4
-
5
-
6
-
7
-
8
-
9
-
10
-
11
-
12
-
13
-
14
-
15
-
16
-
17
-
18
-
19
-
20
-
21
-
22
-
23
-
24
-
25
-
26
-
27
-
28
-
29
-
30
-
31
-
32
-
33
-
34
-
35
-
36
-
37
-
38
-
 39
39 -
 40
40 -
 41
41 -
 42
42 -
 43
43 -
 44
44 -
 45
45 -
 46
46 -
 47
47 -
 48
48 -
 49
49 -
50
-
51
-
52
-
53
-
54
-
55
-
56
-
57
-
58
-
59
-
60
-
61
-
62
-
63
-
64
-
65
-
66
-
67
-
68
-
69
-
70
-
71
-
72
-
73
-
74
-
75
-
76
-
77
-
78
-
79
-
80
-
81
-
82
-
83
-
84
-
85
-
86
-
87
-
88
-
89
-
90
-
91
-
92
-
93
-
94
-
95
-
96
-
97
-
98
-
99
-
100
-
101
-
102
-
103
-
104
-
105
-
106
-
107
-
108
-
109
-
110
-
111
-
112
-
113
-
114
-
115
-
116
-
117
-
118
-
119
-
120
-
121
-
122
-
123
-
124
-
125
-
126
-
127
-
128
-
129
-
130
-
131
-
132
-
133
-
134
-
135
-
136
-
137
-
138
-
139
-
140
-
141
-
142
-
143
-
144
-
145
-
146
-
147
-
148
-
149
-
150
-
151
-
152
-
153
-
154
-
155
-
156
-
157
-
158
-
159
-
160
-
161
-
162
-
163
-
164
-
165
-
166
-
167
-
168
-
169
-
170
-
171
-
172
-
173
-
174
-
175
-
176
-
177
-
178
-
179
-
180
-
181
-
182
-
183
-
184
-
185
-
186
-
187
-
188
-
189
-
190
-
191
-
192
-
193
-
194
-
195
-
196
-
197
-
198
-
199
-
200
-
201
-
202
-
203
-
204
-
205
-
206
-
207
-
208
-
209
-
210
-
211
-
212
-
213
-
214
-
215
-
216
-
217
-
218
-
219
-
220
-
221
-
222
-
223
-
224
-
225
-
226
-
227
-
228
-
229
-
230
-
231
-
232
-
233
-
234
-
235
-
236
-
237
-
238
-
239
-
240
-
241
-
242
-
243
-
244
-
245
-
246
-
247
-
248
-
249
-
250
-
251
-
252
-
253
-
254
-
255
-
256
-
257
-
258
-
259
-
260
-
261
-
262
-
263
-
264
-
265
-
266
-
267
-
268
-
269
-
270
-
271
-
272
-
273
-
274
-
275
-
276
-
277
-
278
 |
 |
44
GB
3
Press
V
/
v
/
B
/
b
repeatedly to
select “Auto Calibration Start,”
then press
.
4
Press
V
/
v
repeatedly to select
Position, then press
or
b
.
You can register three patterns as position
1,2, and 3, depending on the listening
position, listening environment and
measurement conditions.
You can rename the position number,
refer to “Naming inputs” (page 92).
5
Press
b
.
Press
V
/
v
repeatedly and
to un-check
the items you do not want to measure.
• Speaker Distance
• Speaker Level
• Frequency Characteristic
6
Press
to select “Start.”
7
The measurement starts in five
seconds.
8
Measurement starts.
The measurement process will take
approximately 30 seconds. Wait until the
measurement process completes.