Sony VGX-XL2A User Guide (Computer Component) - Page 37
Speaker Setup Notes, Step 4: Connecting to the Internet, Wired Network
 |
View all Sony VGX-XL2A manuals
Add to My Manuals
Save this manual to your list of manuals |
Page 37 highlights
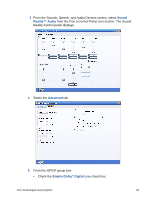
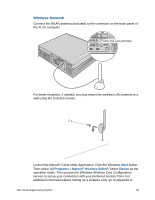
• Verify that AC3 is the option selected for Format. • Verify that Enable Digital Output is checked in the S/PDIF group box. Note: If you are using a HDMI connection through a TV or an amplifier that supports 5.1 sound, do the following: • check Enable HDMI™ Output • select AC3 for the format • check Enable Digital Output 6 Close the Sound Reality Control Panel and the Windows Control Panel. Your 5.1 Surround Sound Speaker Setup is complete. Speaker Setup Notes • After the 5.1 channel sound is setup, sound may not be outputted through the HDMI connection if your HDMI device does not support 5.1 channel sound. To enable HDMI sound, uncheck the Enable Dolby Digital Live check box and check/select the Enable HDMI Output check box located on the Sound Reality Control Panel, Advanced tab. This will disable the 5.1 channel sound output. • Dolby Digital 5.1 must be selected for the audio output of the DVD from the DVD menu. Note: The VGX-XL2A does not support DTS sound decoding. Step 4: Connecting to the Internet Wired Network Use an RJ-45 connector cable. Connect one end to the Ethernet connector on the computer and the other end to your cable or DSL modem. 34 VGX-XL2A Digital Living System
-
 1
1 -
2
-
3
-
4
-
5
-
6
-
7
-
8
-
9
-
10
-
11
-
12
-
13
-
14
-
15
-
16
-
17
-
18
-
19
-
20
-
21
-
22
-
23
-
24
-
25
-
26
-
27
-
28
-
29
-
30
-
31
-
 32
32 -
 33
33 -
 34
34 -
 35
35 -
 36
36 -
 37
37 -
 38
38 -
 39
39 -
 40
40 -
 41
41 -
 42
42 -
43
-
44
-
45
-
46
-
47
-
48
-
49
-
50
-
51
-
52
-
53
-
54
-
55
-
56
-
57
-
58
-
59
-
60
-
61
-
62
-
63
-
64
-
65
-
66
-
67
-
68
-
69
-
70
-
71
-
72
-
73
-
74
-
75
-
76
-
77
-
78
-
79
-
80
-
81
-
82
-
83
-
84
-
85
-
86
-
87
-
88
-
89
-
90
-
91
-
92
-
93
-
94
-
95
-
96
-
97
-
98
-
99
-
100
-
101
-
102
-
103
-
104
-
105
-
106
-
107
-
108
-
109
-
110
-
111
-
112
-
113
-
114
-
115
-
116
-
117
-
118
-
119
-
120
-
121
-
122
-
123
-
124
-
125
-
126
-
127
-
128
-
129
-
130
-
131
-
132
-
133
-
134
-
135
-
136
-
137
-
138
-
139
-
140
-
141
-
142
-
143
-
144
-
145
-
146
-
147
-
148
-
149
-
150
-
151
-
152
-
153
-
154
-
155
-
156
-
157
-
158
-
159
-
160
-
161
-
162
-
163
-
164
-
165
-
166
-
167
-
168
-
169
-
170
-
171
-
172
-
173
-
174
-
175
-
176
-
177
-
178
-
179
-
180
-
181
-
182
 |
 |