TP-Link AC2300 Archer C2300EU V1 User Guide - Page 87
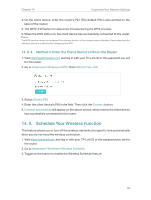
Method 4: Enter the Client Device’s PIN on the Router
 |
View all TP-Link AC2300 manuals
Add to My Manuals
Save this manual to your list of manuals |
Page 87 highlights
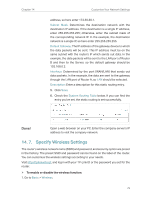
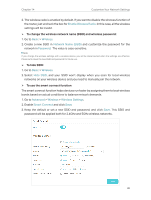
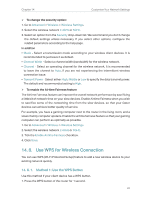
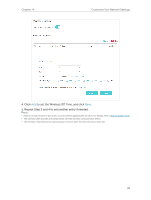
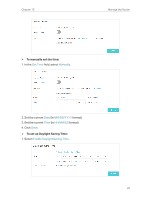
Chapter 14 Customize Your Network Settings 4. On the client device, enter the router's PIN. (The default PIN is also printed on the label of the router.) 5. The WPS LED flashes for about two minutes during the WPS process. 6. When the WPS LED is on, the client device has successfully connected to the router. Note: The WPS function cannot be configured if the wireless function of the modem router is disabled. Please make sure the wireless function is enabled before configuring the WPS. 14. 8. 4. Method 4: Enter the Client Device's PIN on the Router 1. Visit http://tplinkmodem.net, and log in with your TP-Link ID or the password you set for the router. 2. Go to Advanced > Wireless > WPS. Click Method Two--PIN. 3. Select Client's PIN. 4. Enter the client device's PIN in the field. Then click the Connect button. 5. Connect successfully will appear on the above screen, which means the client device has successfully connected to the router. 14. 9. Schedule Your Wireless Function This feature allows you to turn off the wireless netowrks at a specific time automatically when you do not need the wireless connection. 1. Visit http://tplinkwifi.net, and log in with your TP-Link ID or the password you set for the router. 2. Go to Advanced > Wireless > Wireless Schedule. 3. Toggle on the button to enable the Wireless Schedule feature. 83
-
 1
1 -
2
-
3
-
4
-
5
-
6
-
7
-
8
-
9
-
10
-
11
-
12
-
13
-
14
-
15
-
16
-
17
-
18
-
19
-
20
-
21
-
22
-
23
-
24
-
25
-
26
-
27
-
28
-
29
-
30
-
31
-
32
-
33
-
34
-
35
-
36
-
37
-
38
-
39
-
40
-
41
-
42
-
43
-
44
-
45
-
46
-
47
-
48
-
49
-
50
-
51
-
52
-
53
-
54
-
55
-
56
-
57
-
58
-
59
-
60
-
61
-
62
-
63
-
64
-
65
-
66
-
67
-
68
-
69
-
70
-
71
-
72
-
73
-
74
-
75
-
76
-
77
-
78
-
79
-
80
-
81
-
 82
82 -
 83
83 -
 84
84 -
 85
85 -
 86
86 -
 87
87 -
 88
88 -
 89
89 -
 90
90 -
 91
91 -
 92
92 -
93
-
94
-
95
-
96
-
97
-
98
-
99
-
100
-
101
-
102
-
103
-
104
-
105
-
106
-
107
-
108
-
109
-
110
-
111
-
112
-
113
-
114
-
115
-
116
-
117
-
118
-
119
-
120
 |
 |
