Thermador HMCN42FS Installation Instructions - Page 10
Operating Instructions.
 |
View all Thermador HMCN42FS manuals
Add to My Manuals
Save this manual to your list of manuals |
Page 10 highlights
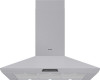
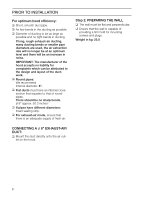
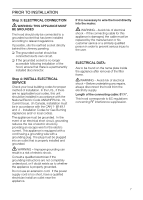
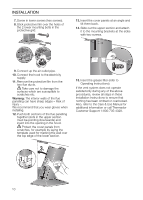
INSTALLATION 07. Screw in lower screws (hex screws). 08. Stick protective film over the holes of the 2 lower mounting bolts in the protective grid. 13. Insert the cover panels at an angle and tilt them back. 14. Slide out the upper section and attach it to the mounting brackets at the sides with two screws. 2. 1. 09. Connect up the air outlet pipe. 10. Connect the hood to the electricity supply. 11. Remove the protective film from the two flue ducts. ṇ Take care not to damage the surfaces which are susceptible to scratches etc. Warning: The interior walls of the flue panelling can have sharp edges - Risk of injury -. We recommend that you wear gloves when installing. 12. Push both sections of the flue panelling together (slots in the upper section must be pointing downwards) and insert into the opening in the hood. ṇ Protect the cover panels from scratches, for example by laying the template used for marking the wall over the top edge of the lower section. 15. Insert the grease filter (refer to Operating Instructions). If the vent system does not operate satisfactorily during any of the above procedures, review all steps in these Installation Instructions to ensure that nothing has been omitted or overlooked. Also, refer to the Care & Use Manual for additional information or call Thermador Customer Support 1-800-735-4328. 3. 1. 2. 10
-
 1
1 -
2
-
3
-
4
-
 5
5 -
 6
6 -
 7
7 -
 8
8 -
 9
9 -
 10
10 -
 11
11 -
 12
12 -
 13
13 -
 14
14 -
 15
15 -
16
-
17
-
18
-
19
-
20
-
21
-
22
-
23
-
24
-
25
-
26
-
27
-
28
-
29
-
30
-
31
-
32
 |
 |