Thermador HMWN30FS User Manual - Page 6
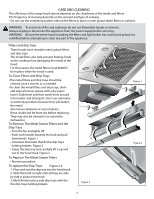
Cleaning The Hood - parts
 |
View all Thermador HMWN30FS manuals
Add to My Manuals
Save this manual to your list of manuals |
Page 6 highlights
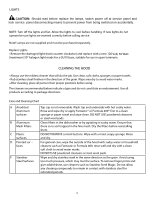
LIGHTS CAUTION: Should read before replace the lamps, switch power off at service panel and lock service panel disconnecting means to prevent power from being switched on accidentally. operate be sure lights are inserted correctly before calling service. Note! Lamps are not supplied and must be purchased separately. Replace Lights Watt CLEANING THE HOOD A ys use the mildest cleaner that do the job. se clean, so loths, s s or paper t s. he . Wipe area dry to a oid ter mar . er c , place all parts in their proper positions be ore us . The cleaners recommended indicate a type and do not constitute an endorsement. se all products to directions. Care and Cleaning Chart A Anodized T W Aluminum B Aluminum C Plastic Painted sur - them. T and dry. r. T r DO NOT USE powdered cleansers or steel wool pads. A T 6
-
 1
1 -
 2
2 -
 3
3 -
 4
4 -
 5
5 -
 6
6 -
 7
7 -
 8
8 -
 9
9 -
 10
10 -
 11
11 -
 12
12 -
13
-
14
-
15
-
16
-
17
-
18
-
19
-
20
-
21
-
22
-
23
-
24
-
25
-
26
-
27
-
28
-
29
 |
 |