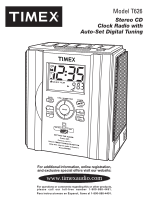
Timex T626S User Manual - Page 5
Programming the Preset Radio Stations
 |
View all Timex T626S manuals
Add to My Manuals
Save this manual to your list of manuals |
Page 5 highlights
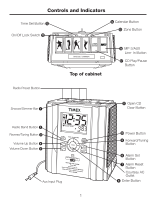
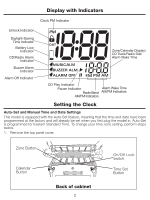
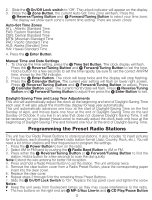
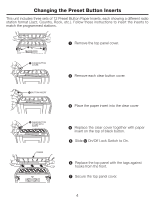
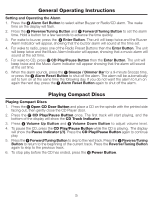
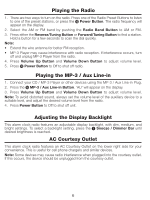
2. Slide the ¹ On/Off Lock switch to 'Off'. The unlock indicator will appear on the display. 3. Press the ƺ Zone Button, the current Auto-Set Time Zone will flash. Press the ᕣ Reverse/Tuning Button and ¾ Forward/Tuning Button to select your time zone. The display will show each zone's current time setting. There are seven zones: Auto-Set Time Zones ATL : Atlantic Standard Time EAS: Eastern Standard Time CEN: Central Standard Time MTN: Mountain Standard Time PAC: Pacific Standard Time ALS: Alaska Standard Time HAI: Hawaii Standard Time 4. Press the ᕦ Enter Button. Manual Time and Date Settings 1. To change the time setting, press the Ƹ Time Set Button. The clock display will flash. Press the ᕣ Reverse/Tuning Button and ¾ Forward/Tuning Button to set the time. Hold a button for a few seconds to set the time rapidly. Be sure to set the correct AM/PM time, shown by the PM indicator. 2. Press the ᕦ Enter Button. The clock will beep twice and the display will stop flashing. 3. Press the ƹ Calendar Button. The current year setting will flash on lower right screen. Press ᕣ Reverse/Tuning Button and ¾ Forward/Tuning Button to adjust. Press ƹ Calendar Button again. The current month/date will flash. Press ᕣ Reverse/Tuning Button and ¾ Forward/Tuning Button to adjust then press the ᕦ Enter Button to exit. Daylight-Saving Time and Leap Year Adjustments This unit will automatically adjust the clock at the beginning and end of Daylight-Saving Time each year. It will also adjust the month/day display for leap year automatically. This unit automatically advances one hour at the start of Daylight-Saving Time on the first Sunday of April, and moves back one hour at the end of Daylight-Saving Time on the last Sunday of October. If you live in an area that does not observe Daylight-Saving Time, it will be necessary for you (except Hawaii zone) to manually adjust the clock back one hour at the beginning of Daylight-Saving Time and forward one hour at the end of Daylight-Saving Time. Programming the Preset Radio Stations This unit has four Radio Preset Buttons to store local stations. It also includes 12 insert pictures for the buttons, each showing a different radio station format (Jazz, Country, Rock, etc.). You will need a list of four stations and their frequencies to program the settings. 1. Press the µ Power Button to turn on the radio. 2. Select AM or FM band by pushing the ᕢ Radio Band Button to AM or FM. 3. Press either the ᕣ Reverse/Tuning Button or ¾ Forward/Tuning Button to find the station. Hold a button for a few seconds to scan the dial quickly. Note: Extend the wire antenna for better FM reception. 4. Press and hold a Radio Preset Button to set the station. The unit will beep twice. 5. Remove the clear button cover from a Radio Preset Button, place the corresponding paper insert into the clear cover. 6. Replace the clear cover. • Repeat steps 3 through 6 for the remaining three Preset Buttons. 7. Slide the ¹ On/Off Lock Switch to 'On'. Replace the top panel cover and tighten the screw Notes: ¥ Keep the unit away from fluorescent lamps as they may cause interference to the radio. • The two buttons on the right end are ƻ MP-3/Aux Line-in and Ƽ CD Play/Pause Button 3
-
 1
1 -
 2
2 -
 3
3 -
 4
4 -
 5
5 -
 6
6 -
 7
7 -
 8
8 -
 9
9 -
 10
10 -
 11
11 -
12
 |
 |