Toshiba 26HL66 Operating Guide - Page 19
Setting the HDMI, audio mode, Viewing the digital signal meter - installation guide
 |
UPC - 022265240649
View all Toshiba 26HL66 manuals
Add to My Manuals
Save this manual to your list of manuals |
Page 19 highlights
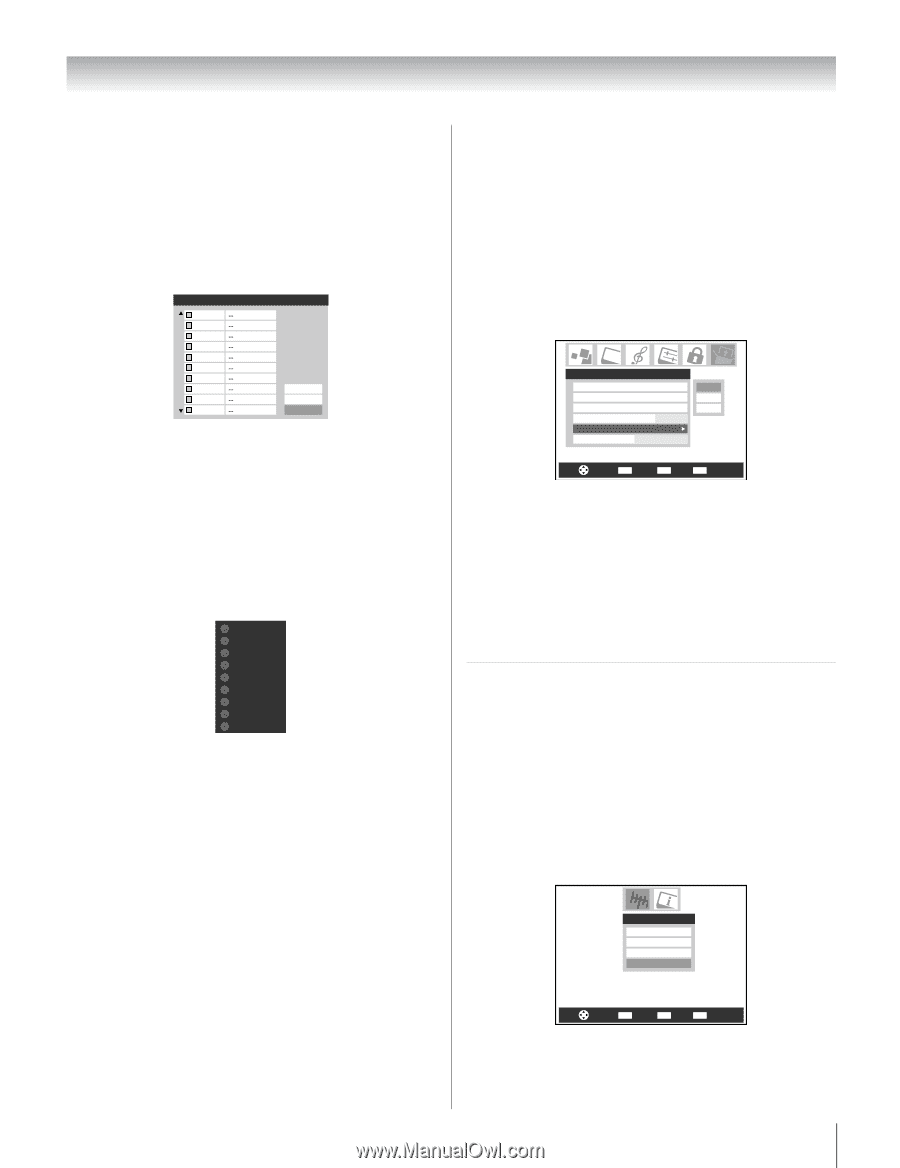
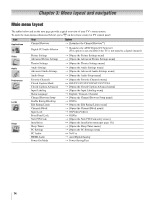
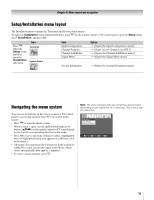
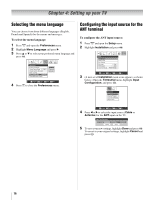
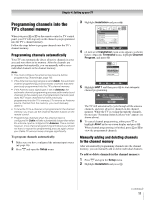
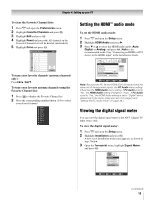
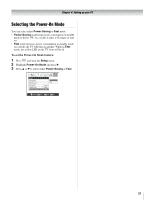
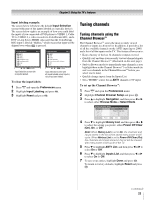
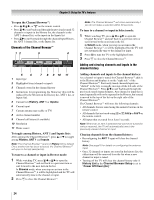
Chapter 4: Setting up your TV To clear the Favorite Channel lists: 1 Press Y and open the Preferences menu. 2 Highlight Favorite Channels and press T. 3 Highlight Edit and press T. 4 Highlight Reset and press T. All channels in the Favorite Channels list will be deleted (unchecked). 5 Highlight Done and press T. Edit Favorite Channels 2 2 - 1 2 - 2 4 - 1 5 17 - 1 17 - 2 28 - 1 28 - 2 28 - 3 ANT 1 Reset Cancel Done To tune your favorite channels (antenna channels only): Press M / m. To tune your favorite antenna channels using the Favorite Channel list: 1 Press = to display the Favorite Channel list. 2 Press the corresponding number button (1-9) to select your desired channel. 1 CH 4-1 2 CH 4-2 3 CH 9 4 CH 10 5 CH 12 6 CH 17 7 CH 19 8 --9 --- Setting the HDMI™ audio mode To set the HDMI audio mode: 1 Press Y and open the Setup menu. 2 Highlight HDMI Audio and press c. 3 Press b or B to select the HDMI audio mode (Auto, Digital, or Analog) and press T. (Auto is the recommended mode.) See "Connecting an HDMI or DVI device to the HDMI input" in the Installation Guide. Setup Installation Sleep Timer PC Settings PC Audio HDMI Audio Power-On Mode No Auto Power-Saving Auto Digital Analog Navigate ENTER Select CH RTN Back EXIT Exit Note: Because the PC IN and HDMI (DVI) IN inputs share the same set of analog audio inputs, the PC Audio menu setting influences the HDMI Audio menu setting. If PC Audio is set to "No," the HDMI Audio setting changes to "Auto." If PC Audio is set to "Yes," the HDMI Audio setting is set to "Digital" and is grayed out in the menu. (Also see item 3 on page 6 and "Setting the PC Audio mode" on page 38.) Viewing the digital signal meter You can view the digital signal meter in the ANT 1 digital TV input source only. To view the digital signal meter: 1 Press Y and open the Setup menu. 2 Highlight Installation and press T. A new set of Installation menu icons appears, as shown in step 3 below. 3 Open the Terrestrial menu, highlight Signal Meter, and press T. Terrestrial Input Configuration Channel Program Channel Add/Delete Signal Meter Navigate ENTER Select CH RTN Back EXIT Exit (continued) 19
-
 1
1 -
2
-
3
-
4
-
5
-
6
-
7
-
8
-
9
-
10
-
11
-
12
-
13
-
 14
14 -
 15
15 -
 16
16 -
 17
17 -
 18
18 -
 19
19 -
 20
20 -
 21
21 -
 22
22 -
 23
23 -
 24
24 -
25
-
26
-
27
-
28
-
29
-
30
-
31
-
32
-
33
-
34
-
35
-
36
-
37
-
38
-
39
-
40
-
41
-
42
-
43
-
44
-
45
-
46
-
47
-
48
-
49
-
50
-
51
-
52
 |
 |