Toshiba 34HFX84 User Manual - Page 44
Locking the video inputs, Changing the PIN code
 |
View all Toshiba 34HFX84 manuals
Add to My Manuals
Save this manual to your list of manuals |
Page 44 highlights
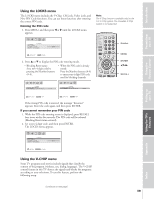
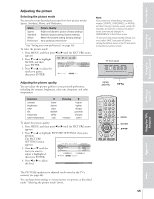
Introduction Connecting your TV Using the Remote Control Locking the video inputs With the VIDEO LOCK feature, you can lock out the input sources (Video 1, Video 2, Video 3, ColorStream HD1, ColorStream HD2, HDMI 1, HDMI 2) and channels 3 and 4. You will not be able to select locked input sources with the TV/VIDEO button or Channel buttons unless you clear the setting. To set up the video lock: 1. From the LOCKS menu, press y or z to highlight VIDEO LOCK, then press ENTER. 2. Press y or z to highlight the level of video locking you want (Video, Video+, or Off ), as follows: VIDEO : Locks Video 1, Video 2, Video 3, ColorStream HD1/HD2, and HDMI 1, HDMI 2. VIDEO+ : Locks Video 1, Video 2, Video 3, ColorStream HD1/HD2, HDMI 1, HDMI 2, and channels 3 and 4. This option should be used if you use the antenna terminal to play a video tape. Note: Make sure the POP is not on channel 3 or 4. OFF : Unlocks all video input sources. LOCKS V - CH I P CH LOCK V I DEO LOCK NEW P I N CODE V I DEO V I DEO+ OFF :: SELECT ENTER : SET 3. Press ENTER. Changing the PIN code 1. From the LOCKS menu, press y or z to highlight NEW PIN CODE. 2. Press the Number buttons (0-9) to enter a 4-digit code. The numbers you enter will replace the dashes in the display. LOCKS V - CH I P CH LOCK V I DEO LOCK NEW P I N CODE V I DEO 2562 0-9 : SELECT ENTER : SET 3. Press ENTER. The new PIN code is now active. TV CABLE/SAT POWER LIGHT SLEEP VCR DVD AUDIO1 123 AUDIO2 MODE 456 789 S PIC SIZE ACTION MENU GUIDE ETUP +10 100/ 0 ENT INFO FAVORITE TLHINEKATER TITLE SUB TITLE FAV AUDI O ENTER FAV CH VOL EXIT DVD RTN DVD CLEAR CH RTN INPUT RECALL MUTE SLOW/DIR SKIP/SEARCH yz ENTER POWER TV CABLE/SAT LIGHT SLEEP VCR DVD 123 AUDIO1 AUDIO2 MODE 456 S PIC SIZE ACTION MENU GUIDE ETUP 789 +10 100/ 0 ENT INFO FAVORITE TLHINEKATER TITLE SUB TITLE FAV AUDI O ENTER FAV CH VOL EXIT DVD RTN DVD CLEAR CH RTN INPUT RECALL MUTE SLOW/DIR SKIP/SEARCH Number ENTER yzx • Setting up your TV Using the TV's Features Appendix Index 44
-
 1
1 -
2
-
3
-
4
-
5
-
6
-
7
-
8
-
9
-
10
-
11
-
12
-
13
-
14
-
15
-
16
-
17
-
18
-
19
-
20
-
21
-
22
-
23
-
24
-
25
-
26
-
27
-
28
-
29
-
30
-
31
-
32
-
33
-
34
-
35
-
36
-
37
-
38
-
 39
39 -
 40
40 -
 41
41 -
 42
42 -
 43
43 -
 44
44 -
 45
45 -
 46
46 -
 47
47 -
 48
48 -
 49
49 -
50
-
51
-
52
-
53
-
54
-
55
-
56
-
57
-
58
-
59
-
60
-
61
-
62
-
63
-
64
-
65
-
66
-
67
-
68
 |
 |
