Toshiba BDX2000 Owner's Manual - English - Page 20
How to Insert a Disc, Reading an SD Memory Card
 |
UPC - 022265003138
View all Toshiba BDX2000 manuals
Add to My Manuals
Save this manual to your list of manuals |
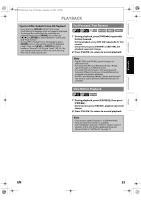
Page 20 highlights
E5PJ1UD_EN.book Page 20 Thursday, September 10, 2009 6:45 PM PLAYBACK How to Insert a Disc 1 Press [OPEN/CLOSE A] to open the disc tray. 2 Place the disc on the disc tray with its label side facing up. Align the disc to the disc tray guide. • Make sure the disc is compatible with this unit. (Refer to page 17 for the list of compatible discs.) 3 Press [OPEN/CLOSE A] to close the disc tray. Please allow time for the disc to load. To eject the disc: Press [OPEN/CLOSE A] to open the disc tray. Remove the disc. Press [OPEN/CLOSE A] to close the disc tray. Reading an SD Memory Card You can play back the AVCHD / MP3 / WMA / JPEG files in an SD Memory Card. With the SD Memory Card, you can also enjoy the following functions. - Special additional contents for BD-ROM Profile 1 ver.1.1. (For more information about the special additional contents, refer to the instruction book that came with the disc.) - BD-Live function (BD-ROM ver. 2 Profile 2.0). (For more information about BD-Live, refer to page 29.) 1 Insert an SD Memory Card, with the label side facing up, into the SD card slot until it clicks. If no disc is in operation, "Media Select" screen will appear on the TV screen. ON/STANDBY PAUSE STOP PLAY OPEN/CLOSE SD Memory Card 2 Use [K / L] to select "SD Card", then press [ENTER]. Media Select Disc SD Card • Media filter screen will appear. • When the SD Memory Card contains only one type of file, skip to step 4. 3 Select the type of the file you want to play back in the media filter screen. Then press [ENTER] to display the file list. Please select the media to play back. Video Audio Picture • Playback of AVCHD files will start right after you choose "Video". (The file list is not available for AVCHD files.) 4 Use [K / L] to select a desired track, folder or file, then press [ENTER]. Use [s / B] to go back and forward between the hierarchies. • If you press [ENTER] on the desired file, playback will start. To remove the SD Memory Card: In stop mode, gently push in the SD Memory Card, then pull it out slowly. Note • The "Media Select" screen will disappear under the conditions listed below: - when the screen saver is activated. - when [RETURN] is pressed. - when the setup menu is called up. • If the "Media Select" screen disappears before you make the selection, refer to "Selecting the Media" on page 21. • Do not remove the SD Memory Card or turn the unit to the standby mode while the contents of the card are in playback. It may result in malfunction or loss of the card's data. • Do not delete the folders or files in the SD Memory Card with your computer. This unit may not read the SD Memory Cards formatted on a computer. • If a folder or file name includes one of the following unrecognizable characters, the folder or file name may not be displayed correctly. - Unrecognizable characters 20 EN
-
 1
1 -
2
-
3
-
4
-
5
-
6
-
7
-
8
-
9
-
10
-
11
-
12
-
13
-
14
-
 15
15 -
 16
16 -
 17
17 -
 18
18 -
 19
19 -
 20
20 -
 21
21 -
 22
22 -
 23
23 -
 24
24 -
 25
25 -
26
-
27
-
28
-
29
-
30
-
31
-
32
-
33
-
34
-
35
-
36
-
37
-
38
-
39
-
40
-
41
-
42
-
43
-
44
-
45
-
46
-
47
-
48
-
49
-
50
-
51
-
52
-
53
-
54
-
55
-
56
-
57
-
58
-
59
-
60
-
61
-
62
-
63
-
64
 |
 |
