Toshiba E310 User Manual
Toshiba E310 - Pocket PC Manual
 |
UPC - 032017138018
View all Toshiba E310 manuals
Add to My Manuals
Save this manual to your list of manuals |
Toshiba E310 manual content summary:
- Toshiba E310 | User Manual - Page 1
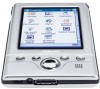
TOSHIBA Pocket PC e310 Introduction Pocket PC e310 User's Manual User's Manual i - Toshiba E310 | User Manual - Page 2
, with respect to the use of the information contained herein. TOSHIBA Pocket PC e310 User's Manual First edition March 2002 Trademarks Microsoft, ActiveSync, Outlook, Pocket Outlook, Windows, Windows NT, and the Windows logo are either registered trademarks or trademarks of Microsoft Corporation in - Toshiba E310 | User Manual - Page 3
read "Safety precautions" before using the Toshiba Pocket PC and ensure that you are aware of graphical symbols) before reading the text, and always follow the instructions provided. Supplementary Information: "The product complies with the requirements , livestock, pets, etc. User's Manual iii - Toshiba E310 | User Manual - Page 4
devices, software, or devices other than those provided by Toshiba Corporation with the product. Handling the unit (including the built-in batteries) WARNINGS ■ Turn the power off in areas where usage is prohibited, such as onboard aircraft or in a hospital and do not use the pocket PC. Usage - Toshiba E310 | User Manual - Page 5
turn the battery switch to the off position immediately and disconnect the AC adaptor from the power outlet. Continued use of the pocket PC under any of these conditions can cause fire. Please contact the dealer from whom the pocket PC was purchased and request inspection or repair service. ■ Do not - Toshiba E310 | User Manual - Page 6
reach of infants can cause injury. Handling AC adaptor, power cord, cradle WARNINGS ■ Use only the AC adaptor supplied with the pocket PC. Using an AC adaptor other than that supplied can cause smoke or ignition. ■ Insert the power plug to a household electric outlet. When travelling abroad, never - Toshiba E310 | User Manual - Page 7
pocket PC was purchased and request repair service. CAUTIONS ■ When unplugging the power plug from the outlet, disconnect the power cord by grasping the power plug itself. Pulling out the power to 35°C ■ Do not use or store the Pocket PC in the following locations. ■ Locations subject to extremely - Toshiba E310 | User Manual - Page 8
Pocket PC only after allowing it to dry completely. ■ When charging the battery, the case of the AC adaptor can become warm, but this is not abnormal. ■ Disconnect the power built-in battery due to an extended period of non-use ■ Failure or repair servicing of the Pocket PC ■ Toshiba Corporation is - Toshiba E310 | User Manual - Page 9
memory card", please be sure to read the relevant instruction manual battery is used as the built-in battery. Please request the dealer from whom the Pocket PC was purchased to replace the built-in battery when this becomes necessary. Lithium ion batteries responsibility of Toshiba Corporation. The - Toshiba E310 | User Manual - Page 10
Toshiba are connected or implemented. In this case, the persons who have connected / implemented those options / cables have to make sure that the system (PC plus options / cables) still fulfils the required standards. To avoid general EMC problems accordance with the instructions, may cause Manual x - Toshiba E310 | User Manual - Page 11
that Canadian Department of Communications (DOC) regulations provide, that changes or modifications not expressly approved by TOSHIBA Corporation could void your authority to operate this equipment. This Class B digital apparatus meets all requirements of the Canadian Interference-Causing Equipment - Toshiba E310 | User Manual - Page 12
±15.19(a)(3), 15.21, 15.27 and 15.105(b): Instruction Manual Federal Communication Commission Interference Statement This equipment has been tested and void the user's authority to operate this equipment. This device complies with Part 15 of the FCC Rules. Operation is subject to the following two - Toshiba E310 | User Manual - Page 13
TOSHIBA Pocket PC e310 Table of Contents Table of Contents Chapter 1 Getting Started 1-1 Welcome 1-1 Where to Find Information 1-2 Chapter 2 Basic Skills 2-1 Parts Names and Function 2-1 Battery Charging 2-5 Initial Setup 2-7 Method of Setting Card into SD Card Slot 2-8 Connecting to a - Toshiba E310 | User Manual - Page 14
Pocket Word 5-1 Pocket Excel 5-6 MSN Messenger 5-7 Windows Media Player 5-11 Microsoft Reader 5-12 Chapter 6 Pocket Internet Operation 8-12 Data Backup Help 8-13 Chapter 9 Additional Information 9-1 Troubleshooting 9-1 Resetting 9-3 Initializing 9-3 Specifications 9-4 User's Manual - Toshiba E310 | User Manual - Page 15
e310 Getting Started Chapter 1 Getting Started Welcome Congratulations on purchasing your Toshiba Pocket PC. Due to the size and capabilities of this device, you can keep your most important business and personal information up-to-date and close at hand. Microsoft® ActiveSync® increases the power - Toshiba E310 | User Manual - Page 16
Help. Last-minute updates and detailed technical information The Read Me files, located in the Microsoft ActiveSync folder on the Toshiba Pocket PC computer and on the Toshiba Pocket PC Companion CD. Up-to-date information http://www.pda.toshiba.com on your Toshiba Pocket PC User's Manual 1-2 - Toshiba E310 | User Manual - Page 17
learn to use your Toshiba Pocket PC. This chapter describes the use and customization of your Toshiba Pocket PC. Parts Names and Function Main unit (front view) SD Card slot Power Button/Front Light Stereo Headphone Jack Recording Button (Program Button 5) Battery/Alarm Lamp LED Touch Screen - Toshiba E310 | User Manual - Page 18
4 = Contacts Program button 5 = Voice recorder Main unit (back view) Stylus Holder Stylus IR Lens Microphone Recording Button SD Card slot Scroller DC-IN Socket User's Manual 2-2 - Toshiba E310 | User Manual - Page 19
on. The front light alternately turns on/off. Press it quickly. The power turns on. The power turns off. Battery Switch The battery switch supplies/cuts off the battery power to the Toshiba Pocket PC. Battery Switch Supply ←→ Stop The setting of this switch at shipment is "stop". When using - Toshiba E310 | User Manual - Page 20
tap the action you want to perform. When you operate the touch screen of the Toshiba Pocket PC, use the supplied stylus. If the tip of the stylus is damaged, do not use it. If you operate the touch screen with a damaged stylus or a or the left side of the screen, it may not move. User's Manual 2-4 - Toshiba E310 | User Manual - Page 21
Basic Skills Battery Charging A built-in battery is installed in the Toshiba Pocket PC. When using the Toshiba Pocket PC for the first time, set the battery switch to the supply side, and then charge the built-in battery with the supplied AC adapter. How to Charge the Battery You can use two - Toshiba E310 | User Manual - Page 22
Basic Skills How to Prolong Battery Life ■ Use the Toshiba Pocket PC with the AC adapter. When you use the Toshiba Pocket PC under the following conditions, the power consumption will be higher than normal. Please use the AC adapter when: ■ The Toshiba Pocket PC is operated while connected to your - Toshiba E310 | User Manual - Page 23
for the first time, carry out the initial setup according to the procedures below after the built-in battery has been charged. 1 Move the battery switch to the "supply" position. The Toshiba Pocket PC powers on automatically and the Welcome screen appears. Tap the screen to start the following setup - Toshiba E310 | User Manual - Page 24
setup is completed. ■ After tapping the screen, you can use the Toshiba Pocket PC. When you tap the Complete screen, the Today screen appears. For more Turn off the power. Insert the card with its contact surface (metal contact surface) facing the back of the Toshiba Pocket PC. User's Manual 2-8 - Toshiba E310 | User Manual - Page 25
Toshiba Pocket PC to a computer, check the following. ■ ActiveSync has been installed on your computer. (See Chapter 3.) ■ Make sure that the Pocket PC and your computer are both turned off. ■ The position of connecting port on the computer may differ according to the computer type. User's Manual - Toshiba E310 | User Manual - Page 26
Basic Skills To Connect Using The Supplied Cradle: 1 Connect the Client cradle to your computer as shown in the illustration below. 2 Insert the Pocket PC into the cradle. User's Manual 2-10 - Toshiba E310 | User Manual - Page 27
using an optional USB Client cable. When the Pocket PC is connected to another device via a USB Client cable do not plug the AC adapter directly into the Pocket PC as this may lead to interference. Instead, plug the AC adapter into the port on the USB Client cable connector. User's Manual 2-11 - Toshiba E310 | User Manual - Page 28
. Tap to change the volume level or to turn the volume on/off. Tap to change date and time. Tap to open the ower information window. Your day at a glance. Tap to create a new item. Tap to view connection status. User - Toshiba E310 | User Manual - Page 29
Turns all sounds on and off Backup battery is low Main batteries are charging Main batteries are low Main batteries are very low Main batteries are full Connection is active Synchronization is icon, , will display. Tap the icon to view all notification icons. User's Manual 2-13 - Toshiba E310 | User Manual - Page 30
on your device. Look on the Toshiba Pocket PC Companion CD for additional programs that you can install Pocket PC and desktop computer. Keep track of your appointments and create meeting requests. Keep track of your friends and colleagues. Inbox Send and receive e-mail messages. Pocket Internet - Toshiba E310 | User Manual - Page 31
stylus on the button. Drag the stylus off the button so that the command is not carried out. Tap to change volume or mute the Pocket PC. Tap to quickly select a program you have recently used. Tap to select a program. Tap to see additional programs. Tap to customize the - Toshiba E310 | User Manual - Page 32
sounds for your device, tap and then Settings. In the Personal tab, tap Sounds & Notifications. The options you choose here apply throughout the device. User's Manual 2-16 - Toshiba E310 | User Manual - Page 33
Basic Skills Enter Information on Your Toshiba Pocket PC You have several options for entering new information: ■ Use the input panel to enter typed text, either by using the Panel button to see your choices. Select an input method. Tap to see your choices. Input panel button. User's Manual 2-17 - Toshiba E310 | User Manual - Page 34
and then Letter Recognizer. 2 Write a letter in the box. When you write a letter, it is converted to typed text that appears on the screen. For specific instructions on using Letter Recognizer, with Letter Recognizer open, tap the question mark next to the writing area. User - Toshiba E310 | User Manual - Page 35
the box. When you write a letter, it is converted to typed text that appears on the screen. For specific instructions on using Block Recognizer, with Block Recognizer open, tap the question mark next to the writing area. To -up menu, or by tapping the command on the Edit menu. User's Manual 2-19 - Toshiba E310 | User Manual - Page 36
and hold the selected words and then tap an editing command on the pop-up menu, or tap the command on the Edit menu. User's Manual 2-20 - Toshiba E310 | User Manual - Page 37
left as writing. Select the text you want to convert and Tap Recognize on the pop-up menu. The writing is turned into text. User's Manual 2-21 - Toshiba E310 | User Manual - Page 38
an "8") after you attempt to recognize the word, the writing you add will not be included if you attempt to recognize the writing again. User's Manual 2-22 - Toshiba E310 | User Manual - Page 39
, or by tapping the command on the Edit menu. To resize a drawing, make sure the Pen button is not selected, and drag a selection handle. User's Manual 2-23 - Toshiba E310 | User Manual - Page 40
device's microphone near your mouth or other source of sound. 2 Press and hold the Recording button on your Pocket PC until you hear a beep. 3 While holding down the Recording button, make your recording. 4 To stop begin recording. Tap to show or hide the Recording toolbar. User's Manual 2-24 - Toshiba E310 | User Manual - Page 41
, tap Edit and then tap My Text Messages . Select the message you wish to edit and make desired changes. Tap to select a prewritten message. User's Manual 2-25 - Toshiba E310 | User Manual - Page 42
, and then tap Go to start the search. To quickly find information that is taking up storage space on your Pocket PC, select Larger than 64 KB in Type. You can also use the File Explorer to find files on your device and , and then tapping Cut or Copy and Paste on the pop-up menu. User's Manual 2-26 - Toshiba E310 | User Manual - Page 43
Toshiba Pocket PC You can customize your device by adjusting device settings and installing additional software. Adjusting Settings You can adjust device settings to suit the way you work. To see available options, tap , Settings, then the Personal or System device ■ Power, to maximize battery life ■ - Toshiba E310 | User Manual - Page 44
instructions. 4 Connect your device and desktop computer. 5 Double-click the *.exe file. ■ If the file is an installer, the installation wizard will begin. Follow the directions on the screen. Once the software Windows folder, tap and hold a blank area of the window the Windows folder. the System tab - Toshiba E310 | User Manual - Page 45
-in battery remaining power and the time that elapses until the power turns off after the last operation. 1 Tap and then Settings. On the System tab, tap Power. 2 Perform your Power settings according to your needs. 3 When finished, tap OK to return to the System tab screen. User's Manual 2-29 - Toshiba E310 | User Manual - Page 46
to a storage card and the like and delete them from the Pocket PC. ■ Delete unnecessary files. ■ Quit a program in execution. ■ Delete a program not in use. For more information on detailed operation method or the memory release method other than the above, see the online help. User's Manual 2-30 - Toshiba E310 | User Manual - Page 47
TOSHIBA Pocket PC e310 Microsoft ActiveSync Chapter 3 Microsoft ActiveSync Using Microsoft® ActiveSync®,you can synchronize the information on your desktop computer with the information on your device. Synchronization compares the data on your device with your PC and updates specific information - Toshiba E310 | User Manual - Page 48
your device, tap , and then tap ActiveSync. For information about using ActiveSync on your PC, start ActiveSync on your PC and then see ActiveSync Help. For more information about ActiveSync on your device, switch to . Tap to synchrinize via IR or change synchronization settings. User's Manual 3-2 - Toshiba E310 | User Manual - Page 49
TOSHIBA Pocket PC e310 Microsoft Pocket Outlook Chapter 4 Microsoft Pocket Outlook Microsoft® Pocket Outlook includes Calendar, Contacts, Tasks changes you made on your device and desktop computer or server and updates both computers with the latest information. For information on using ActiveSync, - Toshiba E310 | User Manual - Page 50
Microsoft Pocket Outlook Calendar: Scheduling Appointments and Meetings Use Calendar to schedule appointments, including meetings and other events. You can check your customize the Calendar display, such as changing the first day of the week, by tapping Options on the Tools menu. User's Manual 4-2 - Toshiba E310 | User Manual - Page 51
Microsoft Pocket Outlook To create an appointment 1 If you are in Day or Week view, tap the desired date and time for the appointment. 2 Tap Remind me in an appointment, your device will remind you according to the options set in , Settings, Personal tab, Sounds & Notifications. User's Manual 4-3 - Toshiba E310 | User Manual - Page 52
appointment. Creating Meeting Requests You can use Calendar to set up meetings with users of Outlook or Pocket Outlook. The meeting request will be created automatically and sent either when you synchronize Inbox or when requests, see Calendar Help and Inbox Help on the device. User's Manual 4-4 - Toshiba E310 | User Manual - Page 53
Microsoft Pocket Outlook Contacts: Tracking Friends and Colleagues Contacts maintains a list of your friends and colleagues so that you can easily find the . Tap to create a new contact. To change the way information is displayed in the list, tap Tools and then Options. User's Manual 4-5 - Toshiba E310 | User Manual - Page 54
To create a contact: 1 Tap New. Microsoft Pocket Outlook Tap to return to the contact list (the contact is saved automatically). Scroll to see more fields. Notes is a good of the company name. ■ Tap , Find, enter the contact name, select Contacts for the type, and then tap Go. User's Manual 4-6 - Toshiba E310 | User Manual - Page 55
Microsoft Pocket Outlook Using the Summary Screen When you tap a contact in the contact list, a summary screen is displayed. To change the contact information, tap Edit. View contact details. Tap to change contact information. Tap to view notes. User's Manual 4-7 - Toshiba E310 | User Manual - Page 56
Microsoft Pocket Outlook Tasks: Keeping a To Do List Use Tasks to keep track of what you have to do. Select the category of tasks you want displayed -up menu of actions. Tap to create a new task. To change the way information is displayed in the list, tap Tools and then Options. User's Manual 4-8 - Toshiba E310 | User Manual - Page 57
To create a task: 1 Tap New. Microsoft Pocket Outlook Tap to return to the task list (the task is saved automatically). Tap to choose from predefined subjects. Notes is , tap Entry Bar on the Tools menu. Then, tap Tap here to add a new task and enter your task information. User's Manual 4-9 - Toshiba E310 | User Manual - Page 58
Microsoft Pocket Outlook Using the Summary Screen When you tap a task in the task list, a summary screen is displayed. To change the task, tap Edit. View task details. Tap to show and hide additional summary information. View notes. Tap to change task. User's Manual 4-10 - Toshiba E310 | User Manual - Page 59
Microsoft Pocket Outlook Notes: Capturing Thoughts and Ideas Quickly capture thoughts, reminders, ideas, drawings, and phone numbers with Notes. You can create a written note -up menu of actions. Tap to record. Tap to show or hide the Recording toolbar. Tap to create a new item. User's Manual 4-11 - Toshiba E310 | User Manual - Page 60
Microsoft Pocket Outlook To create a note: 1 Tap New. 2 Create messages by synchronizing e-mail messages with Microsoft Exchange or Microsoft Outlook on your PC. Synchronizing E-mail Messages E-mail messages can be synchronized as part of the computer in order to be transferred. User's Manual 4-12 - Toshiba E310 | User Manual - Page 61
Pocket Outlook Using the Message List Messages you receive are displayed in the message list. By default, the most recently received messages are displayed first in the list. Select the service Tap to return to the message list. User's Manual Tap to delete this message. Tap to reply or to forward - Toshiba E310 | User Manual - Page 62
Microsoft Pocket Outlook When you connect to your e-mail indications of message status. You specify your downloading preferences when you set up the service or select your synchronization options. You can change them at any time: ■ Change Tap to show/hide the recording toolbar. User's Manual 4-14 - Toshiba E310 | User Manual - Page 63
Microsoft Pocket Outlook 3 Compose your message. To enter preset or frequently used and Folders By default, messages are displayed in one of five folders for each service you have created: Inbox, Deleted Items, Drafts, Outbox, and Sent Items. The from anywhere except the device. User's Manual 4-15 - Toshiba E310 | User Manual - Page 64
Microsoft Pocket Outlook ■ If you use IMAP4, the folders you create and the e-mail messages you move are mirrored on the server. Therefore, synchronization of folders occurs whenever you connect to your mail server, create new folders, or rename/ delete folders when connected. User's Manual 4-16 - Toshiba E310 | User Manual - Page 65
TOSHIBA Pocket PC e310 Companion Programs Chapter 5 Companion Programs The companion programs consist of Microsoft® Pocket Word, Microsoft® Pocket Excel, Windows Media™ Player, and Microsoft® Reader. To switch to a companion program on your device, tap Programs on the menu, and then tap the - Toshiba E310 | User Manual - Page 66
Companion Programs Pocket Word contains a up menu of actions. Tap to create a new document. You can enter information in Pocket Word in one of four modes (typing, writing, drawing, and recording), which are displayed select Wrap to Window on the View menu so that you can see the entire document. User - Toshiba E310 | User Manual - Page 67
hold to see a pop-up menu of actions. Tap to change formatting options. Tap to format text. Tap to show or hide the toolbar. User's Manual 5-3 - Toshiba E310 | User Manual - Page 68
your stylus to write directly on the screen. Ruled lines are displayed as a guide, and the zoom magnification is greater than in typing mode to allow you to write words are converted to graphics (metafiles) when a Pocket Word document is converted to a Word document on your desktop computer. User - Toshiba E310 | User Manual - Page 69
In drawing mode, use your stylus to draw on the screen. Gridlines appear as a guide. When you lift your stylus off the screen after the first stroke, you'll see files. For more information on recording, see Chapter 2. For more information on using Pocket Word, tap and then Help. User's Manual 5-5 - Toshiba E310 | User Manual - Page 70
save the first. You can save a workbook you create or edit in a variety of formats, including Pocket Excel (.pxl) and Excel (.xls). Pocket Excel contains a list of the files stored on your device. Tap a file in the list to easy for you to remember but hard for others to guess. User's Manual 5-6 - Toshiba E310 | User Manual - Page 71
Pocket Excel: ■ View in full-screen mode to see as much of your worksheet as possible. Tap View and then Full Screen. To exit full-screen mode, tap Restore. ■ Show and hide window account. You must have a Passport to use MSN Messenger Service. If you have a Hotmail® or MSN account, you Manual 5-7 - Toshiba E310 | User Manual - Page 72
your contacts will show up on your device without being added again. Working with Contacts The MSN Messenger window shows all of your messenger contacts at a glance, divided into Online and Not Online categories. From and hold the contact, then tap Unblock on the pop-up menu. User's Manual 5-8 - Toshiba E310 | User Manual - Page 73
Chatting with Contacts Tap a contact name to open a chat window. Enter your message in the text entry area at the Tap to send message. To switch back to the main window without closing a chat, tap the Contacts button. To revert back to your chat window, tap Chats and select the person whom you were - Toshiba E310 | User Manual - Page 74
Companion Programs To know if the contact you are chatting with is responding, look for the message under the text entry area. View full chat. View status of the chat. For more information on using MSN Messenger, tap and then Help. User's Manual 5-10 - Toshiba E310 | User Manual - Page 75
Windows Media Player on your desktop computer to copy digital audio and video files to your Toshiba Pocket PC. You can play Windows Media and MP3 files on your Toshiba Pocket PC. For more information about using Windows Media Player for Toshiba Pocket PC, tap , and then tap Help. User's Manual - Toshiba E310 | User Manual - Page 76
The Guidebook contains all the information you'll need to use the software. To open the Guidebook, tap Help on the Microsoft Reader command instructions to download the book files. Sample books and a dictionary are also included in MSReader in the Extras folder on the Toshiba Pocket PC Companion CD - Toshiba E310 | User Manual - Page 77
the table of contents, if there is one. Subsequently, whenever you open the book, you'll be automatically taken to the last page read. User's Manual 5-13 - Toshiba E310 | User Manual - Page 78
the title and then tap Return on the pop-up menu. ■ Copy Text: You can copy text from books that support this feature into any program that accepts text. On a book page, select the text you want to copy. Then, display in the left margin. To show or hide the note, tap the icon. User's Manual 5-14 - Toshiba E310 | User Manual - Page 79
. To remove a book from your device, tap and hold the title in the Library list, and then tap Delete on the pop-up menu. User's Manual 5-15 - Toshiba E310 | User Manual - Page 80
TOSHIBA Pocket PC e310 Pocket Internet Explorer Chapter 6 Pocket Internet Explorer Use Microsoft® Pocket Internet subfolder in Internet Explorer on the desktop computer. ■ Connect to an Internet service provider (ISP with Pocket Internet Explorer on your device. Both computers are updated with - Toshiba E310 | User Manual - Page 81
conserve device memory, go only one level deep. 6 Synchronize your device and desktop computer. Mobile favorites that are stored in the Mobile Favorites folder in Internet Explorer are downloaded to your device. If you did not specify an update schedule in step 3, you will need to manually download - Toshiba E310 | User Manual - Page 82
Explorer You can use Pocket Internet Explorer to browse mobile favorites and channels that have been downloaded to your device without connecting to the Internet. You can also connect to the Internet through an ISP or a network connection and browse the Web. User's Manual Back button. Refresh - Toshiba E310 | User Manual - Page 83
Pocket Internet Explorer To view mobile favorites and channels: 1 Tap the Favorites button to display your list of favorites. Tap the favourite you want to view. Tap link while using the device, go to the page you want to add, tap and hold on the page, and tap Add to Favorites. User's Manual 6-4 - Toshiba E310 | User Manual - Page 84
TOSHIBA Pocket PC e310 Getting Connected Chapter 7 Getting Connected You can use your device your desktop computer to synchronize remotely. Once connected, you can synchronize information such as your Pocket Outlook information. If this is the method you want to use, see ActiveSync Help on your - Toshiba E310 | User Manual - Page 85
in Chapter 4. ■ Online Help on the Pocket PC. Tap and then Help. Tap View, All Installed Help, and then Inbox or Connections. ■ ActiveSync Help on the desktop computer. In ActiveSync, click Microsoft ActiveSync Help on the Help menu. ■ For troubleshooting information, see the PocketPC Web site at - Toshiba E310 | User Manual - Page 86
TOSHIBA Pocket PC e310 Optional Functions Chapter 8 Optional Functions Home You can launch and then Home to display the Home screen. You can also launch the Home by pressing the Toshiba Pocket PC Home button. For initial setting, the respective application icons are registered on three tabs: Main, - Toshiba E310 | User Manual - Page 87
tapping and holding any portion other than the application names displayed in the Running tab. In this case, only the Stop All is selectable. User's Manual 8-2 - Toshiba E310 | User Manual - Page 88
Tabs Running Main Icons - Applications - Pocket Internet Explorer Windows Media Player Notes Tasks Inbox Calendar Contacts Pocket Word Pocket Excel Calculator Programs File Explorer Backup Infrared displayed by tapping and holding any portion other than the icon. User's Manual 8-3 - Toshiba E310 | User Manual - Page 89
entered, you cannot add a new icon. You cannot launch the icon added from the storage card, if the same card is not inserted in the Toshiba Pocket PC. User's Manual 8-4 - Toshiba E310 | User Manual - Page 90
to a maximum of 10 characters. 4 Tap OK on the Tab Settings screen to return to the Home screen. You cannot rename the Running tab. User's Manual 8-5 - Toshiba E310 | User Manual - Page 91
currently running applications arestop. ■ "Stop all" can also be selected by tapping and holding on the "Running" tab screen without selecting an application name. User's Manual 8-6 - Toshiba E310 | User Manual - Page 92
-up menu to delete the selected icon from the tab screen. ■ When an icon is deleted, subsequent icons are all moved up one place. User's Manual 8-7 - Toshiba E310 | User Manual - Page 93
" button. The screen for inputting the new tab name appears. 4 Input the new tab name (up to 10 characters) into the "Rename to" box. User's Manual 8-8 - Toshiba E310 | User Manual - Page 94
the "View" menu. 2 Tap the color you want to set from the list of display colors. That color is set for the application names. User's Manual 8-9 - Toshiba E310 | User Manual - Page 95
a Backup You can make a backup of the Toshiba Pocket PC data to a SD Memory Card. If you have backed up your data on a SD Memory card, you can restore that data in your Toshiba Pocket PC. You can also delete backup file data from the SD Memory card. Periodical data backup is recommended. Data of - Toshiba E310 | User Manual - Page 96
Optional Functions Making a Backup 1 Insert an SD Memory Card. 2 Tap Start, Programs, and then DataBackup to display finished message appears. 6 Tap OK to return to the previous screen. If the SD Memory card does not have enough free capacity, the backup process stops. Check the storage capacity before - Toshiba E310 | User Manual - Page 97
Operation To restore is to overwrite the backed up data from the SD Memory card onto the main memory of your Toshiba Pocket PC. If the same file name exists in the main memory of your Toshiba Pocket PC appears. 9 Tap OK. Your Toshiba Pocket PC is reset and restarts automatically. User's Manual 8-12 - Toshiba E310 | User Manual - Page 98
operation, check that there is enough space in the main unit's memory and on the storage card. (1).Loading the storage card ■ Make sure the main unit's power . 5 A message appears once the restore operation is completed. 6 Tap "OK" button. The main unit is reset and restarted. User's Manual 8-13 - Toshiba E310 | User Manual - Page 99
to delete the backup file appears. 5 Tap the "OK" button. The backup data is deleted from the storage card and the previous screen reappears. User's Manual 8-14 - Toshiba E310 | User Manual - Page 100
TOSHIBA Pocket PC e310 Additional Information Chapter 9 Additional Information Troubleshooting Check the following guide for the possible cause of a problem and how to correct it. Symptom Cause Correction The power button is The built-in battery power is Charge the battery. pressed but the - Toshiba E310 | User Manual - Page 101
ActiveSync does not function when your Pocket PC is connected to your computer with a USB cradle or USB cable. "USB SETUP TOOL" was not executed. It should be performed after execution of ActiveSync. Install "USB SETUP TOOL" contained in the Companion CD. The USB driver of your computer may not - Toshiba E310 | User Manual - Page 102
screen does not respond. When your Toshiba Pocket PC is reset, all data that was not stored during operation will be deleted. Stored data will be saved. If the function cannot be restored even if the reset button is pressed, initialize your Toshiba Pocket PC. ■ When the power is on, press the reset - Toshiba E310 | User Manual - Page 103
Specifications External dimensions 78.75mm(W) x 15.25mm(D) x 124.5mm(H) Weight 142g (5oz) Operating conditions Temperature: 0°C to 40°C, Humidity: 30 to 80% RH, when only the Pocket PC is operating Temperature capable of charging: 5°C to 35°C Built-in battery Type Continuous operating - Toshiba E310 | User Manual - Page 104
is not usable. Data encrypted by the SD memory card security function-compatible equipment is not usable. Based on IrDA Ver.1.3 Maximum data transmission speed: 115 kbps ø3.5mm, stereo mini plug compatible AC adaptor Input power supply: 100-240VAC, 50/60Hz, 33VA Rated output: DC 5V, 2A Although
-
 1
1 -
 2
2 -
 3
3 -
 4
4 -
 5
5 -
 6
6 -
 7
7 -
8
-
9
-
10
-
11
-
12
-
13
-
14
-
15
-
16
-
17
-
18
-
19
-
20
-
21
-
22
-
23
-
24
-
25
-
26
-
27
-
28
-
29
-
30
-
31
-
32
-
33
-
34
-
35
-
36
-
37
-
38
-
39
-
40
-
41
-
42
-
43
-
44
-
45
-
46
-
47
-
48
-
49
-
50
-
51
-
52
-
53
-
54
-
55
-
56
-
57
-
58
-
59
-
60
-
61
-
62
-
63
-
64
-
65
-
66
-
67
-
68
-
69
-
70
-
71
-
72
-
73
-
74
-
75
-
76
-
77
-
78
-
79
-
80
-
81
-
82
-
83
-
84
-
85
-
86
-
87
-
88
-
89
-
90
-
91
-
92
-
93
-
94
-
95
-
96
-
97
-
98
-
99
-
100
-
101
-
102
-
103
-
104
 |
 |

Introduction
Pocket PC e310
User's Manual
TOSHIBA Pocket PC e310