Toshiba HD-A2 Owner's Manual - English - Page 23
Step3 - 1080p
 |
UPC - 022265000151
View all Toshiba HD-A2 manuals
Add to My Manuals
Save this manual to your list of manuals |
Page 23 highlights
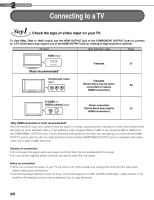
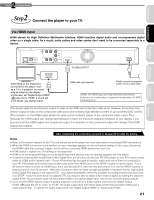
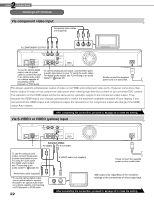
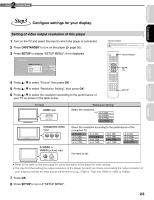
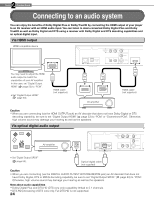
2 Chapter Connections Introduction Connections Playback (Basic) Playback (Advanced) Internet connection Step3 Configure settings for your display. Setting of video output resolution of this player 1 Turn on the TV and select the input to which the player is connected. 2 Press ON/STANDBY to turn on the player ( page 30). 3 Press SETUP to display "SETUP MENU", if not displayed. SETUP MENU Picture Audio Language Ethernet General TV Shape Enhanced Black Level Picture Mode Resolution Setting ON/STANDBY ON/STANDBY / OK 4 Press / to select "Picture" then press OK. 5 Press / to select "Resolution Setting", then press OK. 6 Press / to select the resolution according to the performance of your TV as shown in the table below. SETUP TV input HDMI input HDMI INPUT Component video input S-VIDEO or VIDEO (yellow) input "Resolution Setting" Select the resolution. e.g. up to 480i up to 480p up to 720p up to 1080i Select the resolution according to the performance of the connected TV. up to 480i up to 480p up to 720p up to 1080i up to 480i up to 480p up to 720p up to 1080i up to 480i up to 480p up to 720p up to 1080i up to 480i up to 480p up to 720p up to 1080i No need to set. • Refer to the table on the next page for actual resolution of the player for each setting. • You may find that setting the output resolution of the player to match as closely as possible the native resolution of your display provides the best picture performance (e.g., 720p for 720p and 1080i for 1080i or 1080p). 7 Press OK. 8 Press SETUP to turn off "SETUP MENU". 23 Others
-
 1
1 -
2
-
3
-
4
-
5
-
6
-
7
-
8
-
9
-
10
-
11
-
12
-
13
-
14
-
15
-
16
-
17
-
 18
18 -
 19
19 -
 20
20 -
 21
21 -
 22
22 -
 23
23 -
 24
24 -
 25
25 -
 26
26 -
 27
27 -
 28
28 -
29
-
30
-
31
-
32
-
33
-
34
-
35
-
36
-
37
-
38
-
39
-
40
-
41
-
42
-
43
-
44
-
45
-
46
-
47
-
48
-
49
-
50
-
51
-
52
-
53
-
54
-
55
-
56
-
57
-
58
-
59
-
60
-
61
-
62
-
63
-
64
-
65
-
66
-
67
-
68
-
69
-
70
-
71
-
72
 |
 |