Toshiba P1500 Owners Manual - Page 56
To a TV
 |
UPC - 022265980071
View all Toshiba P1500 manuals
Add to My Manuals
Save this manual to your list of manuals |
Page 56 highlights
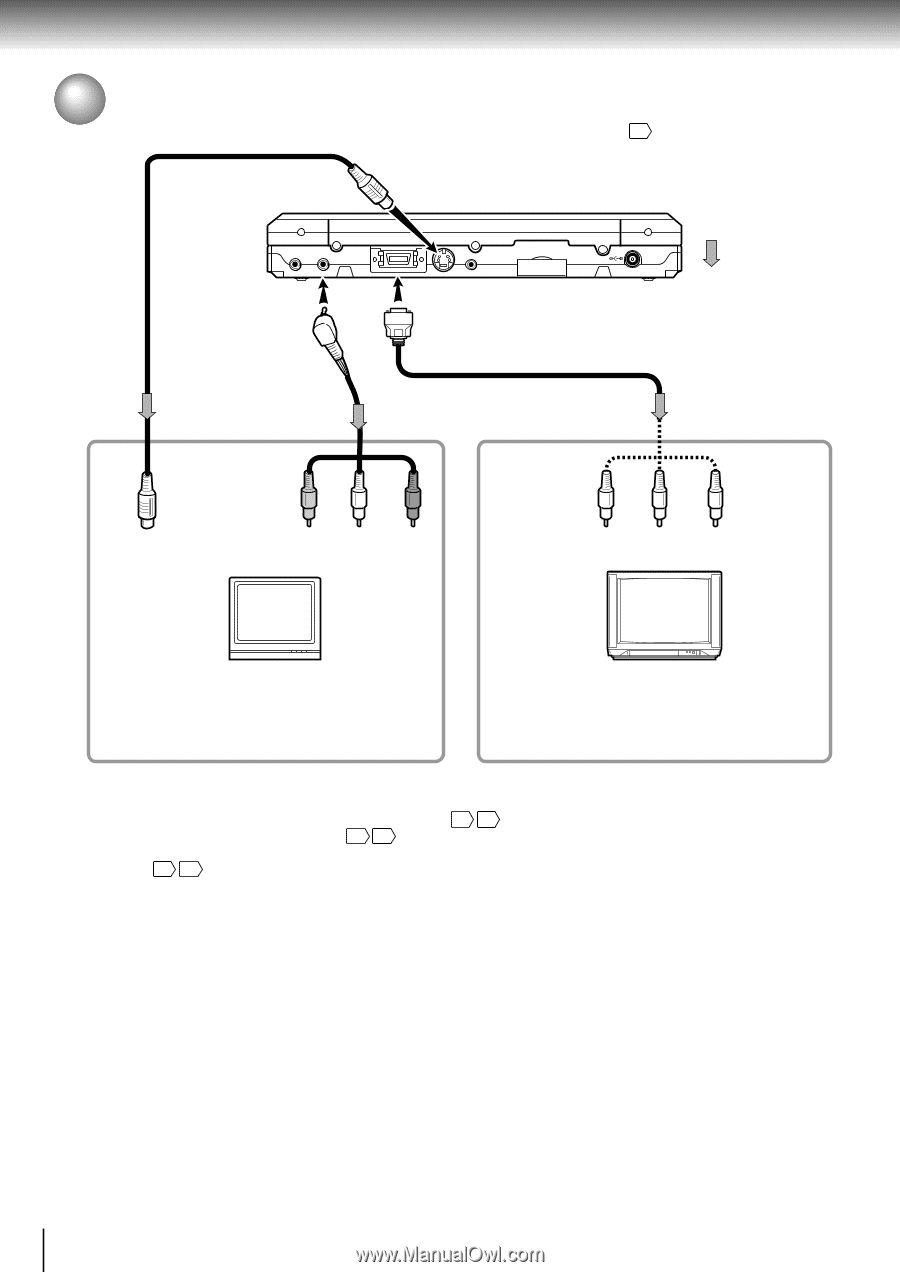
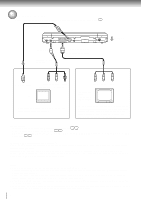
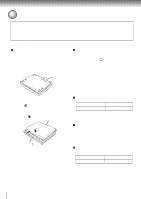
Connections Connecting to a TV Connect the player to a TV to view playback pictures. For details of output sound, see 39 . S video cable (supplied) To S VIDEO AV IN AV OUT COMPONENT VIDEO S VIDEO BITSTREAM/PCM BATTERY DC IN 12V To AV OUT Audio/video cable (supplied) To COMPONENT VIDEO Component video cable (supplied) Signal flow To S video input TV (yellow) (white) (red) To video input To audio input When using an S video cable, do not connect the yellow (composite) video cable. To CR To CB To Y TV equipped with component video inputs • To obtain sound output from the AV OUT connector, as in the left figure, connect the red and white plugs of the supplied audio/video cable to your TV's audio inputs. • Pictures cannot be viewed if you are using the player with the battery pack. Use the AC adapter. On the setting • Set the "TV Shape" according to the aspect ratio of your TV. 44 46 • Set the "Audio Out Select" to "Analog 2ch". 44 47 • When you set the "LCD Picture" to "Fine", close the LCD or press the LCD MODE button on the main unit to turn the LCD monitor off. 23 46 INTERLACED outputs/inputs (ColorStream®) Some TVs or monitors are equipped with component video inputs. Connecting to these inputs allows you to enjoy higher quality picture playback. Actual labels for component video inputs may vary depending on the TV manufacturer. (ex. Y, R-Y, B-Y or Y, CB, CR) In some TVs or monitors, the color levels of the playback picture may be reduced slightly or the tint may change. In such a case, adjust the TV or monitor for optimum performance. Notes • Refer to the owner's manual of the connected TV (or other equipment) as well. • When you connect the player to your TV, be sure to turn off the power and unplug both units from the wall outlet before making any connections. • Connect the player directly to your TV. If you connect the player to a VCR, TV/VCR combination or video selector, the playback picture may be distorted as DVD video discs are copy protected. • If you place the player near a tuner or radio, the radio broadcast sound might be distorted. In this case, place the player away from the tuner and radio. • The output sound of the player has a wide dynamic range. Be sure to adjust the receiver's volume to a moderate listening level. Otherwise, the speakers may be damaged by a sudden high volume sound. 56
-
 1
1 -
2
-
3
-
4
-
5
-
6
-
7
-
8
-
9
-
10
-
11
-
12
-
13
-
14
-
15
-
16
-
17
-
18
-
19
-
20
-
21
-
22
-
23
-
24
-
25
-
26
-
27
-
28
-
29
-
30
-
31
-
32
-
33
-
34
-
35
-
36
-
37
-
38
-
39
-
40
-
41
-
42
-
43
-
44
-
45
-
46
-
47
-
48
-
49
-
50
-
 51
51 -
 52
52 -
 53
53 -
 54
54 -
 55
55 -
 56
56 -
 57
57 -
 58
58 -
 59
59 -
 60
60 -
 61
61 -
62
-
63
-
64
-
65
-
66
-
67
-
68
 |
 |