Toshiba PA3997U-1C1A Camileo Clip Camcorder - Light Blue User Guide - Page 43
Scene, Filter, To avoid blurry photos, place the camcorder on a flat, steady surface
 |
View all Toshiba PA3997U-1C1A Camileo Clip Camcorder - Light Blue manuals
Add to My Manuals
Save this manual to your list of manuals |
Page 43 highlights
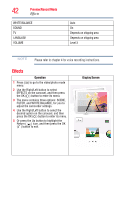
Preview/Record Mode 43 Effects Scene You can select the mode according to the scene condition. ❖ AUTO: Automatic adjustment. ❖ SKIN: Shoot with an effect that makes skin tones more natural. ❖ NIGHT: Use Night mode for night scenes or low light conditions. ❖ BACKLIGHT: You can take shots when the bright light is behind the subject. Operation 1 In the effects menu, select the SCENE icon and then press the OK ( ) button to enter its setting menu. 2 Use the Up/Down button to select the desired setting, and then press the OK ( ) button to validate the setting. 3 Or press the Up button to highlight the Return ( ) icon, and then press the OK ( ) button to exit. Display Screen NOTE To avoid blurry photos, place the camcorder on a flat, steady surface, or use a tripod when taking shots in the NIGHT mode. Filter You can select the special filter effects on the videos or photos. ❖ AUTO: Shoot without any special effect on the image. ❖ BLACK & WHITE: The image is converted to black and white. ❖ CLASSIC: The image is converted to a sepia look. ❖ NEGATIVE: The image is converted as the negative of the normal. Operation 1 In the effects menu, select the FILTER icon and then press the OK ( ) button to enter its setting menu. 2 Use the Up/Down button to select the desired setting, and then press the OK ( ) button to validate the setting. 3 Or press the Up button to highlight the Return ( ) icon, and then press the OK ( ) button to exit. Display Screen
-
 1
1 -
2
-
3
-
4
-
5
-
6
-
7
-
8
-
9
-
10
-
11
-
12
-
13
-
14
-
15
-
16
-
17
-
18
-
19
-
20
-
21
-
22
-
23
-
24
-
25
-
26
-
27
-
28
-
29
-
30
-
31
-
32
-
33
-
34
-
35
-
36
-
37
-
 38
38 -
 39
39 -
 40
40 -
 41
41 -
 42
42 -
 43
43 -
 44
44 -
 45
45 -
 46
46 -
 47
47 -
 48
48 -
49
-
50
-
51
-
52
-
53
-
54
-
55
-
56
-
57
-
58
-
59
-
60
-
61
-
62
-
63
-
64
-
65
-
66
-
67
-
68
-
69
-
70
-
71
-
72
-
73
-
74
-
75
-
76
-
77
-
78
-
79
-
80
-
81
-
82
-
83
-
84
-
85
-
86
-
87
-
88
-
89
-
90
-
91
-
92
-
93
-
94
-
95
-
96
-
97
-
98
-
99
-
100
-
101
-
102
-
103
-
104
-
105
-
106
-
107
-
108
-
109
-
110
-
111
-
112
-
113
-
114
-
115
-
116
-
117
-
118
-
119
-
120
-
121
-
122
-
123
-
124
-
125
-
126
 |
 |
