Toshiba PDR-M25 User Guide
Toshiba PDR-M25 - 2MP Digital Camera Manual
 |
UPC - 032017108370
View all Toshiba PDR-M25 manuals
Add to My Manuals
Save this manual to your list of manuals |
Toshiba PDR-M25 manual content summary:
- Toshiba PDR-M25 | User Guide - Page 1
U.S.A. DIGITAL STILL CAMERA PDR-M25 Tested To Comply With FCC Standards FOR HOME OR OFFICE USE FCC Statement This device complies with Part 15 of reception, which can be determined by turning the equipment off and on, the user is encouraged to try to correct the interference by one or more of the - Toshiba PDR-M25 | User Guide - Page 2
may violate FCC regulations. Violation of FCC regulations may cause the FCC to void your right to use the modified camera. TOSHIBA AMERICA INFORMATION SYSTEMS, INC. Imaging Systems Division 9740 Irvine Boulevard, Irvine, California 92618-1697 Phone Number: (800)288-1354 For customers in Canada - Toshiba PDR-M25 | User Guide - Page 3
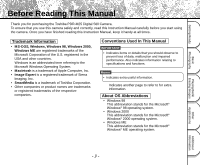
the Toshiba PDR-M25 Digital Still Camera. To ensure that you use this camera safely and correctly, read this Instruction Manual carefully before you start using the camera. Once you have finished reading this Instruction Manual, keep it handy at all times. Trademark Information • MS-DOS, Windows - Toshiba PDR-M25 | User Guide - Page 4
on the PDR-M25. Getting Ready Basic Photography Playing Back/ Erasing Images Preface Basic Photography ■ Attention 1 ■ Before Reading This Manual 3 ■ Contents 4 ■ Safety Precautions 6 ■ Using Your Camera Correctly 12 ■ Features 15 ■ The Function Map 16 Getting Ready ■ Accessories 17 - Toshiba PDR-M25 | User Guide - Page 5
in parentheses ( ) is the function name on the PDR-M25. ISO 59 BULB 59 SELF TIMER 59 DISPLAY 60 USB driver 89 ■ Separately Sold Accessories 91 ■ Connecting to Other Devices 92 Additional Information ■ Specifications 93 ■ Warnings and Messages Displayed on LCD Monitor 97 ■ Troubleshooting - Toshiba PDR-M25 | User Guide - Page 6
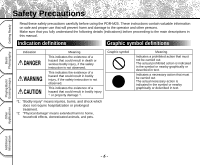
the PDR-M25. These instructions contain valuable information on safe and proper use that will prevent harm and damage to the operator and other persons. Make sure that you fully understand the following details (indications) before proceeding to the main descriptions in this manual. Indication - Toshiba PDR-M25 | User Guide - Page 7
Instruction Manual. • Toshiba Corporation accepts no liability whatsoever for any damages arising from malfunctions arising from combination with equipment or software that is not related to Toshiba Corporation. Should you ever notice smoke, a strange odor or excessive heat coming from the camera - Toshiba PDR-M25 | User Guide - Page 8
and internal inspection, consult the store of purchase, or please contact the technical support number. Do not touch power or TV antenna cords during a thunderstorm. This might cause electric shock. Do not use the camera while you are walking, driving or riding a motorcycle. This might cause you to - Toshiba PDR-M25 | User Guide - Page 9
the AC adapter only with the indicated power supply voltage (120V, 230V AC). Use with any other power supply voltage might cause fire or electric shock. If you want to use the camera on an airplane, consult with the airline and follow their instructions. Use of this camera is sometimes restricted - Toshiba PDR-M25 | User Guide - Page 10
this might damage cords and cables, resulting in fire or electric shock. Do not drop or subject the camera to strong impact. This might cause fire, electric shock or malfunctions. Before you carry out maintenance on the camera, remove the batteries and AC adapter. Leaving these attached might cause - Toshiba PDR-M25 | User Guide - Page 11
with new ones. Doing so might cause them to rupture, ignite or heat up, resulting in fire or major injury or damaging the camera. The new batteries mean "unused batteries recently purchased" for alkaline batteries or lithium batteries, and "batteries recently recharged at the same time" for - Toshiba PDR-M25 | User Guide - Page 12
the camera to sand. The PDR-M25 is particularly sensitive to sand. If the camera comes into contact with sand, not only will the camera become camera or on the lens. When this occurs, switch the camera OFF, and wait an hour before using the camera. Condensation may also form on the SmartMedia™ card - Toshiba PDR-M25 | User Guide - Page 13
, blow off any dust on these parts with a blower brush and lightly wipe with a soft dry cloth. • Clean the body of the camera with a soft dry cloth. Do length of storage since manufacture, temperature, and operating mode of the digital camera, such as play back using LCD and strobe. The use of - Toshiba PDR-M25 | User Guide - Page 14
other terminals. This might cause the camera to malfunction. • Before you disconnect the connector cable, turn the camera OFF and then disconnect the cable holding it by its plug. Do not disconnect the connector cable by pulling the actual cable. • Do not drop the AC adapter or subject it to strong - Toshiba PDR-M25 | User Guide - Page 15
Getting Ready Basic Photography Playing Back/ Erasing Images Features ● 3X zoom lens ● USB interface compatible ● High definition 2.2 million pixels ● Extensivephotographicfunctions • Auto/Flash/Macro/Self-timer • Multi mode (16 continuous images in one frame) • Bulb mode for night and - Toshiba PDR-M25 | User Guide - Page 16
photography modes on the PDR-M25. Zoom Photography (P.45) Digital Zoom Photography (P.46) Size and Quality (P.43) Manually setting the PDR-M25 (P.54) Changing the Preset at once (P.73) Protecting Images (P.75) Changing PDR-M25 camera Settings (P.80) Taking and Playing Back Photographs on - Toshiba PDR-M25 | User Guide - Page 17
USB cable Soft case Getting Ready Basic Photography Playing Back/ Erasing Images Other Applications SmartMedia™ (8MB, 3.3V) (1) • Anti-static case (1) • Index labels (2) • Write-protect stickers (4) CD-ROM • USB driver (for Windows 98) • Software application PDR-M25 •ImageExpert •USB driver - Toshiba PDR-M25 | User Guide - Page 18
Names of Parts - 18 - Additional Information Other Applications Playing Back/ Erasing Images Basic Photography Getting Ready - Toshiba PDR-M25 | User Guide - Page 19
Names of Parts (continued) MENU button In Manual Photography mode, Auto Photography mode or Playback mode, press the (MENU) button to display MENU. Viewfinder Viewfinder lamp ( ➲ P. 39) Power knob LCD monitor ( ➲ P. 33) Tripod mount - 19 - ENTER button Press the center of the button. (Use this - Toshiba PDR-M25 | User Guide - Page 20
Names of Parts (continued) Mode dial - 20 - Additional Information Other Applications Playing Back/ Erasing Images Basic Photography Getting Ready - Toshiba PDR-M25 | User Guide - Page 21
Getting Ready Basic Photography Playing Back/ Erasing Images Names of Parts (continued) Status display This display indicates the camera's status. You can verify the camera's status even if the LCD monitor is not on. The text, numbers and icons that are displayed in the status display vary - Toshiba PDR-M25 | User Guide - Page 22
strap through the loop until the loop slips over the plastic 3 part of the strap 3 . 2 Basic Photography Playing Back/ Erasing Images Other Applications Attach the strap in the same way on the wrist strap attachment on the opposite side of the camera. 1 3 2 - 22 - Additional Information - Toshiba PDR-M25 | User Guide - Page 23
AA batteries. Loading the Batteries IMPORTANT • Before you load or remove the batteries, be sure to turn the camera off. • The camera may not start normally if you load batteries not on the power off status. In this case, turn off, then turn on again. Pull open the battery door in the direction - Toshiba PDR-M25 | User Guide - Page 24
. 1 3 2 Removing the Batteries Reverse the procedure for "Loading the Batteries" and remove the batteries. IMPORTANT • When removing the batteries, take care not to drop the camera or the batteries by mistake. Playing Back/ Erasing Images Other Applications Additional Information - 24 - - Toshiba PDR-M25 | User Guide - Page 25
adapter is connected. [HALF] Half battery power or less [LITTLE] Little battery power left [EMPTY] No battery power left. Replace with new batteries. IMPORTANT • When you remove the batteries, the date and time may return to the default setting. If this happens, set them again when using the camera - Toshiba PDR-M25 | User Guide - Page 26
status. In this case, side the Power Knob to turn off the power, the turn on again. Open the terminal cover 1 , and insert the AC adapter connector plug into the DC IN 5V terminal on the camera 2. 1 2 Insert the AC adapter power plug into the power outlet. Playing Back/ Erasing Images Other - Toshiba PDR-M25 | User Guide - Page 27
camera. 2MB/4MB/8MB (standard accessory)/16MB/32MB/64MB/128MB (all 3.3 V types) You can also connect the PC card adapter (sold separately) or floppy disk adapter ™ specified for use with the PDR-M25. The use of other SmartMedia™ could damage the camera. • SmartMedia™ are precision electronic - Toshiba PDR-M25 | User Guide - Page 28
OFF and then ON again. • The SmartMedia™ may feel warm when it is removed from the camera after the camera is used for a long time. This is normal and not a malfunction. • The SmartMedia™ has a limited service life. If images can no longer be written or erased, buy a new SmartMedia™. • Use the index - Toshiba PDR-M25 | User Guide - Page 29
™ while data is being recorded to the SmartMedia™ (viewfinder lamp flashes). This might damage the SmartMedia™ or corrupt the data on the SmartMedia™. Slide the POWER knob to turn off the power. - 29 - Other Applications Additional Information - Toshiba PDR-M25 | User Guide - Page 30
Getting Ready About SmartMedia™ (continued) Slide the SmartMedia™ door release knob in the direction of the arrow 1 to open the door 2 . 1 2 Pull the SmartMedia™ out with your fingers. Basic Photography Playing Back/ Erasing Images Other Applications Close the SmartMedia™ door. Additional - Toshiba PDR-M25 | User Guide - Page 31
Getting Ready About SmartMedia™ (continued) Write Protection To prevent valuable data from being erased inadvertently, attach the write-protect sticker at the write-protect area. Data can no longer be recorded or erased from SmartMedia™. To write or erase data from SmartMedia™, peel off the sticker - Toshiba PDR-M25 | User Guide - Page 32
dial to the desired mode. Remove the lens cap during photography. In the [ ] or [ ] modes, the lens extends from the camera body. When the camera is turned ON, the Auto Power OFF function starts to work. IMPORTANT • If no operation is carried out for a fixed amount of time (default: about 1 minute - Toshiba PDR-M25 | User Guide - Page 33
Getting Ready Basic Photography Playing Back/ Erasing Images LCD Monitor Display The text, numbers and icons that are displayed on the LCD monitor vary according to the current settings. To erase text currently displayed on the LCD monitor, use the DISPLAY function in the MENU (➲ Page 60 or 78). - Toshiba PDR-M25 | User Guide - Page 34
Getting Ready Basic Photography Playing Back/ Erasing Images LCD Monitor Display (continued) In Manual Photography Mode ( [ ] ) Memo • The display is momentarily disrupted after recording an image or the mode is switched. This does not affect photography. - 34 - Other Applications - Toshiba PDR-M25 | User Guide - Page 35
LCD Monitor Display (continued) In Playback Mode ([ ]) - 35 - Getting Ready Basic Photography Playing Back/ Erasing Images Other Applications Additional Information - Toshiba PDR-M25 | User Guide - Page 36
firmly and prevent your finger or straps from covering the lens or flash. Right Camera held with both hands with your arms firmly held against the sides of your chest Wrong Fingers held over the lens Basic Photography Playing Back/ - Toshiba PDR-M25 | User Guide - Page 37
way down and fully down. When pressed half way down, AF (auto-focus) and AE (auto exposure) are carried out. When pressed fully down, the camera takes a picture. Press the shutter button down half way 1 . AF (auto-focus) and AE (auto exposure) (➲ Additional Information, Glossary (Page 101) start to - Toshiba PDR-M25 | User Guide - Page 38
picture that you composed and press the shutter button down fully. Moving the camera as you press the shutter button will result in a blurred image. • The PDR-M25 uses an accurate auto focus mechanism. However, the PDR-M25 may have difficulty focusing or not be able to focus at all for subjects - Toshiba PDR-M25 | User Guide - Page 39
About the Viewfinder Lamp The viewfinder lamp indicates the state of the camera. The meaning of the lamp may differ according to the mode AF are locked with the shutter button held half down [Power ON] Writing to SmartMedia in progress Do not turn off the power [ ] or [ ] Lens cannot work because of - Toshiba PDR-M25 | User Guide - Page 40
. Using the Viewfinder Get ready to take the photograph. Load the batteries (➲ Page 23) and the SmartMedia™ (➲ Page 28) into the camera. Slide the POWER knob to turn on the power. Set the mode dial to [ ]. Press the (MENU) button. Use the or buttons to select the DISPLAY item and press the button - Toshiba PDR-M25 | User Guide - Page 41
. 2 Press down fully. Using the LCD Monitor Get ready to take the photograph. Load the batteries (➲ Page 23) and the SmartMedia™ (➲ Page 28) into the camera. Slide the POWER knob to turn on the power. - 41 - Additional Information - Toshiba PDR-M25 | User Guide - Page 42
Getting Ready Basic Photography Photography (Auto Photography) (continued) Set the mode dial to [ ]. Look at the image on the LCD monitor to compose the picture. ☞ To adjust the brightness of the LCD monitor ➲ Page 79 Press the shutter button down half way 1 , and press it down fully 2 . • - Toshiba PDR-M25 | User Guide - Page 43
and the remaining amount of space in the SmartMedia™. Slide the POWER knob to turn on the power. Set the mode dial to [ ] or [ ]. Press , the better image quality becomes. Higher quality images, however, take up more memory space, reducing the number of images that can be taken. [FULL - Toshiba PDR-M25 | User Guide - Page 44
, you can change its size (➲ Page 65) and quality ( ➲ Page 67). • The memory size of the image varies according to the subject. • The settings are not canceled even if the camera is turned off or the Auto Power OFF function is activated. • The settings are canceled when you remove or insert the - Toshiba PDR-M25 | User Guide - Page 45
the shutter button down half way, and press it down fully. ➲ Page 37 Memo • The Zoom key setting is automatically canceled by either turning the camera off or by activation of the Auto Power OFF function. Playing Back/ Erasing Images Other Applications Additional Information - 45 - - Toshiba PDR-M25 | User Guide - Page 46
the mode dial to [ ] or [ ]. In the Manual Photography mode, press the ENTER button to set the manual setup screen to non- display. ➲ Page 54 Press the 52) • Digital zoom photography is automatically canceled by either turning the camera off or by activation of the Auto Power OFF function. - Toshiba PDR-M25 | User Guide - Page 47
Manual Photography mode, [ ] is not displayed on the LCD monitor when the manual setup screen is displayed. Press the ENTER button to set the manual . Memo • Macro photography is not canceled even if the camera is turned off or the Auto Power OFF function is activated. • Only the [ ] Suppressed - Toshiba PDR-M25 | User Guide - Page 48
Manual Photography mode, [ ] is not displayed on the LCD monitor when the manual setup screen is displayed. Press the ENTER button to set the manual setup -timer, the setting is not canceled even if the camera is turned off or the Auto Power OFF function is activated. The setting is canceled when - Toshiba PDR-M25 | User Guide - Page 49
Photography mode, the icon for the mode that you selected is not displayed on the LCD monitor when the manual setup screen is displayed. Press the ENTER button to set the manual setup screen to nondisplay. ➲ Page 54 Pressing the flash button displays the available flash modes in order. [ ] Auto - Toshiba PDR-M25 | User Guide - Page 50
a pre-flash just before the picture is taken and then flashes again to take the actual picture. Red-eye is reduced more effectively if the camera is pointed at the line of sight of the subject at as close a distance as possible. [ ] Forced Flash In this mode, the flash always fires - Toshiba PDR-M25 | User Guide - Page 51
• The flash setting is not canceled even if the camera is turned off or the Auto Power OFF function is activated. • The settings are canceled when you remove or insert the batteries or disconnect or connect the AC adapter. • It - Toshiba PDR-M25 | User Guide - Page 52
In the Manual Photography mode, [ ] is not displayed on the LCD monitor when the manual setup screen is displayed. Press the ENTER button to set the manual setup screen • The settings are not canceled even if the camera is turned off or the Auto Power OFF function is activated. • The settings are - Toshiba PDR-M25 | User Guide - Page 53
sure to use a tripod to keep the camera stable and prevent distorted images. Set the Manual Photography mode, [ ] and [ ] are not displayed on the LCD monitor when the manual setup screen is displayed. Press the ENTER button to set the manual if the camera is turned off or the Auto Power OFF function - Toshiba PDR-M25 | User Guide - Page 54
the batteries or disconnect or connect the AC adapter, the manual photography settings will return to their defaults. If this happens, manually set the conditions again. • The settings are not canceled even if the camera is turned off or the Auto Power off function is activated. Set the mode dial - Toshiba PDR-M25 | User Guide - Page 55
. Compose the picture, press the shutter button down half way, and press it down fully. ➲ Page 37 The camera takes the picture. Memo • Photography is also possible with the manual setup screen displayed. W.B. (White Balance) ☞ White Balance ➲ Additional Information, Glossary (Page 101) The - Toshiba PDR-M25 | User Guide - Page 56
Getting Ready Basic Photography Playing Back/ Erasing Images Taking Photographs Manually (Manual Photography) (continued) E.V. (Exposure Compensation) ☞ E.V. (Exposure Compensation the subject to photograph occupies only an extremely small part of the screen. Increasing E.V. lightens the screen, - Toshiba PDR-M25 | User Guide - Page 57
setting the basic settings to be used for photography in the [ ] automatic photography and [ ] manual photography mode. The settings are not canceled even if the camera is turned OFF or the Auto Power OFF function is activated. The settings (except the LCD monitor brightness) are canceled when you - Toshiba PDR-M25 | User Guide - Page 58
REC MENU) (continued) To quit the REC MENU, press the ENTER button. The camera is now ready to take photographs. REC. MODE Select from the following photography modes: mode functions: Photography Mode 1SHOT MULTI BULB Macro O O O Self-timer Digital zoom O O O O O O Flash O X X O: Possible - Toshiba PDR-M25 | User Guide - Page 59
Getting Ready Basic Photography Playing Back/ Erasing Images Changing the Preset Conditions (REC MENU) (continued) PREVIEW This setting allows you to display a photographed image on the LCD monitor for two seconds immediately after you have taken the shot. This allows you check the composition - Toshiba PDR-M25 | User Guide - Page 60
Getting Ready Basic Photography Playing Back/ Erasing Images Changing the Preset Conditions (REC MENU) (continued) DISPLAY Sets the on-screen display status in REC. MODE and PLAY MODE. [OFF] : Both the LCD monitor and the on-screen display are turned off. [ON] : Only the LCD monitor is turned on. - Toshiba PDR-M25 | User Guide - Page 61
Getting Ready Basic Photography Playing Back Photographed Images (Single-Frame Playback) Play back photographed images one image at a time. Set the mode dial to [ ]. The last image frame appears on the LCD monitor. ☞ To adjust the brightness of the LCD monitor ➲ Page 85 Changing the LCD monitor - Toshiba PDR-M25 | User Guide - Page 62
. Entire image Current position of enlargement Memo • Not support Zoom Playback function on TV. • The Zoom Playback function is automatically canceled by either turning the camera off or by activation of the Auto Power OFF function. Playing Back/ Erasing Images Other Applications Additional - Toshiba PDR-M25 | User Guide - Page 63
Nine reduced images are simultaneously displayed on the LCD monitor. This manual calls this display "thumbnail display." This feature is useful, for example canceled by either turning the camera o or by activation of the Auto Power OFF function. - 63 - Other Applications Additional - Toshiba PDR-M25 | User Guide - Page 64
. The slideshow is repeated until the ENTER button is pressed. The LCD monitor displays the image when the ENTER button is pressed. Memo • The Auto Power OFF function does not operate during automatic playback. - 64 - Additional Information - Toshiba PDR-M25 | User Guide - Page 65
with the new size image. This is called "resizing" in this manual. Resizing a previously saved image when the SmartMedia™ has run out of following images cannot be resized: • HALF size images • Images taken with another camera • Protected images (➲ Page 75) • Images cannot also be resized when the - Toshiba PDR-M25 | User Guide - Page 66
Getting Ready Basic Photography Reducing the Image Size (Resize) (continued) Use the or buttons to select [RESIZE] and press the button. The RESIZE menu is displayed. If there are no images that can be resized, a message appears on screen and the screen returns to the PLAY MENU. ➡ Use the or - Toshiba PDR-M25 | User Guide - Page 67
SmartMedia™ so that you can continue taking photographs. The following images cannot be compressed BASIC) image quality images • Images taken with another camera • Protected images (➲ Page 75) • Images cannot also be compressed when the SmartMedia™ is write-protected. Set the mode dial to [ ]. The - Toshiba PDR-M25 | User Guide - Page 68
Getting Ready Basic Photography Compressing Images (Quality) (continued) Use the or buttons to select [QUALITY], and press the button. The QUALITY menu is displayed. If there are no images that can be compressed, a message appears on screen and the screen returns to the PLAY MENU. ➡ The current - Toshiba PDR-M25 | User Guide - Page 69
Getting Ready Selecting the Folder to Play Back Select the folder to play back when the currently loaded SmartMedia™ contains two or more folders. Set the mode dial to [ ]. The last image frame or the thumbnail display appears on the LCD monitor. Press the (MENU) button. The PLAY MENU is displayed. - Toshiba PDR-M25 | User Guide - Page 70
Getting Ready Basic Photography Playing Back/ Erasing Images Selecting the Folder to Play Back (continued) About Folder Names Images photographed on this camera are recorded to a folder. You cannot choose in which folder to store images. The [100] folder is created when you have photographed - Toshiba PDR-M25 | User Guide - Page 71
Getting Ready Erasing Images (Erase Frame) Erases one image at a time. Note, however, that images cannot be erased when they are protected (➲ Page 75) or the SmartMedia™ is writeprotected (➲ Page 31). Set the mode dial to [ ], [ ] or [ ]. When [ ] is selected, the last image frame appears on the - Toshiba PDR-M25 | User Guide - Page 72
Getting Ready Basic Photography Playing Back/ Erasing Images Erasing Images (Erase Frame) To continue erasing images, repeat the above procedure from step 2. Memo • When [ PROTECT ] is displayed on the LCD monitor, cancel the protection (➲ Page 77). • If you take a photograph after erasing an - Toshiba PDR-M25 | User Guide - Page 73
the SmartMedia™ contains protected images). FRAME 100 0004 YES 1 NO ALL FORMAT Memo • The folder is not erased even if you execute ERASE ALL. PDR-M25 does not display the folder not containing any image. • To erase the images in another folder, specify the folder by [FOLDER] and then erase the - Toshiba PDR-M25 | User Guide - Page 74
(➲ Page 75) are also erased. SmartMedia™ cannot be formatted if it is write-protected (➲ Page 31). IMPORTANT • The SmartMedia™ must be formatted on the camera before use. Set the mode dial to [ ], [ ] or [ ]. When [ ] is selected, the last image frame appears on the LCD monitor. Hold down the erase - Toshiba PDR-M25 | User Guide - Page 75
Getting Ready Protecting Images This feature prevents images from being erased. IMPORTANT • Formatting erases all the images on a SmartMedia™, regardless of whether they are protected or not. • To protect the entire SmartMedia™, see "Write Protection" (➲ Page 31). Protecting an Image Set the mode - Toshiba PDR-M25 | User Guide - Page 76
Getting Ready Basic Photography Protecting Images (continued) Use the or buttons to select the desired image to protect, and press the ENTER button. This fixes the image to be protected, and [ ] is displayed under the image. To cancel the selection, press the ENTER button again. To write- - Toshiba PDR-M25 | User Guide - Page 77
Getting Ready Basic Photography Protecting Images (continued) Removing the Protection Carry out steps 1 to 3 in "Protecting An Image". Use the or buttons to select the image to unprotect, and press the ENTER button. This fixes the images whose protection is to be removed, and [ ] under the - Toshiba PDR-M25 | User Guide - Page 78
Getting Ready Basic Photography Changing the Display Setting in Playback Mode This setting allows you to switch the on-screen display. Set the mode dial to [ ] The last image frame appears on the LCD monitor. Press the (MENU) button. The PLAY MENU is displayed. Use the or buttons to select [ - Toshiba PDR-M25 | User Guide - Page 79
Getting Ready Basic Photography Playing Back/ Erasing Images Changing the LCD Setting in Playback Mode This setting allows you to adjust the brightness of the LCD monitor. This adjustment does not adjust the brightness of the image to be recorded. [-5] to [+5] To adjust the brightness of the LCD - Toshiba PDR-M25 | User Guide - Page 80
) This feature allows you to set up the environment for using your camera in addition to image-related settings. This is called "setup". The TIME/AUTO-OFF/TV/IMAGE No./DEFAULT The details set here are held in memory even if the camera is turned OFF. Set the mode dial to [ ]. The SET-UP menu - Toshiba PDR-M25 | User Guide - Page 81
Getting Ready Tab menu Basic Photography Basic Photographic Settings (SET-UP mode) (continued) Press the button. The tab menu is displayed. ☞ How to set the time ➲ Page 81 Use the or buttons to change the setting in the tab menu, and press the ENTER button. To cancel changing of settings, press - Toshiba PDR-M25 | User Guide - Page 82
almost turned off) to prevent battery wear. This is called the Auto Power OFF mode. This setting allows you to set the time until the camera is set to the Auto Power OFF mode. This function is not activated during automatic playback (➲ Page 64) or when transferring images into computers. To return - Toshiba PDR-M25 | User Guide - Page 83
number reaches 999, format the SmartMedia™. • When you use SmartMedia™ that was used for taking photographs on another camera, or swap between two or more SmartMedia™, the data held by this camera is given priority as the image number. The folder number is assigned according to the state of your - Toshiba PDR-M25 | User Guide - Page 84
Getting Ready Basic Photographic Settings (SET-UP mode) (continued) DEFAULT Sets whether or not to return the settings (except TIME, LANGUAGE, TV (video output format) and the LCD monitor brightness) to their defaults. [CANCEL] : Does not return settings to their defaults. [OK] : Returns - Toshiba PDR-M25 | User Guide - Page 85
to lighten (+) the LCD monitor. The LCD monitor can be adjusted within the range [-5] to [+5]. (Default is 0.) LCD Press the ENTER button. This returns the camera to the previous mode. o - 85 - Additional Information - Toshiba PDR-M25 | User Guide - Page 86
the TV. We recommend using the AC adapter on an indoor power outlet when available. IMPORTANT • Before you connect your camera to other equipment, be sure to turn all other connected equipment OFF. If you connect your camera to other equipment with the power still ON, the screen may flicker or the - Toshiba PDR-M25 | User Guide - Page 87
Getting Ready Basic Photography Playing Back/ Erasing Images Taking and Playing Back Photographs on a TV (continued) Take photographs or play them back. Details of operation are the same as taking photographs and playing them back on the LCD monitor. ☞ How to take photographs ➲ Page 40 How to - Toshiba PDR-M25 | User Guide - Page 88
also be transferred to a PC using the PC card adapter (sold separately) or floppy disk adapter (sold separately). (➲ Page 92) To transfer images to a PC, software and USB driver must be installed. For details, refer to the Software Manual and the User's Guides for your PC. Using SmartMedia™ on a PC - Toshiba PDR-M25 | User Guide - Page 89
Installing the USB Driver For Windows 98 Only Install this driver when the USB cable (provided) is used. The USB driver provided on the CD-ROM is exclusively for Windows 98. Installing the USB driver for use in Windows 2000/ME is not necessary. Insert the CD-ROM supplied with this software package - Toshiba PDR-M25 | User Guide - Page 90
Playing Back/ Erasing Images Installing the USB Driver (continued) For MAC OS 9.0 or higher PDR-M25 conforms with USB Mass Storage Class. A mass storage class-compliant USB driver is already in stalled on the MAC OS 9.0 or higher. The USB driver installation is not needed. - 90 - Other - Toshiba PDR-M25 | User Guide - Page 91
camera and accessories ➲ "Connecting to Other Devices" (page 92) For details on these accessories, refer to the Instruction Manual for the accessory you are using. To purchase above accessories within the United States, please visit our website at http://www.toshiba.com/taisisd/dsc ● AC Adapter PDR - Toshiba PDR-M25 | User Guide - Page 92
Basic Photography Playing Back/ Erasing Images SmartMedia™ (provided) PC card adapter Floppy disk adapter PDR-M25 USB cable (provided) Video cable (provided) AC adapter (sold separately) Plug socket - 92 - Printer PC Software application (CD-ROM) (provided) TV monitor Other Applications - Toshiba PDR-M25 | User Guide - Page 93
Getting Ready Basic Photography Specifications Camera Body Model Toshiba Digital Still Camera PDR-M25 Recording medium SmartMedia™ (3.3V) 2/4/8/16/32/64/128MB compatible Compression system JPEG-compliant Image file format Exif Ver.2.1-compliant Number of frames (Approx.) FULL size: - Toshiba PDR-M25 | User Guide - Page 94
.02/F6.9 f=6.2 mm - 18.6 mm (equivalent to 38mm - 114mm on a 35mm camera) Real image type zoom finder TTL system AF, focus adjusting range: approximately 3.15 in. (exposure compensation available in Manual mode) 1/1000 to 1 sec. Auto selected Selectable in manual photography mode (outdoors, standard - Toshiba PDR-M25 | User Guide - Page 95
used as it is. *2 You can not use manganese dry battery in this camera. SmartMedia™ Type Type of memory Operating conditions Dimensions Accessories Image memory card for digital cameras (SmartMediaTM) NAND flash memory Temperature +32°F (0°C) to +104°F (+40°C) Humidity 80% or less (no condensation - Toshiba PDR-M25 | User Guide - Page 96
°C) +14°F (-10°C) ~ 158°F (+70°C) 1-8/9" (48 mm) (W) x 1-1/4" (26 mm) (H) x 2-3/4" (70 mm) (D) Approx. 3.5 oz (100 g) Connector Cable Length Approx. 6.6 ft (2 m) AC adapter (PDR-ACM1E) (sold separately) Power supply AC230V 50Hz Rated Input Capacity 120 mA Rated Output DC5.0V 1.5A Operating - Toshiba PDR-M25 | User Guide - Page 97
CARD ERROR --- PROTECTED CARD --- FRAME ERROR --- UNMATCHED DATA --- FRAME No. FULL --- PROTECT --- FOLDER No. ERROR --- IMAGE No. ERROR --- Meaning Remaining battery power half or less No battery power playback a frame not recorded on this camera. The frame number has reached 999- - Toshiba PDR-M25 | User Guide - Page 98
out quickly. No photograph is taken when the shutter button is pressed. The AC adapter plug has come out of the power outlet. The POWER knob is not turned on. The batteries are exhausted. You are using the camera in extremely cold conditions. The terminals are dirty. The battery has reached its - Toshiba PDR-M25 | User Guide - Page 99
Troubleshooting (continued) Problem I cannot use the flash to take pictures. The flash will not charge. Causes The mode dial has been changed to another setting. The flash is set to Suppressed Flash mode. You pressed the shutter button while the flash was charging. The camera Turn the power OFF and - Toshiba PDR-M25 | User Guide - Page 100
Ready Troubleshooting (continued) Problem Nothing is displayed even through the LCD monitor is set to ON. The set date and time disappears. Causes The camera is in the PC mode. Remedy Change the camera to the photography or playback mode. See Page P.40 P.61 Both the batteries and AC adapter - Toshiba PDR-M25 | User Guide - Page 101
digital still cameras or a digital camera and a printer. This standard defines the hierarchy and file names used when storing image files on memory cards or other recording medium. ● Exif File Format (Exchangeable Image File Format) When the brightness of the light changes, the human eye adapts - Toshiba PDR-M25 | User Guide - Page 102
to the Toshiba Digital Community, like pecial adapter mounts for Tele-photo, Wide-angle, and other filters and lenses desinged specifically for your digital camera. There are frequent discounts and promotions on printing services, carring cases, service plans, and digital camera accessories. To find
-
 1
1 -
 2
2 -
 3
3 -
 4
4 -
 5
5 -
 6
6 -
 7
7 -
8
-
9
-
10
-
11
-
12
-
13
-
14
-
15
-
16
-
17
-
18
-
19
-
20
-
21
-
22
-
23
-
24
-
25
-
26
-
27
-
28
-
29
-
30
-
31
-
32
-
33
-
34
-
35
-
36
-
37
-
38
-
39
-
40
-
41
-
42
-
43
-
44
-
45
-
46
-
47
-
48
-
49
-
50
-
51
-
52
-
53
-
54
-
55
-
56
-
57
-
58
-
59
-
60
-
61
-
62
-
63
-
64
-
65
-
66
-
67
-
68
-
69
-
70
-
71
-
72
-
73
-
74
-
75
-
76
-
77
-
78
-
79
-
80
-
81
-
82
-
83
-
84
-
85
-
86
-
87
-
88
-
89
-
90
-
91
-
92
-
93
-
94
-
95
-
96
-
97
-
98
-
99
-
100
-
101
-
102
 |
 |

- 1 -
Basic
Photography
Playing Back/
Erasing Images
Other
Applications
Additional
Information
Getting Ready
For customers in the U.S.A.
DIGITAL STILL CAMERA
Tested To Comply
With FCC Standards
FOR HOME OR OFFICE USE
PDR-M25
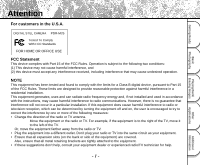
FCC Statement
This device complies with Part 15 of the FCC Rules. Operation is subject to the following two conditions:
(1) This device may not cause harmful interference, and
(2) this device must accept any interference received, including interference that may cause undesired operation.
NOTE
This equipment has been tested and found to comply with the limits for a Class B digital device, pursuant to Part 15
of the FCC Rules. These limits are designed to provide reasonable protection against harmful interference in a
residential installation.
This equipment generates, uses and can radiate radio frequency energy and, if not installed and used in accordance
with the instructions, may cause harmful interference to radio communications. However, there is no guarantee that
interference will not occur in a particular installation. If this equipment does cause harmful interference to radio or
television reception, which can be determined by turning the equipment off and on, the user is encouraged to try to
correct the interference by one or more of the following measures:
•
Change the direction of the radio or TV antenna.
Move the equipment or the radio or TV. For example, if the equipment is to the right of the TV, move it
to the left of the TV.
Or, move the equipment farther away from the radio or TV.
•
Plug the equipment into a different outlet. Don’t plug your radio or TV into the same circuit as your equipment.
•
Ensure that all expansion slots (on the back or side of the equipment) are covered.
Also, ensure that all metal retaining brackets are tightly attached to the equipment.
•
If these suggestions don’t help, consult your equipment dealer or experienced radio/TV technician for help.
Attention