Toshiba RD-X2 Owners Manual - Page 10
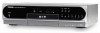
Index to Parts and Controls
 |
View all Toshiba RD-X2 manuals
Add to My Manuals
Save this manual to your list of manuals |
Page 10 highlights
Introduction Index to Parts and Controls See pages with arrows for details. Front panel 1 23 4 5 6 7 8 9 10 11 12 ON/STANDBY HDD TIMESLIP DVD S-VIDEO VIDEO L INPUT 2 R INPUT SELECT REC MODE REC MENU - CHANNEL + QUICK MENU CONTENT MENU ENTER * The above illustration displays the front panel with the cover open. See the following page on how to open or close the cover. 1 ON/STANDBY button pages 18, 19 Turns the power on/restores the unit in the standby mode. 2 ON/STANDBY indicator page 18, 19 Displays the operational state of the recorder. 9 Skip ( )/Fast forward button page 46, 47 Press briefly to skip, or press down for more than 1 second for fast forward. • Skip : Plays the next title, chapter, or track. • Fast forward : Scans the picture forward. 3 Remote sensor GUIDE" page 12 in "INSTALLATION ! Pause ( ) button page 28, 38 Stops playback or recording momentarily. 4 Front panel display page 16 5 Open/Close ( ) button page 18, 19 Opens and closes the disc tray. 6 REC ( ) button/indicator Starts recording. page 69 " Stop ( ) button page 28, 38 Stops playback or recording. # Play ( ) button Starts playback. page 28 7 Three mode button/indicator (HDD, TIMESLIP, DVD) page 28, 30, 67 Selects recording/playback media. 8 Skip ( )/Fast reverse button page 46, 47 Press briefly to skip, or press down for more than 1 second for fast reverse. • Skip : Plays the previous title, chapter, or track. • Fast reverse : Scans the picture backwards. 10 *RD-X2.Ope(US)p010-017 10 9/3/02, 11:23 AM
-
 1
1 -
2
-
3
-
4
-
 5
5 -
 6
6 -
 7
7 -
 8
8 -
 9
9 -
 10
10 -
 11
11 -
 12
12 -
 13
13 -
 14
14 -
 15
15 -
16
-
17
-
18
-
19
-
20
-
21
-
22
-
23
-
24
-
25
-
26
-
27
-
28
-
29
-
30
-
31
-
32
-
33
-
34
-
35
-
36
-
37
-
38
-
39
-
40
-
41
-
42
-
43
-
44
 |
 |
