Toshiba SD-H400-S-TU Installation Guide - Page 227
Confirm, Settings, Change, Connection, Type?, should read: Connect Via: Network.
 |
View all Toshiba SD-H400-S-TU manuals
Add to My Manuals
Save this manual to your list of manuals |
Page 227 highlights
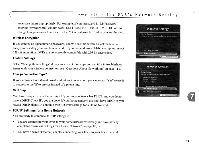
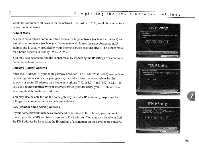
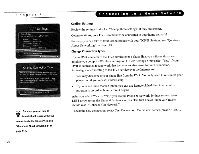
_ _ _ _C_h_a_p_t_e_r_ _7 ~ For steps you can take to ~ troubleshoot issues with your connection to the TIVo service, see "Questions About Networking" on page 118. 94 _ Confirm Settings Review the settings and select "Accept these settings" if they are correct. Congratulations, your DVR should now be connected to your home network! For steps you can take to troubleshoot issues with your TCP/IP Settings, see "Questions About Networking" on page 118. Change Connection Type? If your DVR connects to the TiVo service over a phone line, you will see this screen anytime you complete Wireless Settings or TCP/IP Settings. Only select 'Yes,' if your DVR is connected to a network that includes an always-on Internet connection. Advantages of connecting to the TiVo service over the Internet are: • You may disconnect your phone line from the DVR. You only need to reconnect your phone line if you repeat Guided Setup. • If you have Home Media Option, you can use Remote Scheduling to schedule a program to record an hour before it begins. After you select "Yes" or "No," you see the Phone & Network Settings screen. Press LEFT arrow to see the Phone & Network screen. The first line of Phone & Network should read: "Connect Via: Network." To test the new connection, select Test Connection. On the next screen, press SELECT.
-
 1
1 -
2
-
3
-
4
-
5
-
6
-
7
-
8
-
9
-
10
-
11
-
12
-
13
-
14
-
15
-
16
-
17
-
18
-
19
-
20
-
21
-
22
-
23
-
24
-
25
-
26
-
27
-
28
-
29
-
30
-
31
-
32
-
33
-
34
-
35
-
36
-
37
-
38
-
39
-
40
-
41
-
42
-
43
-
44
-
45
-
46
-
47
-
48
-
49
-
50
-
51
-
52
-
53
-
54
-
55
-
56
-
57
-
58
-
59
-
60
-
61
-
62
-
63
-
64
-
65
-
66
-
67
-
68
-
69
-
70
-
71
-
72
-
73
-
74
-
75
-
76
-
77
-
78
-
79
-
80
-
81
-
82
-
83
-
84
-
85
-
86
-
87
-
88
-
89
-
90
-
91
-
92
-
93
-
94
-
95
-
96
-
97
-
98
-
99
-
100
-
101
-
102
-
103
-
104
-
105
-
106
-
107
-
108
-
109
-
110
-
111
-
112
-
113
-
114
-
115
-
116
-
117
-
118
-
119
-
120
-
121
-
122
-
123
-
124
-
125
-
126
-
127
-
128
-
129
-
130
-
131
-
132
-
133
-
134
-
135
-
136
-
137
-
138
-
139
-
140
-
141
-
142
-
143
-
144
-
145
-
146
-
147
-
148
-
149
-
150
-
151
-
152
-
153
-
154
-
155
-
156
-
157
-
158
-
159
-
160
-
161
-
162
-
163
-
164
-
165
-
166
-
167
-
168
-
169
-
170
-
171
-
172
-
173
-
174
-
175
-
176
-
177
-
178
-
179
-
180
-
181
-
182
-
183
-
184
-
185
-
186
-
187
-
188
-
189
-
190
-
191
-
192
-
193
-
194
-
195
-
196
-
197
-
198
-
199
-
200
-
201
-
202
-
203
-
204
-
205
-
206
-
207
-
208
-
209
-
210
-
211
-
212
-
213
-
214
-
215
-
216
-
217
-
218
-
219
-
220
-
221
-
 222
222 -
 223
223 -
 224
224 -
 225
225 -
 226
226 -
 227
227 -
 228
228 -
 229
229 -
 230
230 -
 231
231 -
 232
232 -
233
-
234
-
235
-
236
-
237
-
238
-
239
-
240
-
241
-
242
-
243
-
244
-
245
-
246
-
247
-
248
-
249
-
250
-
251
-
252
-
253
-
254
-
255
-
256
-
257
-
258
-
259
-
260
-
261
-
262
-
263
-
264
-
265
-
266
-
267
-
268
-
269
-
270
-
271
-
272
-
273
-
274
-
275
-
276
-
277
-
278
-
279
-
280
-
281
-
282
-
283
-
284
-
285
-
286
-
287
-
288
-
289
-
290
-
291
 |
 |
