Toshiba SDV280 Owners Manual - Page 26
Clock setting continued, Manual clock setting
 |
View all Toshiba SDV280 manuals
Add to My Manuals
Save this manual to your list of manuals |
Page 26 highlights
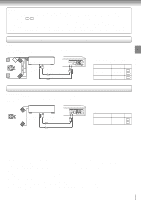
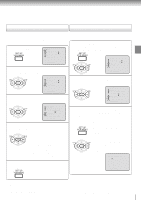
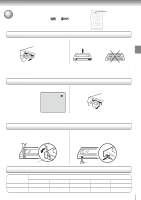
Basic setup Clock setting (continued) If the auto clock process did not set the date and time correctly, you 2-4 must set them manually for timer recording and daylight saving time. 2-4 1 Manual clock setting EXAMPLE: Setting the clock to "8:30 AM" March, 23 (SAT), 2002. 1 Press VCR MENU. 6 After setting the clock, date and time starts functioning automatically. 8 : 30AM SAT 2 Press SET + or - to select "SYSTEM SET UP", press ENTER. MENU TIMER REC SET AUTO REPEAT ON OFF SAP ON OFF CH SET UP SYSTEM SET UP 〈+/-/ENTER/MENU〉 3 Press SET + or - to select "CLOCK SET", then press ENTER. SYSTEM SET UP CLOCK SET LANGUAGE/IDIOMA/LANGUE NO NOISE BACKGROUND ON OFF AUTO CLOCK ON OFF STANDARD TIME DAYLIGHT SAVING TIME 〈+/-/ENTER/MENU〉 4 Press SET + or - to set the month, then press ENTER. MONTH 3 DAY 1 (WED) YEAR 2000 TIME 12 : 00AM 〈+/-/ENTER/CANCEL/MENU〉 5 Set the day, year and time as in step 4. MONTH 3 DAY 23 (SAT) YEAR 2002 TIME 8 : 30AM 〈+/-/ENTER/CANCEL/MENU〉 To make corrections any time during the process Press CANCEL repeatedly until the item you want to change blinks, then press SET + or -. Note: After a power failure or disconnection of the power, the timer settings will be lost. In this case, reset the present time. 26
-
 1
1 -
2
-
3
-
4
-
5
-
6
-
7
-
8
-
9
-
10
-
11
-
12
-
13
-
14
-
15
-
16
-
17
-
18
-
19
-
20
-
 21
21 -
 22
22 -
 23
23 -
 24
24 -
 25
25 -
 26
26 -
 27
27 -
 28
28 -
 29
29 -
 30
30 -
 31
31 -
32
-
33
-
34
-
35
-
36
-
37
-
38
-
39
-
40
-
41
-
42
-
43
-
44
-
45
-
46
-
47
-
48
-
49
-
50
-
51
-
52
-
53
-
54
-
55
-
56
-
57
-
58
-
59
-
60
-
61
-
62
-
63
-
64
-
65
-
66
-
67
-
68
-
69
-
70
-
71
-
72
-
73
-
74
-
75
-
76
 |
 |
