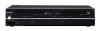
Toshiba SDV398 Owners Manual - Page 14
Clock Setting
 |
View all Toshiba SDV398 manuals
Add to My Manuals
Save this manual to your list of manuals |
Page 14 highlights
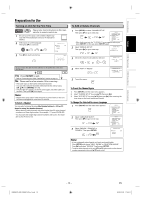
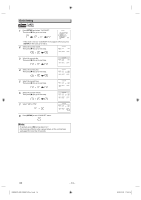
Clock Setting VCR 1 Press [SETUP] and select "CLOCK SET". Then press [B] to go to next step. or - M E N U - TIMER PROGRAMMING AUTO REPEAT [OFF] CHANNEL SET UP B CLOCK SET LANGUAGE SELECT AUDIO OUT TV STEREO [ON] SAP • If the clock is not set, "CLOCK SET" menu appears when you press [SETUP]. In this case, go to step 2. 2 Select the current month. Then press [B] to go to next step. or CLOCK SET MONTH DAY 10 / -- YEAR - - - - HOUR MINUTE AM/PM -- : -- - - 3 Select the current day. Then press [B] to go to next step. or CLOCK SET MONTH DAY 10 / 06 YEAR - - - - HOUR MINUTE AM/PM -- : -- - - 4 Select the current year. Then press [B] to go to next step. or 5 Select the current hour. Then press [B] to go to next step. or 6 Select the current minute. Then press [B] to go to next step. or 7 Select "AM" or "PM". or 8 Press [SETUP] to exit "CLOCK SET" menu. CLOCK SET MONTH DAY YEAR 1 0 / 0 6 TUE 2 0 0 9 HOUR MINUTE AM/PM -- : -- - - CLOCK SET MONTH DAY YEAR 1 0 / 0 6 TUE 2 0 0 9 HOUR MINUTE AM/PM 05 : -- - - CLOCK SET MONTH DAY YEAR 1 0 / 0 6 TUE 2 0 0 9 HOUR MINUTE AM/PM 05 : 40 - - CLOCK SET MONTH DAY YEAR 1 0 / 0 6 TUE 2 0 0 9 HOUR MINUTE 05 : 40 AM/PM P M AM B PM Note: • To go back, press [s] during steps 2 to 7. • Clock setting will be lost after a power failure, or this unit has been unplugged for more than 30 seconds. EN E8EB6CD_SD-V398KC_EN_v1.indd 14 - 14 - 2009/01/29 17:05:14
-
 1
1 -
2
-
3
-
4
-
5
-
6
-
7
-
8
-
 9
9 -
 10
10 -
 11
11 -
 12
12 -
 13
13 -
 14
14 -
 15
15 -
 16
16 -
 17
17 -
 18
18 -
 19
19 -
20
-
21
-
22
-
23
-
24
-
25
-
26
-
27
-
28
-
29
-
30
-
31
-
32
-
33
-
34
-
35
-
36
 |
 |
