Uniden ULC58 Owners Manual - Page 7
Install The Ulc58
 |
View all Uniden ULC58 manuals
Add to My Manuals
Save this manual to your list of manuals |
Page 7 highlights
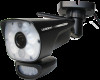
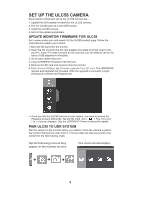
1. Attach the camera's antenna and plug the camera into power. 2. Tap Pairing on the Camera Setup screen. 3. Tap the channel number you want to pair the camera to. 4. A message displays with instructions to press the PAIR button on the camera. A 30-second countdown begins. Press and release the PAIR button on the back of the camera (see page 5). ##You must press the PAIR button on the back of the camera during the 30-second countdown; otherwise, the camera will not be paired. 5. The system displays live video 3 seconds after the camera is successfully paired. INSTALL THE ULC58 When you are positioning the camera, bring the monitor along; it's much easier to find the best viewing angle when you have the display handy. ##The monitor's battery will last about 2 hours on its own. 1. Position the camera where you want it, plug it into power, and check video on the monitor. Move the camera if the view is not what you want. 2. Hold the base of the camera stand where you want to mount it and mark the location of the screw holes. 3. Use the included screws and anchors to attach the base to the wall or ceiling. 4. Tug gently on the stand to make sure it is securely in place. SET ULC58 PARAMETERS The Light Settings on the main screen tab lets you: • Set how long the light will be on once it is activated • Set a timer for the light to be on during a specified time period • Dim the light intensity Duration The Duration option allows you to set the length of time the light stays on after it is triggered. Options are 1, 3, or 10 minutes, or Off. 7
-
 1
1 -
 2
2 -
 3
3 -
 4
4 -
 5
5 -
 6
6 -
 7
7 -
 8
8 -
 9
9 -
 10
10 -
 11
11 -
 12
12
 |
 |
