ViewSonic PJD5153 PJD5153 User Guide English - Page 15
Remote control, Power, Source selection keys, COMP1, D-Sub / Comp. 1, D-Sub, Auto Sync, Keystone keys
 |
View all ViewSonic PJD5153 manuals
Add to My Manuals
Save this manual to your list of manuals |
Page 15 highlights
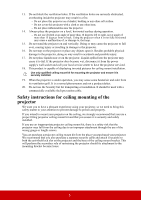
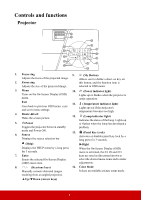
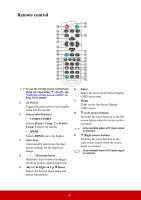
Remote control 15 1 16 2 COMP1 COMP2 HDMI 3 Auto Sync 4 Source 17 5 Enter 6 4 18 7 Menu 3D Exit 19 8 20 PgUp PgDn 9 21 10 Mouse Pattern Blank 22 11 23 24 12 25 13 Eco Mode Color Mode 26 14 27 To use the remote mouse control keys 6. Enter (Page Up, Page Down, , and ), see "Using the remote mouse control" on page 10 for details. Enacts the selected On-Screen Display (OSD) menu item. 1. Power Toggles the projector between standby mode and Power ON. 7. Menu Turns on the On-Screen Display (OSD) menu. 2. Source selection keys • COMP1/COMP2 8. (Left mouse button) Performs the same function as the left mouse button when the mouse mode is Selects D-Sub / Comp. 1 or D-Sub / activated. Comp. 2 source for display. Only available when a PC input signal • HDMI is selected. Selects HDMI source for display. 3. Auto Sync Automatically determines the best picture timings for the displayed image. 4. / (Keystone keys) 9. (Right mouse button) Performs the same function as the right mouse button when the mouse mode is activated. Only available when a PC input signal is selected. Manually corrects distorted images resulting from an angled projection. 5. Left/ Right/ Up/ Down Selects the desired menu items and makes adjustments. 8
-
 1
1 -
2
-
3
-
4
-
5
-
6
-
7
-
8
-
9
-
 10
10 -
 11
11 -
 12
12 -
 13
13 -
 14
14 -
 15
15 -
 16
16 -
 17
17 -
 18
18 -
 19
19 -
 20
20 -
21
-
22
-
23
-
24
-
25
-
26
-
27
-
28
-
29
-
30
-
31
-
32
-
33
-
34
-
35
-
36
-
37
-
38
-
39
-
40
-
41
-
42
-
43
-
44
-
45
-
46
-
47
-
48
-
49
-
50
-
51
-
52
-
53
-
54
-
55
-
56
-
57
-
58
-
59
-
60
-
61
-
62
-
63
-
64
-
65
-
66
-
67
-
68
-
69
-
70
-
71
-
72
-
73
-
74
-
75
-
76
-
77
-
78
-
79
-
80
-
81
-
82
-
83
-
84
-
85
 |
 |
