ViewSonic VG700b User Manual - Page 6
Installation of Wall Mount Optional
 |
View all ViewSonic VG700b manuals
Add to My Manuals
Save this manual to your list of manuals |
Page 6 highlights
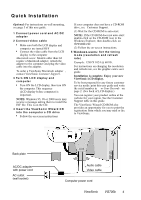
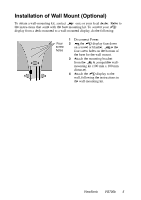
Installation of Wall Mount (Optional) T o o b t a i n a w a l l - m o u n t i n g k i t, c o n t a c t V i e w S o n i c o r y o u r l o c a l d e a l e r. R e f e r t o t h e i n s t r u c t i o n s t h a t c o m e w i t h t h e b a s e m o u n t i n g k i t. T o c o n v e r t y o u r L C D d is p la y fro m a d e s k - m o u n te d to a w a ll- m o u n te d d is p la y, d o th e fo llo w in g : Four screw holes 1 D i s c o n n e c t P o w e r. 2 L a y th e L C D d is p la y fa c e d o w n o n a t o w e l o r b l a n k e t. N o t i c e t h e fo u r s c re w h o le s o n th e b o tto m o f t h e b a s e f o r t h e w a l l m o u n t. 3 A tta c h th e m o u n tin g b ra c k e t fro m th e V E S A c o m p a tib le w a llm o u n tin g k it ( 1 0 0 m m x 1 0 0 m m d is ta n c e ). 4 A tta c h th e L C D d is p la y to th e w a l l, f o l l o w i n g th e i n s tr u c ti o n s i n t h e w a l l - m o u n t i n g k i t. ViewSonic VG700b 5
-
 1
1 -
 2
2 -
 3
3 -
 4
4 -
 5
5 -
 6
6 -
 7
7 -
 8
8 -
 9
9 -
 10
10 -
 11
11 -
 12
12 -
13
-
14
-
15
-
16
-
17
-
18
-
19
-
20
-
21
 |
 |
