Vivitar DVR 426HD v2 Camera Manual - Page 14
Video Capture Mode - digital video recorder with camera red
 |
View all Vivitar DVR 426HD manuals
Add to My Manuals
Save this manual to your list of manuals |
Page 14 highlights
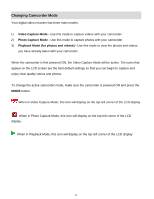
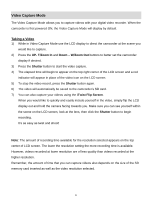
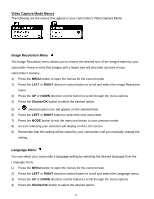
Video Capture Mode The Video Capture Mode allows you to capture videos with your digital video recorder. When the camcorder is first powered ON, the Video Capture Mode will display by default. Taking a Video 1) While in Video Capture Mode use the LCD display to direct the camcorder at the scene you would like to capture. 2) Press the UP- T/Zoom In and Down - W/Zoom Out buttons to better set the camcorder display if desired. 3) Press the Shutter button to start the video capture. 4) The elapsed time will begin to appear on the top right corner of the LCD screen and a red indicator will appear in place of the video icon on the LCD screen. 5) To stop the video record, press the Shutter button again. 6) The video will automatically be saved to the camcorder's SD card. 7) You can also capture your videos using the iTwist Flip Screen. When you would like to quickly and easily include yourself in the video, simply flip the LCD display out and hold the camera facing towards you. Make sure you can see yourself within the scene on the LCD screen, look at the lens, then click the Shutter button to begin recording. It's as easy as twist and shoot! Note: The amount of recording time available for the resolution selected appears on the top center of LCD screen. The lower the resolution setting the more recording time is available. However, videos recorded at lower resolution are of less quality than videos recorded at the higher resolution. Remember, the amount of time that you can capture videos also depends on the size of the SD memory card inserted as well as the video resolution selected. 13
-
 1
1 -
2
-
3
-
4
-
5
-
6
-
7
-
8
-
 9
9 -
 10
10 -
 11
11 -
 12
12 -
 13
13 -
 14
14 -
 15
15 -
 16
16 -
 17
17 -
 18
18 -
 19
19 -
20
-
21
-
22
-
23
-
24
-
25
-
26
-
27
-
28
-
29
-
30
-
31
-
32
-
33
-
34
-
35
-
36
-
37
 |
 |
