Vivitar DVR 980HD DVR 980 Camera Manual
Vivitar DVR 980HD Manual
 |
View all Vivitar DVR 980HD manuals
Add to My Manuals
Save this manual to your list of manuals |
Vivitar DVR 980HD manual content summary:
- Vivitar DVR 980HD | DVR 980 Camera Manual - Page 1
High Definition Digital Video Camera 980HD User's Manual © 2010 Sakar International, Inc. All rights reserved. Windows and the Windows logo are registered trademarks of Microsoft Corporation. All other trademarks are the property of their respective companies. - Vivitar DVR 980HD | DVR 980 Camera Manual - Page 2
to Know Your Camera 3 Section 2 Getting Started 6 Section 3 Enjoying the Record Mode 8 Section 4 Enjoying the Playback Mode 20 Section 5 Setting Your 9 Sakar Warranty Card 36 Section 10 Technical Support 36 Section 11 Specifications and System Requirements 37 Section 12 Troubleshooting 39 - Vivitar DVR 980HD | DVR 980 Camera Manual - Page 3
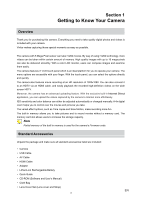
digital photos and videos is included with your camera. Vivitar manually. A 4x digital zoom helps you to control over the movies and pictures you take. The varied effect options, such as Time Lapse and Slow Motion, make recording • Quick Guide • CD-ROM (Software and User's Manual) • Cloth Bag • - Vivitar DVR 980HD | DVR 980 Camera Manual - Page 4
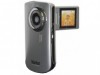
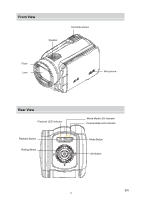
Front View Speaker Tele/Wide Button Flash Lens Microphone Rear View Playback LED Indicator Playback Button Rolling Wheel Movie Mode LED Indicator Picture Mode LED Indicator Mode Button OK Button EN 4 - Vivitar DVR 980HD | DVR 980 Camera Manual - Page 5
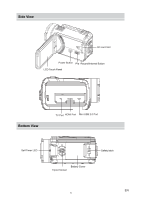
Side View SD card Slot Power Button Pre -Record/Internet Button LCD Touch Panel Bottom View TV Port HDMI Port Mini USB 2.0 Port Self Timer LED Battery Cover Tripod Socket Safety latch EN 5 - Vivitar DVR 980HD | DVR 980 Camera Manual - Page 6
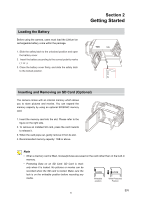
on the built-in memory. • Protecting Data on an SD Card: SD Card is readonly when it is locked. No pictures or movies can be recorded when the SD card is locked. Make sure the lock is on the writeable position before - Vivitar DVR 980HD | DVR 980 Camera Manual - Page 7
down to take pictures. Focusing Frame: White Focusing Frame: Green • To take a picture during movie recording: When recording movies, press Mode Button ( ) to capture the image. The Dual record icon( ) appears on the LCD monitor. • To view stored movies and pictures: Press Playback Button - Vivitar DVR 980HD | DVR 980 Camera Manual - Page 8
: Rotate to move between the wheel menu options. Right Button: LCD Information ON/OFF. In Record menu, press to switch to the submenu. Left Button: Flash Auto/Red-Eye-Reduction/Digital Light/ Flash OFF. In Record menu, press to return to the main menu. Up Button: Move between the option items. Down - Vivitar DVR 980HD | DVR 980 Camera Manual - Page 9
Movie Resolution (1) Picture Resolution (2) (3) (4) (5) FHD (1080p 30) HD (720p 30) WVGA 60 VGA (4:3) Slow Motion (Record movies at 320x240 resolution.) High (16 MP) Standard (5 MP) Low (3 MP) Recording time of the movie that can still be taken at current resolution Number of images that can still - Vivitar DVR 980HD | DVR 980 Camera Manual - Page 10
Macro Position Focusing Manual White Balance (9) Motion Detection Zoom meter: (10) FHD (1080p 30):1X~10X (10X Optical zoom and 1X Digital zoom) Other video resolution:1X~40X (10X Optical zoom and 4X Digital zoom) (11) Option Menu (12) Playback Mode (13) Movie/Picture Record Mode Movie - Vivitar DVR 980HD | DVR 980 Camera Manual - Page 11
30) WVGA 60 VGA (4:3) Note • The image resolution captured during movies recording is the same as the video resolution. • The flash can not be used when capturing image during movies recording. Using the Pre-Record Function • The Pre-record function ensures that you will not miss any critical - Vivitar DVR 980HD | DVR 980 Camera Manual - Page 12
Only) 2. Red Eye Reduction( Only) ): The pre-flash will fire to reduce the red-eye effect. (Picture Recording 3. Digital Light ( ): To extend the dynamic range for backlight and high contrast sense so that the objects will be brighter and clearer. 4. Flash Off ( ): The flash - Vivitar DVR 980HD | DVR 980 Camera Manual - Page 13
Scene Effect • Auto • Skin • Night • Backlight • B/W (Black/White) • Classic • Negative • Self-Timer • Macro Mode • ISO Operations for Record Mode Operation 1. Touch (on-screen icon) in Record Mode. The wheel menu will show on the screen. Screen 2. Scroll the wheel menu on the screen lightly - Vivitar DVR 980HD | DVR 980 Camera Manual - Page 14
(5MP)(Standard): Shoot pictures at 2592x1944, 5MP quality. • Low (3MP): Shoot pictures at 2048 x 1536, 3MP quality. Operation Display Screen 1. In Picture Record Mode, touch icon) to show the wheel menu. (on-screen 2. Scroll and stop on [Resolution]. The submenu of Resolution pops up. 3. Touch - Vivitar DVR 980HD | DVR 980 Camera Manual - Page 15
camera adjusts the color balance of images automatically. Three manual white balance settings are available: • Auto: The image is converted as the negative of the normal Operation Display Screen 1. In Movie/Picture Record Mode, touch (onscreen icon) to show the wheel menu. 2. Scroll and stop on - Vivitar DVR 980HD | DVR 980 Camera Manual - Page 16
Movie Effect Operation 1. In Movie Record Mode, touch icon) to show the wheel menu. (on-screen to adjust the camera's settings. Display Screen Stabilization Record with an effect of reducing camera shake to result in more stable videos. Operation 1. In the Effect submenu, touch [Stabilization - Vivitar DVR 980HD | DVR 980 Camera Manual - Page 17
Touch [OK] to validate the setting. 4. Camera will start to record video automatically if it detects a movement. Stop recording if it does not detect a movement. Display Screen Slow Motion Record videos with slow motion effect. When the video is played, the playback time will be longer than the - Vivitar DVR 980HD | DVR 980 Camera Manual - Page 18
Picture Effect Operation 1. In Picture Record Mode, touch icon) to show the wheel menu. (on-screen 2. Scroll and stop on [Effect]. The submenu of Effect pops up. 3. Touch the desired Effect - Vivitar DVR 980HD | DVR 980 Camera Manual - Page 19
ISO The camera adjusts the ISO sensitivity of its images automatically. Two manual ISO sensitivity settings are available. (800/1600) The larger the number is, the higher the ISO sensitivity is set to. Select a small number to shoot a - Vivitar DVR 980HD | DVR 980 Camera Manual - Page 20
: Zoom out Mode Button: 1. Switch between Movie Preview Screen and Picture Preview Screen. Playback Button: 1. Switch between Record /Playback Mode. 2. Return to the previous screen. Pre-Record/ Internet Button: In Movie Playback Mode, press to select the current movie to upload to Internet. EN 20 - Vivitar DVR 980HD | DVR 980 Camera Manual - Page 21
Picture Resolution (2) 0003/0005 FHD(1080p 30) HD (720p 30) WVGA 60 VGA (4:3) Slow Motion (320x240) High (16 MP) Standard (5MP) Low (3MP) Dual Record (The image resolution captured during movies recording is the same as the video resolution.) Current number/ Total number of picture/movie. EN 21 - Vivitar DVR 980HD | DVR 980 Camera Manual - Page 22
(3) Movie/Picture Preview Screen On (4) Return to the previous screen/ Switch to Record Mode (5) Movie playback time counter (6) Delete (7) Upload selected movies to Internet (8) Volume (9) Previous movie/picture (10) Movies fast rewind Movies Play (11) Movies Pause (12) - Vivitar DVR 980HD | DVR 980 Camera Manual - Page 23
Operations for Playback Mode The Playback Mode is for viewing and managing movies and pictures on the built-in memory or on an SD Card. Operation Display Screen 1. Press Playback Button ( ) or press screen to switch to the Playback mode. on the 2. In the Playback preview screen, press Mode - Vivitar DVR 980HD | DVR 980 Camera Manual - Page 24
Delete Movies 1. Touch Operation to go to the Delete option screen. Display Screen 2. Touch [Yes] to delete the current movie or [No] to cancel the operation and to exit; touch [All] to delete all movies. 3. Before all movies are about to be deleted, a confirmation screen will appear; touch [Yes - Vivitar DVR 980HD | DVR 980 Camera Manual - Page 25
Picture Playback Operation Display Screen 1. When in the Picture Playback mode, sweep to the right or touch to go to the previous picture; sweep to the left or touch to go to the next picture. 2. While the picture is selected, press on the screen as well as go up to enter Magnification Mode - Vivitar DVR 980HD | DVR 980 Camera Manual - Page 26
Delete Picture Operation 1. Touch to go to the Delete option screen. Display Screen 2. Touch [Yes] to delete the current picture or [No] to cancel the operation and to exit; touch [All] to delete all pictures. 3. Before all pictures are deleted, a confirmation screen will appear; touch [Yes] to - Vivitar DVR 980HD | DVR 980 Camera Manual - Page 27
Section 5 Setting Your Camera Setting Menu Operation 1. Touch (on-screen icon) when in Record Mode. The Record menu wheel will show on the screen. 2. Scroll and stop on [Setting]. The submenu of Setting pops up. 3. The Setting submenu contains 6 options for configuring - Vivitar DVR 980HD | DVR 980 Camera Manual - Page 28
TV Ensure that the appropriate TV standard of your area is selected - either NTSC or PAL. Wrong TV system setting may cause image flickers. • NTSC(60Hz): USA, Canada, Japan, South Korea and Taiwan, etc. • PAL(50Hz): UK, Europe, China, Australia, Singapore and Hong Kong, etc. Operation 1. In the - Vivitar DVR 980HD | DVR 980 Camera Manual - Page 29
Time Setting Operation 1. In the Setting submenu, touch [Time Setting] on the screen to go to the Time Setting menu. Display Screen 2. Touch Year, Month, Day, Hour, or Minute to set. 3. Adjust the numeric value by touching / . 4. Touch [OK] to validate the settings. Format Yes: Format the built- - Vivitar DVR 980HD | DVR 980 Camera Manual - Page 30
Default Setting To restore the default factory setting, select this option. Operation 1. In the Setting submenu, touch [Default Setting] on the screen to go to the Default Setting confirmation screen. Display Screen 2. Touch [Yes] to execute the operation and [No] to cancel the operation. The - Vivitar DVR 980HD | DVR 980 Camera Manual - Page 31
-Definition 16:9(Wide) TV 1. Connect the HDMI cable to your camera's HDMI Out port. 2. Connect the other end of the cable to a television. 3. Set the video input source of your TV to " HDMI." (16:9) 4. Use the buttons to view the stored pictures and movies on the TV. Operation On TV 1. Press - Vivitar DVR 980HD | DVR 980 Camera Manual - Page 32
the CD-ROM, connect to the internet and then click the "Install Vivitar Experience Image Manager" button to begin the installation. Note • If you do camera. Click the "How to transfer photos and videos from my camera to my computer" button for instructions. 5. If you have internet access, the " - Vivitar DVR 980HD | DVR 980 Camera Manual - Page 33
"Close" button when the installation is complete. Click the "Launch Vivitar Experience Image Manager" to open the application. 13. On Macintosh: a few seconds until the computer recognizes the device. Getting Photos and Videos from your Camera to your Computer Do not disconnect the cable during - Vivitar DVR 980HD | DVR 980 Camera Manual - Page 34
transfer photos and videos from one social network to another • Organize your images by creating offline and online albums • Edit images using automatic and manual tools • Use automatic "Geotagging" with built in Google Maps For more details on how to use the Vivitar Experience Image Manager - Vivitar DVR 980HD | DVR 980 Camera Manual - Page 35
into the Videos/My Videos folder. 7. Do not disconnect the cable during transfer. Doing so will cancel the transfer of any files on their way to your computer. Transfer media: Using Macintosh To transfer media from your camera to your computer manually using Macintosh: 1. Use the USB cable that - Vivitar DVR 980HD | DVR 980 Camera Manual - Page 36
) for service, your package should include: 1) Copy of original bill of sale 2) A detailed written description of the problem. 3) where purchased Section 10 Technical Support For technical support issues please visit our website at www.vivitar.com. You can find manuals, software and FAQ's at - Vivitar DVR 980HD | DVR 980 Camera Manual - Page 37
Weight 5 Mega pixel CMOS sensor Movie record, Picture record f=5.95~59.5mm F2.0~2.8 Macro mode: Digital zoom) Other video resolution:1X~40X (10X Optical zoom and 4X Digital zoom) Electronic 3" touch LCD Built-in 128MB memory (partial memory is used for firmware code); SD/SDHC card slot support - Vivitar DVR 980HD | DVR 980 Camera Manual - Page 38
(white, red, blue or green) may appear on the LCD screen. These dots are a normal result of the manufacturing process, and do not affect the recording. EN 38 - Vivitar DVR 980HD | DVR 980 Camera Manual - Page 39
Section 12 Troubleshooting Troubleshooting 1. If the LCD preview is not clear while shooting, condition is to format SD card by the camera instead of a PC (Please refer to the detailed Format instruction in Section 5). 4. Why is camera flash not active when taking pictures? In the flash auto mode, - Vivitar DVR 980HD | DVR 980 Camera Manual - Page 40
unintentional data loss. 9. I deleted images using the Vivitar Experience Image Manager. The images were also deleted from my computer. How do I recover images that I accidently deleted? All images deleted using the Vivitar Experience Image Manager are sent to your computer`s Recycle or Trash Bin
-
 1
1 -
 2
2 -
 3
3 -
 4
4 -
 5
5 -
 6
6 -
 7
7 -
8
-
9
-
10
-
11
-
12
-
13
-
14
-
15
-
16
-
17
-
18
-
19
-
20
-
21
-
22
-
23
-
24
-
25
-
26
-
27
-
28
-
29
-
30
-
31
-
32
-
33
-
34
-
35
-
36
-
37
-
38
-
39
-
40
 |
 |
High Definition
Digital Video Camera
980HD
User’s Manual
© 2010 Sakar International, Inc. All rights reserved.
Windows and the Windows logo are registered trademarks of Microsoft Corporation.
All other trademarks are the property of their respective companies.