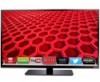
Vizio E500i-B1 Download
Vizio E500i-B1 Manual
 |
View all Vizio E500i-B1 manuals
Add to My Manuals
Save this manual to your list of manuals |
Vizio E500i-B1 manual content summary:
- Vizio E500i-B1 | Download - Page 1
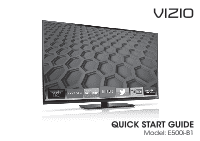
VIZIO QUICK START GUIDE Model: E500i-B1 - Vizio E500i-B1 | Download - Page 2
of power supplied to your home, consult your dealer or local power company. • Do not apply pressure or throw objects at your TV. This may compromise the integrity of the display. The manufacturer's warranty does not cover user abuse or improper installations. • The power cord must be replaced when - Vizio E500i-B1 | Download - Page 3
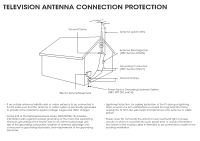
Antenna Lead In Wire Antenna Discharge Unit (NEC Section 810-20) Grounding Conductors (NEC Section 810-21) Ground Clamps Electric Service Equipment Power Service Grounding Electrode System (NEC ART 250, part H) • If an outside antenna/satellite dish or cable system is to be connected to the - Vizio E500i-B1 | Download - Page 4
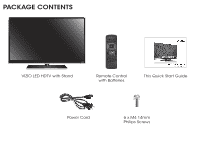
PACKAGE CONTENTS VIZIO LED HDTV with Stand Remote Control with Batteries This Quick Start Guide Power Cord 6 x M4 14mm Philips Screws - Vizio E500i-B1 | Download - Page 5
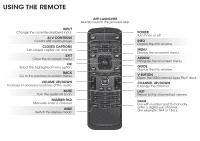
NUMBER PAD Manually enter a channel. WIDE Switch the display mode. APP LAUNCHER Quickly launch the pictured app. POWER Turn TV on or off. INFO Display the info window. MENU Display the on-screen menu. ARROW Navigate the on-screen menu. GUIDE Display the info window. V BUTTON Open the VIZIO Internet - Vizio E500i-B1 | Download - Page 6
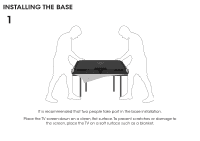
INSTALLING THE BASE 1 It is recommended that two people take part in the base installation. Place the TV screen-down on a clean, flat surface. To prevent scratches or damage to the screen, place the TV on a soft surface such as a blanket. - Vizio E500i-B1 | Download - Page 7
2 3 Align the neck piece with the bottom of the TV as shown. Using a Philips screwdriver, tighten three (3) of the included screws into the center of the neck piece to secure it to the TV. Align the base with the neck piece and tighten the remaining three (3) screws using a Philips screwdriver as - Vizio E500i-B1 | Download - Page 8
Green Blue Red White Red FIRST-TIME SETUP 1 Connect all of your devices first. Choose ONE connection type for each device. Match colored connectors to colored ports. BACK OF TV Yellow White Red - Vizio E500i-B1 | Download - Page 9
HDMI CABLE* BEST • DIGITAL • HD VIDEO (1080p)† • HD AUDIO COMPONENT CABLE* BETTER • ANALOG • HD VIDEO (1080i)† • STEREO AUDIO Match colored connectors to colored ports. COAXIAL † Maximum Resolution Commonly-Connected Devices: Cable or Satellite Boxes Blu-ray™ or DVD Players Game Consoles - Vizio E500i-B1 | Download - Page 10
gently on the V logo and sliding away from the remote. Insert the included batteries. Gently slide the battery cover back into place. Connect the power cord to the back of the TV. The flat edge of the connector goes toward the outside of the TV. Plug the power cord into an electrical outlet. - Vizio E500i-B1 | Download - Page 11
the Connecting to the Internet with Wi-Fi section for more information. Turn the TV on by pressing the Power button on the remote. The Setup App is displayed. Use the Arrow buttons on the remote to highlight Home Use and press OK. Follow the on-screen instructions to complete the first-time setup. - Vizio E500i-B1 | Download - Page 12
) Network Password VIZIO TV SETTINGS Picture Audio Timers Network Tuner CC Closed Captions Devices System Guided Setup User Manual Wide VIZIO Zoom GUINDoErDmSaElTUPPanoramic Tuner Setup Network Setup Exit 2D 3D ABC Input Wide CC Sleep Timer Picture Audio Network Settings Help Wide Exit - Vizio E500i-B1 | Download - Page 13
3 If you are having trouble connecting to your network, check your router placement. see your SSID, you will need to enter it manually by selecting Hidden Network. For more information, see the TV's User Manual. Using the on-screen keyboard, enter your network's password, then highlight Connect and - Vizio E500i-B1 | Download - Page 14
MENU Button VIZIO TV SETTINGS Picture Audio Timers Network Tuner CC Closed Captions Devices System Guided Setup User Manual Wide Zoom Normal Panoramic Exit 2D 3D ABC User Input Wide CC Manual Sleep Timer Picture Audio Network Settings Help Press the MENU button on the Remote Control - Vizio E500i-B1 | Download - Page 15
the First-Time Setup Using the On-Screen Menu Using the USB Media Player Using VIZIO Internet Apps Troubleshooting & Technical Support Specifications Limited Warranty Legal & Compliance LED HDTV WITH VIZIO INTERNET APPS PLUS® Use the Up and Down Arrow buttons to select the chapter you want to - Vizio E500i-B1 | Download - Page 16
of Apps that allow you to watch movies and TV shows, listen to music, get weather and news information, and more-all on demand. A high-speed Internet connection is required to receive product updates and to access online content. Press the OK button to launch an App. Press the Left/Right Arrow - Vizio E500i-B1 | Download - Page 17
displayed in the Dock and Apps on additional pages can be moved to the Dock. Press the V Button twice to launch the fullscreen V.I.A. Plus Apps window. My Apps Tab Shows the Apps installed on your TV. Installed Apps The Apps displayed here are also available in the V.I.A. Plus App Dock. App Store - Vizio E500i-B1 | Download - Page 18
HDTVs, its built-in smart chip provides picture perfect HD video, 3D, and superior audio at up to 10.2 Gbps. This all-in-one cable also supports advanced 7.1 surround sound and audio return channel, eliminating the need for additional cables. Available at www.VIZIO.com This Product Sold Separately - Vizio E500i-B1 | Download - Page 19
SPEAKERS For the pinnacle of surround sound immersion and convenience, the VIZIO 5.1 Sound Bar sets the bar exceptionally high. Designed to fit any medium to large music wirelessly letting you turn any room into the ultimate home theater. Available at www.VIZIO.com This Product Sold Separately - Vizio E500i-B1 | Download - Page 20
ULTIMATE ULTRABOOK™ THIN+LIGHT With uncompromising performance, and premium picture and audio quality in a remarkably thin profile, the VIZIO Thin+Light is the Ultrabook that's impossible to ignore. Ultra-responsive and ultra-portable, the VIZIO Thin+Light boots up instantly and goes wherever you - Vizio E500i-B1 | Download - Page 21
Do You Have Questions? Find Answers At SUPPORT.VIZIO.COM Find help with: • New Product Setup • Connecting Your Devices • Technical Problems • Product Updates • And More Live Chat Support Available Your can also contact our award-winning support team at: Phone: (877) 878-4946 (TOLL-FREE) Email: - Vizio E500i-B1 | Download - Page 22
devices are turned on. • Press the INPUT button on the remote and select the input to which your device is connected (HDMI-1, COMP, etc.). There are black/ gray bars on the top/bottom/sides of the screen. • Note that some television channels add black bars to the picture. • Set the TV image mode - Vizio E500i-B1 | Download - Page 23
or packaging that affords an equal degree of protection.VIZIO Technical Support will provide instructions for packing and shipping the covered Product to the VIZIO service center. Limitations and Exclusions VIZIO's one-year limited warranty only covers defects in materials and workmanship.This - Vizio E500i-B1 | Download - Page 24
© 2014 VIZIO INC. ALL RIGHTS RESERVED. 140128OC-A
-
 1
1 -
 2
2 -
 3
3 -
 4
4 -
 5
5 -
 6
6 -
 7
7 -
8
-
9
-
10
-
11
-
12
-
13
-
14
-
15
-
16
-
17
-
18
-
19
-
20
-
21
-
22
-
23
-
24
 |
 |
VIZIO
QUICK START GUIDE
Model: E500i-B1