Vtech DigiArt Spirals & Sounds User Manual - Page 5
Paper Installation, Animal Stencil Installation
 |
View all Vtech DigiArt Spirals & Sounds manuals
Add to My Manuals
Save this manual to your list of manuals |
Page 5 highlights
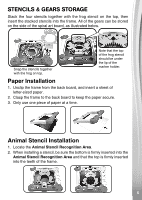
STENCILS & GEARS STORAGE Stack the four stencils together with the frog stencil on the top, then insert the stacked stencils into the frame. All of the gears can be stored on the side of the spiral art board, as illustrated below. Snap the stencils together with the frog on top. Note that the top of the frog stencil should be under the lip of the marker holder. Paper Installation 1. Unclip the frame from the back board, and insert a sheet of letter-sized paper. 2. Clasp the frame to the back board to keep the paper secure. 3. Only use one piece of paper at a time. Animal Stencil Installation 1. Locate the Animal Stencil Recognition Area. 2. When installing a stencil, be sure the bottom is firmly inserted into the Animal Stencil Recognition Area and that the top is firmly inserted into the teeth of the frame. 5 5
-
 1
1 -
 2
2 -
 3
3 -
 4
4 -
 5
5 -
 6
6 -
 7
7 -
 8
8 -
 9
9 -
 10
10 -
 11
11 -
12
-
13
-
14
-
15
-
16
-
17
-
18
 |
 |
