Weber Summit 400 LP Operating Guide - Page 10
Main Burner Flame Pattern, Main Burner Cleaning Procedure, Replacing the Burners
 |
View all Weber Summit 400 LP manuals
Add to My Manuals
Save this manual to your list of manuals |
Page 10 highlights
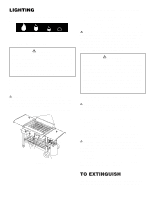
MAINTENANCE Main Burner Flame Pattern The Weber Gas Barbecue burners have been factory set for the correct air and gas mixture. The correct flame pattern is shown in figure 6. Burner inside cooking box Tips occasionally yellowish Light blue Flames Figure 6 Dark blue If the flames do not appear to be uniform the length of the burner tube, follow the burner cleaning procedures. Replacing the Burners 1. Your Weber Gas Barbecue must be OFF and cool. 2. Turn OFF gas at source. 3. Disconnect regulator. 4. To remove control panel refer to "Remove the control panel and the front panel" in the Step-By-Step Guide. 5. Remove splash guards. 6. Remove cooking grates. 7. Remove Flavorizer bars. 8. Remove the manifold by unsnapping the clips at the right and left front of the cooking box. Figure 9. Main Burner Cleaning Procedure Turn off the gas supply. Remove the manifold. Look inside each burner with a flashlight. Figure 7. Figure 7 Clean the inside of the burners with a wire (a straightened out coat hanger will work). Figure 8. Check and clean the air shutter opening at the ends of the burners. Check and clean the valve orifices at the base of the valves. Use a brass bristle brush to clean outside of burners. This is to make sure all the burner ports are fully open. Figure 9 9. Disconnect white and black wire from each igniter. Figure 10. Figure 8 ƽCAUTION: Do not enlarge the burner ports when cleaning. White wire Black wire Figure 10 10
-
 1
1 -
2
-
3
-
4
-
 5
5 -
 6
6 -
 7
7 -
 8
8 -
 9
9 -
 10
10 -
 11
11 -
 12
12 -
 13
13 -
 14
14 -
 15
15 -
16
 |
 |
