Weider 100 Bench English Manual - Page 3
Decal, Location
 |
View all Weider 100 Bench manuals
Add to My Manuals
Save this manual to your list of manuals |
Page 3 highlights
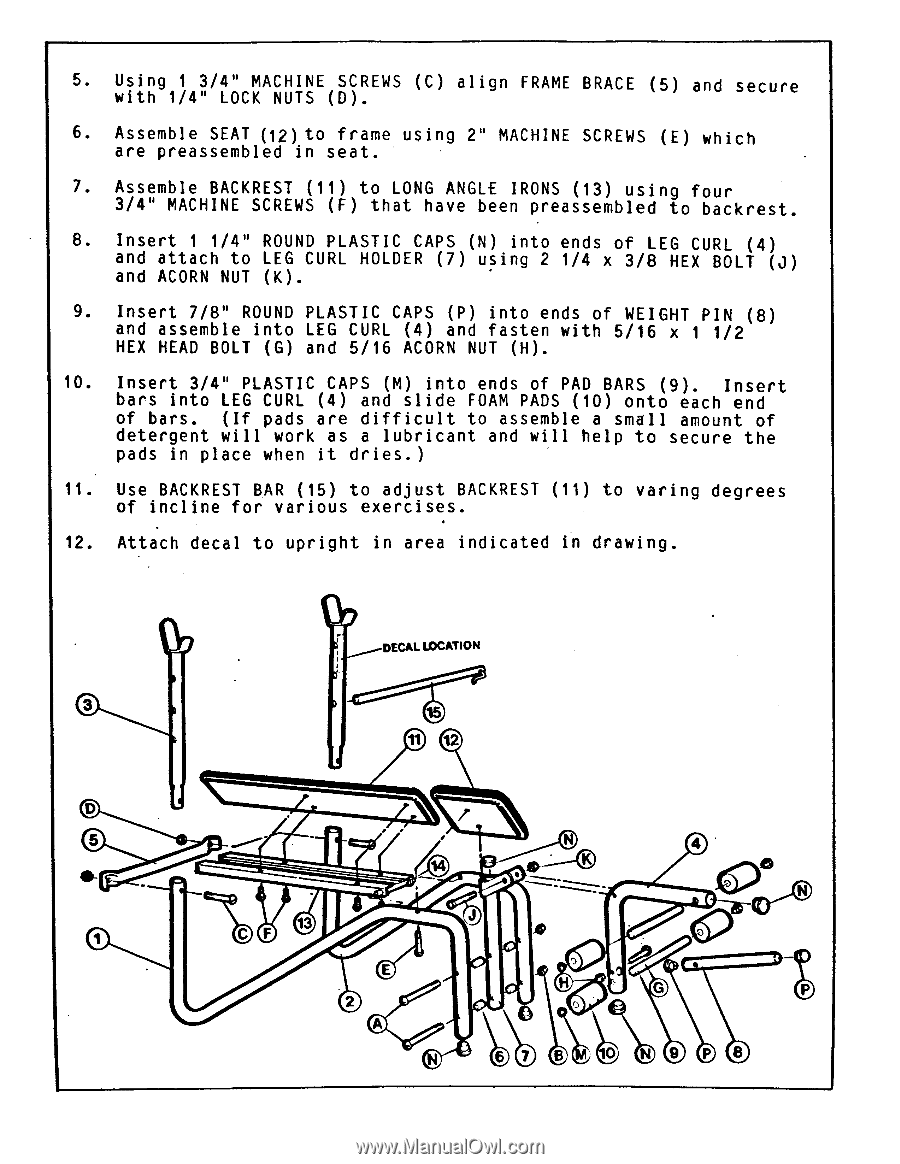
5. Using 1 3/4" MACHINE SCREWS (C) align FRAME BRACE (5) and secure with 1/4" LOCK NUTS (D). 6. Assemble SEAT (12)to frame using 2" MACHINE SCREWS (E) which are preassembled in seat. 7. Assemble BACKREST (11) to LONG ANGLE IRONS (13) using four 3/4" MACHINE SCREWS (F) that have been preassembled to backrest. 8. Insert 1 1/4" ROUND PLASTIC CAPS (N) into ends of LEG CURL (4) and attach to LEG CURL HOLDER (7) using 2 1/4 x 3/8 HEX BOLT (J) and ACORN NUT (K). 9. Insert 7/8" ROUND PLASTIC CAPS (P) into ends of WEIGHT PIN (8) and assemble into LEG CURL (4) and fasten with 5/16 x 1 1/2 HEX HEAD BOLT (G) and 5/16 ACORN NUT (H). 10. Insert 3/4" PLASTIC CAPS (M) into ends of PAD BARS (9). Insert bars into LEG CURL (4) and slide FOAM PADS (10) onto each end of bars. (If pads are difficult to assemble a small amount of detergent will work as a lubricant and will help to secure the pads in place when it dries.) 11. Use BACKREST BAR (15) to adjust BACKREST (11) to varing degrees of incline for various exercises. 12. Attach decal to upright in area indicated in drawing. DECAL LOCATION 3 15 11 12 D 5 4 • 0 (2) 42) 0 13 F H O 2 0 A 9 P8
-
 1
1 -
 2
2 -
 3
3 -
 4
4
 |
 |