Weider 8300 Hard Drive English Manual - Page 12
Weider 8300 Hard Drive Manual
 |
View all Weider 8300 Hard Drive manuals
Add to My Manuals
Save this manual to your list of manuals |
Page 12 highlights
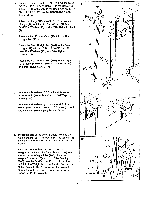
26. Insert a 1/4" x 2 1/2" Screw (54) through the Side Guard "T" Bracket (61) and the Rear Upright (49) as shown. Tighten the 1/4" x 2 1/2" Screw (54) into the upper end of the Butterfly Backrest (41). Attach the lower end of the Butterfly Backrest (41) to the Rear Upright (49) with a 1/4" x 2 1/2" Screw (54) and 1/4" Flat Washer (6). Attach the Side Guard (42) and the VKR Side Guard (46) to theSide Guard 'T' Bracket (61) with two #8-32 Screws (10) and #8-32 Nuts (98). 27. Press a 2" Inner Cap (13) into the Rear Upright (49). Attach a Seat Bracket (39) to the Rear Upright (49) with a 1/4" x 2 1/4" Carriage Bolt (40), 1/4" Flat Washer (6), and 1/4" Nylon Locknut (5). Attach the Butterfly Seat (62) to the Seat Bracket (39) with two 1/4" x 3/4" Screws (7). The narrow end of the Butterfly Seat must be above the 2" Inner Cap (13). Attach the Butterfly Seat to the Rear Upright (49) with a 1/4" x 2 1/2" Screw (54) and 1/4" Flat Washer (6). 28. Apply grease to the axles on the Rear Upright Top (101). Slide the Left Butterfly Arm (27) onto the left axle. Note the bracket on the Butterfly Arm to make sure that the Butterfly Arm is on the correct side. Hold two 1" Retainers (50) and a 1" Plastic Cap (51) against the lower end of the axle. The teeth on the Retainers must bend toward the Plastic Cap. Tap the Retainers and Plastic Cap onto the axle. 4•• Press two 1 3/4' Inner Caps (29) and a 1" x Inner Cap (114) into the Left Butterfly Arm (27). Assemble the Right Butterfly Arm (105) to the right axle on the Rear Upright Top (101) in the same manner. Wet the lower ends of the Butterfly Arms (27, 105) with soapy water. Slide an 8" Foam Pad (28) onto the lower end of each Butterfly Arm. 26 41 98 10 46 42 I 54 61 49 54 27 62 Narrow End 49 140 139 6 13 5 54 28 101 0 Brackets Grease : 29 114 50 50 5 105 114 51 27 28 28 29 29 12
-
 1
1 -
2
-
3
-
4
-
5
-
6
-
 7
7 -
 8
8 -
 9
9 -
 10
10 -
 11
11 -
 12
12 -
 13
13 -
 14
14 -
 15
15 -
 16
16 -
 17
17 -
18
-
19
-
20
-
21
-
22
-
23
-
24
-
25
-
26
-
27
-
28
 |
 |
